
BIOSECURITY ONLINE TRAINING (BOLT) MODULE
The Biosecurity for Beekeepers online training is now free for all Australian beekeepers.
The honey bee biosecurity training module contains information that is present in the biosecurity manual in an online format and questionnaire. Its aim is to maximise the early detection of exotic bee pests (specifically Varroa mites), and minimise the spread of potential pest incursions though improved understanding of the importance of biosecurity, best management practices and basic awareness of key
The truth about bees
All of our ideas about bees are based on one species, the European honeybee. Most of the others are nothing like it
Reality: There are around 20,000 species, only one of which is the common honeybee. They come in many colours. Most bees don’t dance. Only a few species make honey. For most bees, stinging does not mean death. Some never sting.
")
Not yellow-and-black: Halictus poeyi and Agapostemon splendens (Credit: Clay Bolt/NPL)
Everyone loves the honeybee. We humans have been drooling over its honey and prospering from its powers of pollination for millennia.
But our worship of this one species, understandable as it might be, is a sign that something has gone wrong. It’s the perfect example of our ruthlessly human-centric, overtly practical view of the natural world.
There are actually around 20,000 known species of bee. The famous European honeybee Apis mellifera is just one of them.
")
Megachile pluto may be the world’s largest bee (Credit: The Natural History Museum/Alamy)
They come in a wide range of sizes. Members of the teensy Australian genus Euryglossina (Quasihesma) are typically less than 2mm long, while the alarmingly large Megachile/Chalicodoma pluto from Indonesia is almost 4cm.
There are also plenty of bees that don’t conform to the popular perception of yellow and black.
The North American sweat bee Agapostemon splendens, for instance, is green and blue. Among the valley carpenter bees (Xylocopa varipuncta) of North America, the females are black and the males are yellow.
 are common all over Europe (Credit: Andy Sands/NPL)")
Ashy mining bees (Andrena cineraria) are common all over Europe (Credit: Andy Sands/NPL)
The European honeybee is by far and away the most prolific maker of honey. But there are around half a dozen other honeybees in south Asia that are similarly exploited.
Being social, all these honey-making species have evolved ways to communicate important information to the rest of the hive.
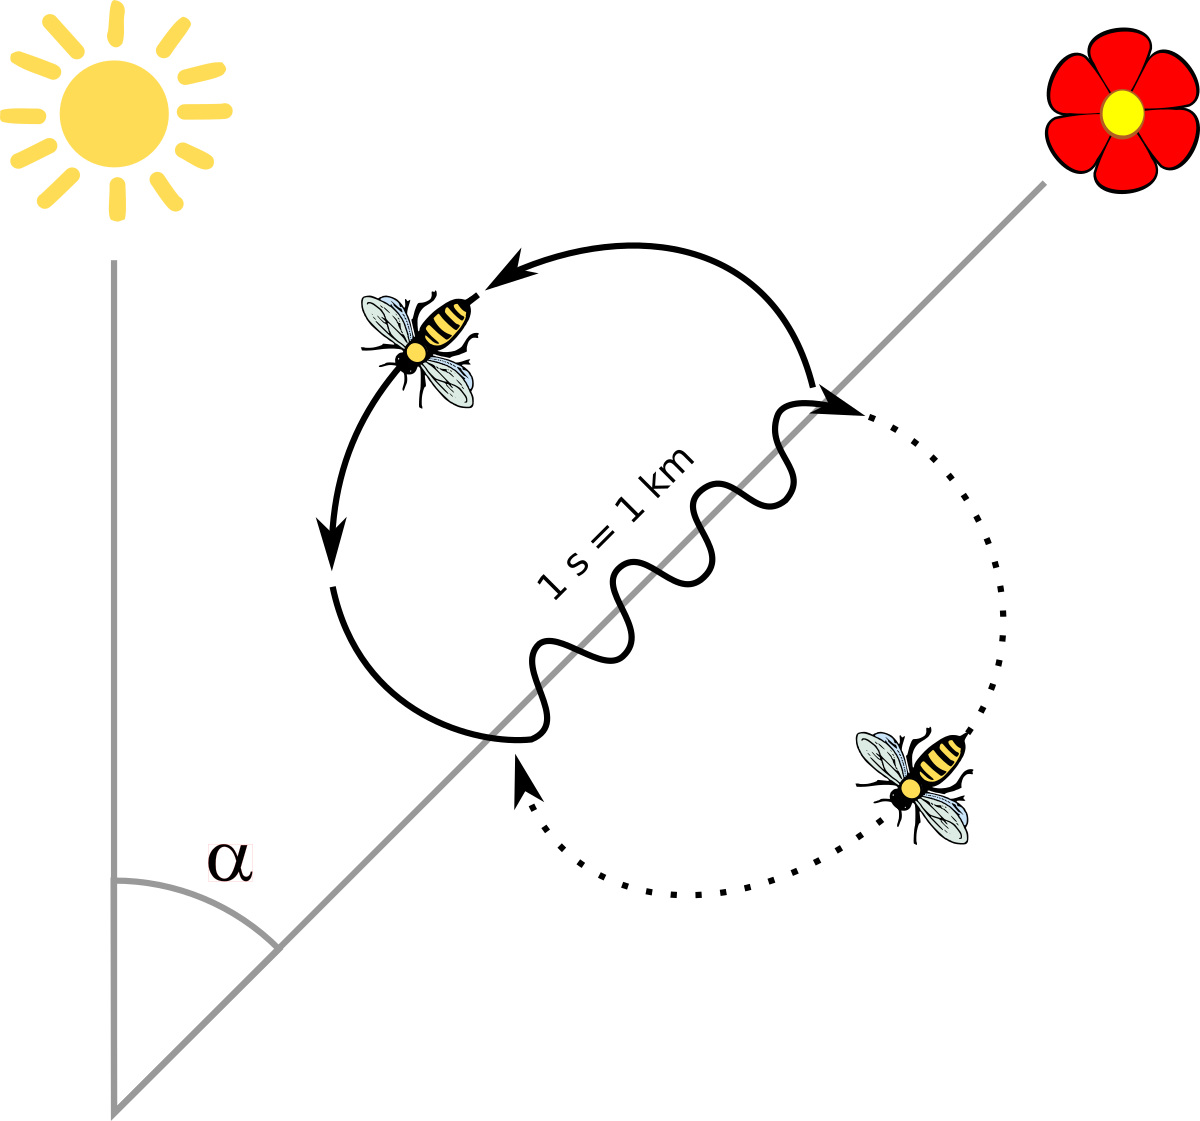
Most famously, foraging honey bees perform a “waggle dance”: a series of deliberate movements across the honeycomb that conveys the direction and distance of a rich source of pollen and nectar.
Different species appear to have their own distinct “dialects” of waggle dance. But bees are so smart that when researchers coaxed Asiatic and European bees to inhabit the same hive, the Asiatic bees were able to translate the dancing language of the Europeans.
Sophisticated as the waggle dance undoubtedly is, bees of all shapes and sizes perform other feats of communication too.
When a bee is foraging, it leaves behind volatile chemicals that act like sticky notes: smelly messages that reveal whether a flower has been recently plundered. Subsequent visitors use these cues to improve their foraging efficiency.
")
This is what it looks like when an Apis mellifera stings you (Credit: John B. Free/NPL)
On the subject of stinging, there are quite a few misconceptions.
For a start, it’s only females that can sting. That’s because the stinger is a modified version of their egg-laying organ, the ovipositor.
“No male bee of any species can sting, even honeybees and bumblebees,” says Richard Comont of the Bumblebee Conservation Trust in the UK.
Then there’s the widespread belief that all bees have barbed stingers that lodge in the target’s skin, eviscerating the bee and killing it. It’s only honeybee workers that do this. Most bee species have barbless stingers, so can attack with impunity.
 like to eat rotting flesh (Credit: Nick Garbutt/NPL)")
Some stingless bees (Trigona sp.) like to eat rotting flesh (Credit: Nick Garbutt/NPL)
That said, most species don’t do much stinging. This is the case for most solitary bees, which make up around half of all known bee species.
Among solitary bees, all females are fertile, unlike social bees with their legions of sterile workers. That means a risky strategy like stinging is only deployed in the most extreme situations. “It’s far better for them to flee and fight another day,” says Comont.
There are also a lot of bees – around 500 species – whose stingers are so reduced that they are collectively referred to as stingless bees. These sound nice, though there are a few species of stingless bees that have given up nectar and pollen in favour of rotting flesh.
These so-called vulture bees aside, most bees are united by their power to pollinate.
")
We have made European honeybees part of our daily lives (Credit: Laurent Geslin/NPL)
The value of this service to agriculture is huge, estimated at US$70 billion every year. This explains why there is such concern over the disappearance of bees in recent decades.
We’ve been systematically stripping flowers out of the countryside
The decline in apiculture had resulted in a decline in honeybees.
“For wild bees, it’s a bit of a mixed and incomplete picture,” says Comont. “But the UK lost 18 species of solitary bee and two species of bumblebee in the 20th century.”
The relationship between bees and flowers goes way back: the flourishing of flowering plants that occurred over 100 million years ago is almost certainly bound up with the buzzing of bees.
The intensification of agriculture has disrupted that relationship. “We’ve been systematically stripping flowers out of the countryside,” says Comont. “The best way to reverse these declines is to put flowers back.”
Bee Anatomy
Honey bees are insects and have five characteristics that are common to most insects.
- They have a hard outer shell called an exoskeleton.
- They have three main body parts: head, thorax, abdomen.
- They have a pair of antennae that are attached to their head.
- They have three pairs of legs used for walking.
- They have two pairs of wings.
You can use the illustrations below to explore the anatomy of the honey bee both what you can see from the outside and also the parts of the honey bee located inside.
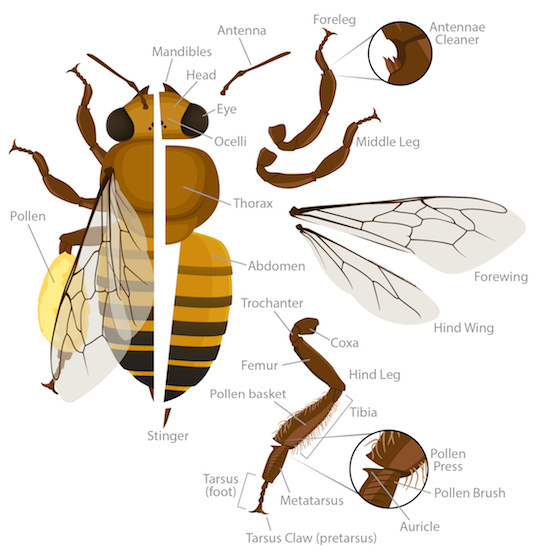
Labeled illustration of the exterior anatomy of a honey bee.
Looking at the Outside of a Honey Bee
| Head | Location of the eyes, brain, where the antennae attach. | ||
| Mandibles | Strong outer mouthparts that help protect the proboscis. | ||
| Proboscis | (Not shown) Tube-like mouth part used to suck up fluids. | ||
| Ocelli | One of two types of insect eyes used to detect motion. | ||
| Eye (Compound) | The second type of eyes made of many light detectors called ommatidia. | ||
| Antenna | Movable segmented feelers that detect airborne scents and currents. | ||
| Thorax | Midsection where the (6) legs and wings attach. | ||
| Abdomen | Hind part of the bee and where the stinger is located. | ||
| Stinger | Or sting, is a sharp organ at the end of the bee’s abdomen used to inject venom. | ||
| Forewings | Wings closest to the head. | ||
| Hind Wings | Wings farthest from the head. | ||
| Forelegs | Legs closest to the head. | ||
| Antennae Cleaners | Notches filled with stiff hairs that help bees clean their antennae. There is one on each foreleg. | ||
| Middle Legs | Leg located between the foreleg and hind leg. | ||
| Hind Legs | Legs farthest from the head. In workers, these legs have a unique set of tools used to collect and carry pollen called the press, brush, and auricle. | ||
| Coxa | First segment of an insect leg. | ||
| Trochanter | Second segment of an insect leg. | ||
| Femur | Third segment of an insect leg. | ||
| Tibia | Fourth segment of an insect leg; the tibia of the hind leg holds the pollen basket, where pollen is carried. | ||
| Metatarsus | Fifth segment of an insect leg; the metatarsus of the hind leg holds special pollen collecting tools. | ||
| Tarsus | The last segment of the leg and what touches the walking surface. | ||
| Tarsus Claw | Claw found on the last segment of the leg. | ||
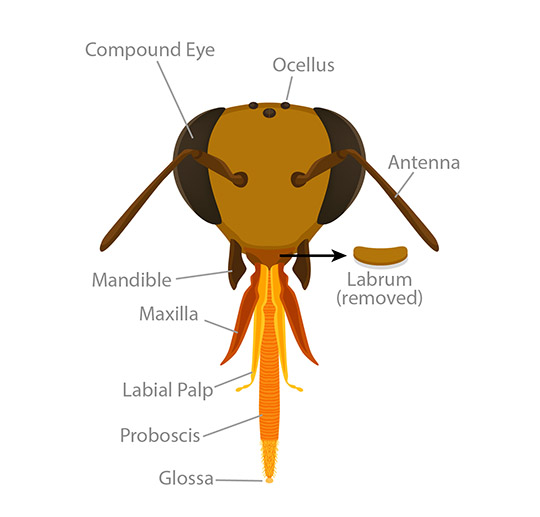
Labeled illustration of the exterior anatomy of the head of a honey bee.
| Compound Eye | A type of eyes of insect eye that is made of many light detectors called ommatidia. |
| Ocellus | A type of insect eye used to detect motion. (Plural: ocelli) |
| Antenna | A movable segmented feeler that detects airborne scents and currents. |
| Labrum | Mouthpart that can help handle food and that forms the top of the feeding tube. |
| Mandible | Strong outer mouthpart that helps protect the proboscis. |
| Maxilla | Mouthpart beneath the mandible that can handle food items. |
| Labial Palp | Mouthpart used to feel and taste during feeding. |
| Proboscis | Tube-like mouth part used to suck up fluids. |
| Glossa | An insect’s hairy tongue that can stick to nectar to pull it in toward the mouth. |

Labeled illustration showing the internal anatomy of a honey bee. Illustration by Walké via Wikimedia Commons.
Looking Inside a Honey Bee
| 1 | – | Proboscis | Straw-like mouthparts of a bee used to drink fluids. |
| 2 | – | Maxillae | The outer sheath of the proboscis which surrounds the labium. |
| 3 | – | Mandible | A pair of jaws used to chew pollen and work wax for comb building. They also help with anything that the bee needs to manipulate. |
| 4 | – | Labrum | A movable flap on the head that covers the opening of the food canal and proboscis |
| 5 | – | Food Canal | Like our mouths, this is the opening by which the bee will take in food. Bees’ food is almost always liquid in the form of nectar or honey. |
| 6 | – | Pharynx | Muscles used to move the labium and suck up nectar from flowers. |
| 7 | – | Esophagus | The hollow tube through which ingested fluids pass to the honey stomach and later the midgut. |
| 8 | – | Hypopharyngeal gland | Gland that produces some of the compounds necessary for making royal jelly, used to feed the larvae. |
| 9 | – | Brain | Honey bees have excellent learning and memory processing abilities. Their brain processes information used in navigation and communication as well as memory. The brain also controls many of the basic bee body functions. |
| 10 | – | Salivary Gland | The salivary glands have a number of functions. Like the hypopharyngeal gland, the salivary glands produce some compounds necessary for producing royal jelly. The salivary glands produce liquid used to dissolve sugar, and also produce compounds used to clean the body and contribute to the colony’s chemical identity. |
| 11 | – | Flight Muscles | The thorax muscles, which power the bee’s wings for flying and movement. These muscles work very hard and can help the bee to beat its wings up to 230 times per second. |
| 12 | – | Heart | Unlike in mammals, honey bees and insects have an open circulatory system, meaning their blood is not contained within tubes like veins or arteries. The blood, or hemolymph, in insects is free-flowing throughout the body cavity and is pumped via the heart. The heart is the structure in red, and acts like a pumping leaky tube to help move the hemolymph throughout the body |
| 13 | – | Opening of Spiracle | The respiratory system in insects is a series of hollow tubes connected to air sacs in the body. The openings of these hollow tubes are called spiracles. The tubes are called trachea which then provide oxygen and gas exchange to all tissues in the body. |
| 14 | – | Air sac | Air filled sacs used as reservoirs of air in the insect body. |
| 15 | – | Midgut | Contains the proventriculus, ventriculus, and small intestine. This is where most of the digestion and nutrient absorption occurs in the insect body |
| 16 | – | Heart Openings | Openings in the heart tube which take in and pump out hemolymph. |
| 17 | – | Ileum | A short tube connecting the midgut to the hindgut. The Ileum also often houses microbes, which aid in digestion. |
| 18 | – | Malpighian Tubules | A set of small tubes that are used to absorb water, waste, and salts and other solutes from body fluid, and remove them from the body. |
| 19 | – | Rectum | The rectum acts like our large intestine and is the bees primary location of water absorption for the gut after digestion and nutrient absorption. |
| 20 | – | Anus | The exit of the digestive system, used to excrete food waste (poop) while in flight. |
| 21 | – | Stinger | Also called “sting” is used to puncture the skin and pump venom into the wound. In worker bees the stinger has a barbed end. Once pushed into the skin the stinger remains in the victim. The venom sac will remain with the stinger. If left in the body the stinger will continue to pump venom from the venom sac into the victim. Queen bees have a longer and un-barbed stinger. Drones (males) do not have a stinger. |
| 22 | – | Stinger Sheath | The hardened tube, from which the stinger can slide in and out. |
| 23 | – | Sting Canal | The sting is hollow, allowing venom to pass through the stinger. This is also the canal via which an egg is passed, when the queen lays an egg. |
| 24 | – | Venom Sack | Holds the venom produced by the venom gland, and can then contract to pump venom through the stinger. |
| 25 | – | Venom Gland | The gland which produces the venom that damages tissue if injected into the body. |
| 26 | – | Wax Glands | Worker bees start to secrete wax about 12 days after emerging. About six days later the gland degenerates and that bee will no longer produce wax. The queen is continually laying eggs to maintain colony size and to produce more new workers that produce wax. |
| 27 | – | Ventral Nerve Cord | Like the nerve cord in our spine, which holds bundles of nerve fibers that sends signals from our brain to the rest of our body. |
| 28 | – | Proventriculus | A constricted portion of the honey bee foregut or honey stomach, which can control the flow of nectar and solids. This allows honey bees to store nectar in the honey stomach without being digested. |
| 29 | – | Honey Stomach (Foregut/Crop) | A storage sac, used in honey bees to carry nectar. The honey stomach is hardened to prevent fluids from entering the body at this location. |
| 30 | – | Aorta | Blood vessel located in the back of a bee that carries blood from the heart to the organs. |
| 31 | – | Esophagus | Part of the bee digestive system that begins below the mouth and connects to the honey stomach. |
| 32 | – | Ventral Nerve Cord | Same as 27. This is a large bundle of nerves from the brain that sends signals to the rest of the bee’s body. |
| 33 | – | Labium | In bees a tongue-like appendage used to help drink up nectar. Like our tongue bees can taste with this organ. The labium fits inside of the maxilla (2), kind of like a straw. |
Bearding Vs Swarming: How To Tell The Difference
Bearding Vs Swarming: How To Tell The Difference
Source: https://busybeekeeping.com
Bearding and swarming are two different phenomena that occur in the lifecycle of honeybees. In both cases, a large number of bees cluster together – which is why many people mistake bees bearding for bees that are about to swarm. While there are some similarities between the two, you should be able to tell the difference by looking a bit closer.
What Is Swarming?
Swarming is when the queen and a large group of worker bees leave their hive. It can happen for two reasons.

The first reason is when the bees abscond or abandon their hive in order to survive. It could be because there is insufficient food or water, problems with disease, frequent disturbances, or issues with the queen that threatens the survival. In this instance, the entire colony leaves the hive.
The second reason bees might swarm is as a natural means of reproduction that occurs when a colony of bees run out of space in their existing hive. Rather than the entire colony leaving, it splits into two separate colonies.
The queen and a large number of workers leave the hive to create a new one. Before swarming, bees will deprive the queen of food so that she loses enough weight to fly. They will then create a number of queen cells so that a new queen can take over the hive.
Scout bees will fly to find a new location for the hive to cluster temporarily (usually for a few hours), before sending more scouts to find a suitable place to create the new hive.
What Is Bearding?
Bearding is when, rather than go inside the hive, bees hang outside the entrance in large clusters. Because of the shape, it often gives the appearance that the hive has grown a beard of bees.

Bees beard to control the internal temperature and humidity levels of the hive. You see, when the hive becomes too hot, the brood begins to die, threatening the existence of the colony.
On top of that, the high level of humidity means bees are not able to reduce the moisture content of nectar and turn it into honey, which could leave the colony without enough food to survive.
That’s why bees beard outside the hive – so they can create more space inside the hive which allows for more ventilation. Sometimes you might even see them sitting at the entrance of the hive fanning their wings to help with air flow.
Bearding is a completely natural behaviour and the sign of a healthy hive. Swarming, on the other hand, indicates there may be something wrong. That’s why, if you’re not sure whether your bees are bearding or preparing to swarm, it’s a good idea to check.
The Differences Between Swarming And Bearding
Bearding bees might look like they’re preparing to swarm at first sight, but there are a few differences you can use to be sure of which one is happening.
Time Of Year
The first clue as to whether your bees are swarming or bearding is the time of the year.
Swarming typically occurs during mid-late Spring, because many flowers are in bloom. This allows bees to collect a lot of pollen and nectar, providing optimal conditions for the queen to lay more eggs and the colony to grow in size. When the colony becomes too large for their hive, some of the bees will start preparing to swarm.
Bearding usually occurs during Summer or when the weather is very hot. A hot and humid climate can make it more difficult for bees to regulate the internal temperature of their hive, forcing them to hang outside as they wait for it to cool down.
Time Of Day
As well as the time of year, the time of day also usually differs between bearding and swarming.
Bees tend to swarm in the middle part of the day, between 10am and 2pm. This gives them enough time to cluster and scout a new location for their hive.
Bearding, on the other hand, typically occurs in the late afternoon or at night. That’s because bees are out of the hive during the day collecting pollen and nectar. When they return to find the hive is too hot, they cluster outside.
The Level Of Activity
Bees preparing to swarm are typically very loud and active. You will likely see large numbers of bees moving rapidly and some flying around.
When bees are bearding, they will be very docile and rarely take flight. Instead, they tend to cluster together in a large group on the landing board or around the outside of the hive. You might see some of the bees fanning their wings into the hive trying to increase ventilation.
Amount Of Space Inside The Hive
Bees swarm when they have run out of space inside the hive to continue building more comb – which is essential to store food and raise more brood. When this happens, the colony has grown too large for the hive, and will decide to split it in two.
If you suspect your bees are preparing to swarm, check the hive to see how much space is left on each of the frames. If the bees have built comb all the way to the edges of the frame and have nowhere left to build – especially if the comb is full of food or brood – they could very well be preparing to swarm.
If this is the case, you will likely notice an abundance of idle worker bees who have nothing to do – because there is barely any room to store more food or raise more brood.
Sometimes a lack of space can also make it difficult to regulate the internal temperature of the hive, which could force bees to beard outside. So not enough room does not necessarily mean the hive is going to swarm just yet – but it’s likely they will at some point in the near future.
Either way, if you notice a lack of space, it’s time to either add more frames or another brood box or honey super, or split the hive.
The Presence Of Queen Cells
The presence of queen cells is a big giveaway your hive is preparing to swarm.
If bees are preparing to swarm and split the colony in two, they must raise a new queen to leave behind. To do this, they build queen cell cups, into which the current queen will lay eggs. These are long, vertical beeswax cells that can usually be found on the bottom or outer edges of the comb.

If you suspect your colony is preparing to swarm, then inspect your hive and search for queen cells. If you find some – especially ones that contain eggs or larvae – it is highly likely your hive is preparing to swarm. If you find capped cells, the swarm is imminent.
It takes around 9 days after capping for the new queen to emerge. So, if there are capped queen cells, it means the hive will swarm sometime within the next 9 days.
If the queen cells are capped, the swarm could happen any day.
If your bees are bearding, on the other hand, they have no reason to raise another queen – so there should be no queen cells.
Swarming Vs Bearding: How To Tell The Difference
| Swarming | Bearding | |
| Swarming typically occurs in mid-late Spring or early Summer, when flowers are in bloom, as this creates optimal conditions for the colony’s population to grow rapidly. | Bearding typically occurs during Summer when the weather is hot and humid, making it more difficult to regulate the internal temperature of the hive. | |
| Swarming will most likely occur during the middle of the day, between the hours of 10 am-2 pm, giving the bees enough time to cluster, before scouting for a new home. | Bearding will most likely occur in the late afternoon or evening when bees return home after collecting pollen and nectar only to find their hive is too hot inside. | |
| Bees that are about to swarm are typically loud and active (especially aerially). | Bees that are bearding tend to stay grounded and huddle in large clusters on the landing board or outside of the hive. | |
| Before a colony swarms, they need to raise a new queen to take over the hive – so you’ll find queen cells (vertical, peanut-shaped beeswax cells) on the outer edges of the comb. | If your bees are bearding, you may notice some fanning their wings towards the entrance in an attempt to improve ventilation and cool down the hive. | |
| Bees swarming is the sign of a strong colony that has outgrown its hive, so you’ll notice there is little or no room to build additional comb on any of the frames. | A lack of space can contribute to bees bearding – but it’s also something you need to resolve as soon as possible, because it means they will likely prepare to swarm sometime soon unless additional space is provided. |
Summing Up…
Bearding is when bees hang outside the hive, typically in the late afternoon or at night. They do this to reduce the number of bees inside and help cool down their hive.
Swarming typically happens as a natural means of reproduction and occurs when the colony has outgrown the hive. Around half the hive, along with the queen, will leave to find a new home.
If your bees are preparing to swarm, you will need to split the hive or provide additional frames upon which they can continue to build comb – which is necessary to store food and brood.
What Is A Honey Refractometer And How To Use It
A refractometer is a tool that measures the refractive index of a liquid substance. In other words, it measures the degree light bends when passing through the solution. It is used in many fields to identify the purity and concentration of substances in liquid samples.
A honey refractometer is an instrument that measures the degree light bends when passing through honey. This helps estimate the moisture content in the honey sample – giving beekeepers more certainty over the risk of honey fermentation and whether or not to apply corrective measures.
How Does A Refractometer Work?
Most of us have heard of refraction and how light bends or changes direction when it goes through a liquid like water.
Remember that experiment with a pencil or straw in a glass of water and how it bends as it passes through water? – this is called refraction, and it’s the principle under which refractometers work.

Refraction happens when light travels from one transparent substance to another. Following the previous example, when light travels from the air into the glass of water, light bends because of a change of speed – light slows down when it travels from air into water.
The degree of refraction or bending light is affected by the amount of liquids or solids present in a solution or substance. So, a solution with more dissolved solids will bend differently than one with less.
A refractometer takes the angle at which light enters the liquid and compares it to the angle at which light exits to calculate the refractive index.
What Makes A Honey Refractometer Different?
Beekeepers use the refractometer to measure how much water or moisture there is in honey.
Given one of the main components of honey is sugar, honey refractometers use the Brix scale, which measures the amount of sugar in a solution.
One degree Brix is equivalent to 1 gram of Sucrose in 100 grams of solution (or one percent of sugar).
While you can use other types of refractometers, you might want to make the task easier for yourself and get a honey refractometer.
The difference is a regular refractometer will show the reading as a percentage of solids dissolved in water. Honey refractometers do the opposite – they give the measurement of moisture in solids.
A honey refractometer has a reduced Brix scale. Instead of presenting values between 0-100% water in the sample, it will display a number between 10-30% water (equivalent to 70-90% solids in the sample).
These features will make testing the moisture in honey more straightforward – it will show you what you need, without having to make any additional calculations.
Why Should You Buy A Honey Refractometer?
Not every beekeeper has to own a refractometer. However, it’s a handy tool when it comes to harvesting honey.
The amount of water present in a batch or jar of honey will affect the rate at which it ferments. Therefore, it is crucial to measure moisture, especially if you plan to store your honey for a long time, sell it or give it away to other people.
While there are many refractometers with a wide range of prices, it’s not necessary for you to buy an expensive one as a beekeeper.
A handheld honey refractometer will be adequate for you to monitor the moisture in your honey.

Types Of Honey Refractometers You Can Buy
There are two main types of honey refractometers you can get. These are analog and digital refractometers.
The main difference is how the result is read. When using an analog refractometer, you will need to look through an eyepiece for the analog type and read the results from the scale presented. In contrast, a digital refractometer will show the reading on its screen.
The other big difference you might find between these is the price. Digital refractometers tend to be more expensive.
Which one you choose is entirely up to you. Both will serve the purpose – it’s just a matter of how much you’re willing to spend and which one you feel most comfortable with.
Parts Of A Honey Refractometer
While a digital refractometer is simpler to use, an analog refractometer is more accessible in terms of price. Therefore, it tends to be the most common.
- Prism: This is the section where you place your honey.
- Cover – Clear lid or cover that protects the prism.
- Calibration screw: It is often covered with a plastic lid. With the help of a screwdriver and a calibration liquid, you will be able to calibrate the instrument by adjusting the screw.
- Focus ring: This will allow you to focus on the image so you can see it clearly.
- Eyepiece: This is where you will look to read the results.


What Else Comes In The Box? – Analog Refractometer
Note: This varies according to the seller so keep this in mind when you are buying one. While some of these items can be replaced by everyday household items, you might want your set to include them – make sure you ask the seller what’s included.
- User manual: The instructions specific for the model and brand you bought. It will most likely include the steps for calibration and measuring, and taking care of your refractometer.
- Calibrating solution: A liquid that comes in a little bottle that will help you calibrate your instrument.
- Screwdriver to calibrate
- Pipette dropper: This will help you take a honey sample and put it on the prism. If yours doesn’t have one, it doesn’t matter. You can still use other things for this, like a plastic spoon, a popsicle stick, or even your finger.
How To Use A Honey Refractometer
Analog refractometers are easy to use but can be a little intimidating at first. So, here is a guide for you to know how to use your refractometer.
How To Calibrate A Honey Refractometer
Before you can start measuring your honey samples, making sure your honey refractometer is well-calibrated is vital. This will guarantee your readings will be as accurate as possible.
Most refractometers will come calibrated from the manufacturer; however, it never hurts to check before using it. The screw can loosen up during transport or over time if you don’t use it too often.
What you will need:
- Refractometer
- Reference or calibrating liquid
- Screwdriver
- A source of light
The reference liquid is a substance that has a known Brix reading or moisture content. If your set came with one of these, its Brix or moisture content will be written in the calibration instructions.
Before You Start
- Open the lid or cover and clean the prism with a microfiber cloth or lint-free fabric. I would recommend you do this every time you are going to use the refractometer.
- Another essential step before calibrating and using a refractometer is to ensure both the refractometer and the calibrating liquid have the same temperature (ideally room temperature: 68˚ F or 20˚ C). This is because temperature affects refractive index readings.
- You also need to keep the refractometer, the calibrating liquid, and the honey you will measure at the same temperature. For this, it might be helpful to do the calibration and measurement in a room you can keep at a constant temperature.
Step By Step – Honey Refractometer Calibration
Lift the clear cover on the prism and add a few drops of the calibrating liquid on the glass. Use just enough to cover the entire surface of the prism, without going over the edges.
- Close the cover and make sure there are no air bubbles by gently pressing down the transparent lid.
- Take off the cover of the adjustable screw and keep the screwdriver at arm’s reach so you can adjust it if needed.
- Take your refractometer and look through the eyepiece, while directing it towards a source of light
- Move the focus ring until the scales and numbers become clear to you. You will see the background is divided into color blocks, most likely blue and white.
- The line dividing the two is what indicates the value in its corresponding scale.

- The substance you are using to calibrate already has a known or given Brix or moisture content value. As you look through your eyepiece, identify if you can read that given value or if your refractometer is showing a different one.
- If it’s different, you will have to calibrate your device by adjusting the screw while still looking through the eyepiece until the line between the blue and white meet the known or given value.
- Your honey refractometer is calibrated and ready to use. Clean the prism with a damp microfiber cloth or lint-free fabric, wipe it dry and cover it. Put on the cap or cover on top of the adjustment screw, and you are ready to go!
My Honey Refractometer Didn’t Include A Calibration Liquid. What Now?
What if your refractometer doesn’t come with a calibrating liquid, you ran out, or the Brix/moisture content is unknown?
In this case, you can still use your tool and get accurate results calibrating with different substances that can be easy to find.
The first thing you must keep in mind is that the substance you choose to calibrate should be compatible with the scale of your refractometer.
Commonly, honey refractometers will have a 90-60 Brix scale or 10-30% water scale, which means, if you are using one of these refractometers, the calibrating substance you use should have a known Brix between 90 and 60 or 10-30% water content.
For other refractometers with the full scale, you can use other solutions with Brix that go from 100-0 Brix (or moisture).
Calibrating Honey Refractometers With A 90-60 Brix Scale
Most people these days use olive oil in their cooking, given its increase in popularity, so it’s very likely you already have some in your kitchen. If not, you can easily find it in your local supermarket.
Olive oil can be used as a calibrating oil. It won’t be as accurate as a calibration oil made specifically for this purpose, but it works well to test honey.
According to the United Nations Food and Agriculture Organization (FAO), olive oil has a refractive index between 1.4677-1.4705, equivalent to around 70.9° Brix – 71.9° (as per ICUMSA standards).
Calibrating Refractometers With A Full Scale
The easiest way, and probably most accurate, to calibrate a refractometer with a full scale is to use distilled water which should read at 0° Brix.
So, to calibrate, take one or two drops of distilled water and put it on your refractometer’s prism, and read the results against a source of light. If it doesn’t read 0° Brix, then you need to adjust the screw until it does.
How To Use Your Refractometer To Measure The Moisture Content Of Your Honey
Now your refractometer is calibrated and ready to use, let’s move on to how to measure the moisture content of your honey.
Before You Start
- Take your refractometer and honey to your extraction room, or somewhere you can control the temperature to keep it constant. You want both the refractometer and your honey to be at room temperature (around 68˚ F or 20˚ C).
- Stir your honey well if it already sits in a jar or bucket. This will help to get a more accurate reading. The moisture content of honey taken from the top layer of a pot or bucket will be slightly different than a sample from the bottom.
Step By Step
- Lift the clear lid on top of the prism. Use your microfiber cloth to make sure there is no dust.
- Take a couple of drops of honey with your dropper and put them on the prism and spread it on the whole area. Alternatively, you can stick your fingertip in honey and smear it on the glass. You only need enough to cover the prism area.
- Close the prism cover and squeeze gently to get rid of any bubbles.
- Take the refractometer to your eye and hold it in front of a source of light while looking through the eyepiece. Use the focus ring if you need the image to get clearer.
- You will see the background divided in white and blue with the border that separates the two. Most analog honey refractometers will have the water content scale and the Brix scale. Find the point where the line meets the water content scale and read the number. That is the water content or moisture of the honey you just sampled.
- Clean the prism and the clear lid with a microfiber or lint-free cloth.
Additional tips
- Take multiple readings from the same sample and calculate the average, as a single drop might give a poor indication of the entire batch. This is particularly important if you are taking the sample from honey that has been sitting in a bucket or jar.
- If you are taking honey directly from your supers before extraction, collect a sample from different parts of the honeycomb.
- Making labels from masking tape with the moisture or the frame and date/time will help you track the progress if you are trying to decrease the moisture content.
How To Take Care Of Your Honey Refractometer
How you take care of your honey refractometer will increase its longevity and provide you with more accurate readings.
Here are few tips to make sure to take good care of it:
- Always wipe your prism with a gentle, lint-free fabric. This will get rid of dust particles before you calibrate and use your refractometer.
- After using, clean the prism and the transparent panel or lid with a moistened lint-free cloth.
- Make sure you put away your refractometer in its box after every use.
- Always close the clear panel or lid after you are done using the refractometer. Getting scratches on the prism will most likely affect the readings.
Why Do Bees Collect Nectar?
Why Do Bees Collect Nectar?
Source: https://busybeekeeping.com
Bees collect nectar because it is an essential food source for the colony. Nectar provides the carbohydrates needed for bees to perform daily tasks such as flying and colony maintenance.

What Do Bees Do With Nectar?
Bees do two main things with the nectar they collect. Both tasks ensure the short and long term survival of the colony.
1. They Use It As Food
Foraging bees extract nectar from flowers and stores it in their special honey stomach, known as a crop, to be transported back to the hive. When hungry, a bee will open a valve and a portion of the nectar will pass from her honey crop through to her own stomach to be converted to energy for her own needs.
Bees feed each other nectar using a method called trophallaxis, where the nectar is regurgitated by one bee and fed to the next one.
2. They Store It
When the honey crop is full, forager bees carry the nectar back to the hive where it is transferred to specialized worker bees who take the nectar and store it in empty cells.
This process is called trophallaxis and involves the forager regurgitating the nectar, which is then taken up by the worker and mixed with additional enzymes before being stored inside a cell. The moisture in the nectar is evaporated until it becomes honey, then it’s sealed with a wax capping.
The stored honey is essential food for the colony in the Winter months when the weather makes foraging less likely. It gives the colony the energy it needs to help maintain the desired temperature of the Winter cluster.
Do Bees Eat Nectar?
Bees certainly do eat nectar. They utilize the nectar they collect, and the honey they make from it, as their energy source. The nectar contains carbohydrates and various minerals such as calcium, sodium, magnesium, copper and potassium.
The presence and concentration of these minerals varies from one source of flora to another. Factors that affect the availability of these minerals include the weather, the amount of water available and the type of soil in which the plant lives.
How Do Bees Get Nectar From Flowers?
Forager bees get nectar from flowers using their proboscis, or mouth parts. They suck the nectar into their honey stomach, or crop. Foragers are the oldest bees in the colony, having performed all the other tasks needed to maintain the survival of the colony.
Foraging bees have a hardened exoskeleton and well-developed flight muscles to equip them for the arduous task of flying back and forth to the hive, collecting and depositing nectar and pollen.
Nectar is produced by nectaries, which are special glands usually found in the deepest part of the flower. To access the nectaries, the forager will brush past the pollen-laden anther or male part of the flower. Using their proboscis, the bees will suck up the nectar into their honey stomach or crop.
Once their crop is full, they return to the hive to pass the nectar to the worker bees, who store and evaporate the nectar until it becomes honey.
How Do Bees Know Which Flowers Have Nectar?
Bees use a number of clever methods to find which flowers have nectar:
1. Type Of Flower
Foragers are attracted to simple or single flowers that have an open, cup like face as the nectar and pollen is readily accessible. The proboscis of a European bee is approximately 5.7 to 6.7* millimetres (according to The Australian Beekeeping Manual) – so any flower that has its nectar source deeper than this won’t be accessible to a bee.
Plants that have a cluster of individual flowers along, or at the end of a stem, are very attractive to foragers – because they save energy by accessing the pollen and nectar from the many flowers along the stem, all during a single foraging trip.

2. Color Of The Flower
Foragers are attracted to the colors purple, blue, violet, yellow and white. They possess the ability to see ultra violet light, which we cannot, so many of the attributes and marks it finds pleasing in a flower aren’t visible to us.
Although bees can’t see the color red, many red flowers have other markings or ultra violet stripes that act as signposts to guide the bee to the nectary.
3. Scent Of The Flower
Bees have poor visual acuity or clarity of sight. Unlike our eyes, bees have compound eyes, which consist of thousands of tiny photo receptors that allow them to focus well up close. Therefore they rely on scent to find flowers at a distance.
4. Electrical Charge Of The Flower
According to research conducted in England, plants emit a weak negative electrical impulse that may signal to bees there is food available.
Bees wings generate a positive impulse as they fly from flower to flower. It’s a well-known scientific fact that opposite charges attract, so it’s possible the negative charge emitted by the plant attracts the bee to it.
A subsequent scientific experiment concluded that bees appear to be sensitive to the negative electrical signal given off by flowers and attracted to this impulse when searching for nectar and pollen.
Researchers have also determined that bees know when the nectar in a flower has been harvested by another insect, because the electrical signals change once the nectar has been removed.
5. The Waggle Dance
When a forager finds a good source of nectar and pollen, she returns to the hive to tell the others. She does this by performing what is known as the waggle dance, which lets the other foragers know the distance and direction of the food source.
In addition, the forager returns to the hive with the smell of newly found nectar and pollen sources on her body. Together with a donated sample of the nectar, the foragers are able to locate the good food source.
Inside the beehive it is usually dark and, with their poor visual acuity, the foragers can’t see the waggle dance. Instead, they follow the performance using their antennae to feel the vibrations produced during the dance. This helps them determine the location of the food source.
How Much Nectar Do Bees Collect In A Day?
Researchers have found bees can carry around 28mg of nectar, equivalent to 40% of their body mass (approx. 70 mg). In some cases, the loads of nectar were nearly the same as their body weight.
However, the amount of nectar collected varies and is dependent upon several factors:
The Season
During the Spring and Summer seasons, when the weather is warm and sunny, more plants and trees flower. This provides greater opportunities for the foragers to collect nectar. The days are longer in the warmer seasons too, so forager bees have more time to collect food.
The Strength Of The Hive
A strong and healthy hive with a large bee population will have more foragers available to collect nectar from flowering plants.
Space In The Hive
Ample room in the hive will allow forager bees to collect and store the surplus nectar.
Nectar-rich Flora
Some flowering plants provide more nectar than others – and some types of nectar are more beneficial to bees than other types. In addition, the amount and nutritional value of nectar gathered will vary from day to day, depending on the health of the flowering plant. If there has been above average rainfall prior to the Spring, then more nectar will be available.
Summing Up…Why Is Nectar Important To Bees?
Nectar is important to bees because it is an essential source of energy, in the form of carbohydrates, for the colony. It allows the bees, including the queen, to perform all the necessary tasks needed for the colony to function and thrive.
As a beekeeper, you should ensure your garden has many different flowering plants and trees to provide your colony with nectar. It’s important to provide your bees with plants that are of the right color and type to allow your foragers to access the nectar easily.
What Is Drawn Comb?
What Is Drawn Comb?
Source: https://busybeekeeping.com
Drawn comb is a sheet of beeswax foundation whose cells have been drawn out into three-dimensional hexagonal cells using beeswax manufactured by the bees.
Drawn comb has several purposes. It is used by bees to either store honey or pollen, as insulation and a place for bees to cluster.
It is also used by the queen to lay eggs. The comb houses the eggs which develop into larvae, pupae and eventually adult bees.

Drawn Comb vs Foundation
Foundation is the sheet of wax (or plastic) placed in a frame that is imprinted with a hexagonal pattern. This pattern guides the bees to build drawn comb, which are the hexagonal, three-dimensional cells bees build on top of the foundation.
Drawn comb is much better than foundation because it is ready for the bees to use immediately and is used by bees for every key function in the hive.
They raise young in the brood comb, store nectar and pollen in the cells, perform communication dances across the comb, use it as insulation and to form a Winter cluster. Having drawn comb in the hive means the bees have the space to perform all their duties.
With only foundation to use, the colony cannot function properly because the bees have no cells to work with. Instead, they have to build the cells using beeswax. This means they have less time and energy to devote to raising brood and storing nectar.
This is especially true in Spring when the colony is focused on growth and needs the maximum amount of space to rear brood. Also in Spring flowers bloom, nectar begins to flow and the bees need room to store the incoming nectar.
If they don’t have enough drawn comb to do store food in, the bees will be forced to put the nectar into the brood cells (cells in which the queen lays eggs). This leaves fewer cells for the queen to lay in – meaning fewer bees and a weaker colony.
What Does Drawn Comb Look Like?
Drawn comb is similar to the color of straw, almost white, especially when it is used for the first time. The color of new comb depends on a few factors, such as the current sources of nectar, the race of bees in the hive and what type of pollen they’re collecting. As the same comb is used over and over, it will darken in color.
The drawn comb has a wax-like feel. This is because bees make comb from wax secreted from the eight pairs of wax glands under their abdomen. The wax is chewed by the bees and they mix it with enzymes from their saliva which softens the wax until it is able to be molded like clay.
Each cell of drawn comb is hexagonal in shape. The six-sided shapes fit together perfectly and they can hold the queen bee’s eggs and store the pollen and honey the worker bees bring.
How Long Does It Take For Bees To Draw Out Comb?
There are several factors that will affect how long it takes for bees to draw out all the frames of foundation in a honey super. If all factors are working together perfectly, it will take 1 to 2 weeks for a strong colony to draw out all the frames in one super. In fact, some colonies can take less than a week even though this rarely happens.
The factors that affect how long it will take to draw comb are:
Nectar Flow
When there is plenty of nectar for the bees to eat they are much stronger, more productive and will take a shorter time to draw comb.
Number Of Bees In The Colony
A larger number of bees means there are more foragers to collect food for the colony. This also means a healthier queen that can produce more eggs to sustain a strong colony. A strong colony is able to draw a single frame of comb much faster than a weaker colony.
Age Of Bees
Worker bees are most productive during their early stages of life and their wax glands are at peak production. As we know, drawn comb relies on the availability of wax. Therefore a younger bee population will draw a frame much faster than an older group of bees.
Temperature
Bees use wax to build comb and this becomes brittle if subjected to cold temperatures. Wax produced is not useable unless the temperature is ideally 35 degrees Celsius (95 degrees Fahrenheit). Therefore, comb cannot be drawn out during the colder months.
What Do Bees Use Drawn Comb For?
Bees use drawn comb for the following main purposes:
- Store honey – bees collect nectar from flowers which is stored in their honey stomach. The nectar is turned into honey by reducing its moisture content as it is passed from one bee to the other before being stored inside the cell and sealing it with a wax cap.
- Store pollen – bees collect pollen from flowering plants and mix it with nectar to form bee bread which is stored inside the cells of drawn comb. Bee bread is the protein source fed to bee larvae.
- Store eggs, larvae and pupae – the queen lays an individual egg into each cell of drawn comb. After three days the eggs hatch into larvae which are fed a mixture of royal jelly and bee bread. Within five days the larvae are 1,500 times larger than their original size. At this time their cells are sealed with wax and the larvae spin a cocoon. Inside the cocoon they pupate and develop the features of an adult bee. After twelve days they chew through the wax cap and join the colony.
How Long Does Drawn Comb Last?
Drawn comb can be reused in the hive, but will need to be replaced eventually. When you replace it depends upon the condition it is in.
Over time the cells in the brood comb become smaller, because after each bee birth some of the cocoon is left behind. The comb becomes dark and damaged because of the thousands of bees that walk across it every day, leaving traces of dirt and debris from their legs.
After approximately two years some of the frames of old dark comb in the hive should be replaced with either fresh drawn comb if you have it, or foundation. Replace no more than half the frames at any one time – and make sure there is no brood in them when you change them over.
Comb that has honey stored in it will last longer than brood comb. It may need to be replaced eventually because it can become damaged when removed for extraction.
How To Store Frame With Drawn Comb
Drawn comb in good condition can be stored and used again when needed. Here’s how to store frames with drawn comb:
- Before removing the frames for storage, make sure they have no brood in them. Do this by placing them above the queen excluder and wait until all the brood has hatched out.
- Remove the frames from the hive and place each one in a large plastic bag and secure them.
- Place each frame in the freezer for two days to kill any wax moth larvae.
- Store the frames in an airtight plastic tub or storage bin.
Can You Re-Use Drawn Comb?
Drawn comb can be reused in the same hive provided it is not old, dark or damaged. However, drawn comb should never be placed in another hive because it could harbor disease that would be transferred to the new colony.
Brood comb can be re-used in the brood nest but not in the honey super. The cells could contaminate the honey because they contain remnants of the bee birth. It will discolor the honey too.
Conclusion
Made by the bees from beeswax they secrete, drawn comb is used by bees for all the essential functions they perform within the hive. They use it as a storage facility, a nursery and as insulation, and it is the foundation of a strong hive.
What Is A Beekeeping Nuc And When Should You Use One?
What Is A Beekeeping Nuc And When Should You Use One?
As a beginner beekeeper, you may have come across the term ‘nuc’. But what is it exactly? And what is it used for in beekeeping?

A nuc (which is short for nucleus colony) is a small colony of bees. It is usually stored in a single, deep box which holds 3-5 frames. These frames contain worker bees, larvae, pupae and eggs, and stores of honey and pollen. Typically, but not always, a nuc also includes a Queen.
A nuc has several uses in beekeeping. Most commonly, it is used to:
– Start a new hive
– Split a large colony in two
– Prevent a colony from swarming
– Raise additional queen bees
– Store a captured swarm of bees
Let’s take a closer look at each situation so you can get a better idea of when you may need a nuc or nuc box.
Starting A New Hive
Many beekeepers view nucs as the easiest way to start a colony because they are a smaller version of one and include the comb, honey, pollen and brood.
This means a nuc is an already established colony and bees can begin foraging as soon as it’s moved to the new location. They will have a head start on honey production and won’t have to spend as much time making honey for the colder months.
There is also less chance of the colony rejecting the queen that comes with a nuc than introducing a new one you buy from somewhere else. The worker bees and drones will already be familiar with the queen and used to working together.
However, in the early stages, a nuc can be quite vulnerable because it contains far fewer bees than a full-sized colony. They need time to grow stronger to survive in winter.
It also makes them vulnerable to robbing, where a stronger hive will steal nectar, honey and syrup, often resulting in the starvation of the new hive.
That’s why, if you do start a new colony from a nuc, you must plan properly to maximize the chances of success.
Splitting A Larger Colony In Two
If you want to start another hive but don’t want to buy more bees, splitting a large, existing hive using a nuc can be a simple and effective strategy to take. Because the frames in a nuc will have comb, honey stores and pollen, the new colony will have a head-start growing.
To split a hive, you will need to take frames from a stronger, larger hive. Ensuring you take frames from a healthy donor hive will reduce the chances of problems with the new one as less disease will be transmitted from one to the other.
Make sure you take the appropriate mix of frames to give the new colony everything it needs to survive. The nuc should be a complete system where bees can live independently, so you’ll need frames with capped brood, open brood, honey and pollen. Be careful not to take the queen bee, though – you don’t want to leave the donor colony queenless.
Also, be mindful of the time of the year you are planning to split a colony. It is critical for both hives to have enough time to build their stores before winter, so doing this when bees will be able to forage and find enough flowering plants is vital.
If you split the hives around the middle of Spring, they will have enough time to increase their stores and grow in the hive before winter.
If you don’t feel confident splitting a hive, you can talk to your local beekeeping club before having a go yourself. Some of them will likely have experience in the matter and will be able to assist you.
Preventing A Hive From Swarming
Splitting a hive can prevent swarming in a large colony. You can tell if a colony is preparing to swarm by observing how much room the hive has. If you notice a lack of space and large amounts of food stores within the hive and a significant number of worker bees, this could indicate your colony is ready to split.
You can also tell if your colony is ready to swarm by looking out for swarm cells or new queen cells. This means around half of the workers are preparing to leave the colony with the queen, and those who stay behind will raise a new one.
Splitting the hive will create extra room in your existing colony for the bees to work in, which will reduce the likelihood of them swarming. If your current hive has queen cells in it, remove these frames and place them in the box. This will give the new hive the foundation to raise a new queen and start a new colony.
Raising New Queens
There are many reasons why raising a queen bee in your own backyard can be more attractive to you than buying it from someone else.
For one, queen bees cost money (typically US$30 – 40 not including shipping) and raising your own will reduce the expenses of your beekeeping hobby.
Additionally, timing can be critical if you find yourself with a colony that has lost its queen. Buying one may take a long time, depending on how many people are rearing queen bees, location, and transportation factors.
Usually, new queens don’t develop in the presence of another queen, as they will kill each other to decide who rules over the hive. Therefore, having a nuc is incredibly useful in queen rearing.
If you have seen signs of your colony getting ready to swarm, take frames from the larger and stronger colony that contain the queen cells and the nursing bees and place them in your nuc. The bees will continue to do their work, and you will have a new queen bee in your new, smaller colony.
However, if you don’t have queen cells, you can still make a new queen by splitting the hive and making sure the frames you take from the donor colony has eggs or young larvae.
After a few hours, the hive will realize they don’t have a queen bee. So, they will select a few of the young larvae, and begin building queen cells. At this point, you just have to wait and make sure they have enough food and water to do their job.
Capturing And Storing Swarms Of Bees
Swarming is a natural process in honeybee colonies. The queen will leave with about half of the worker bees and as much honey as they can carry in their bodies to find another home.
These swarms usually land on a structure not that far from their original location, and cluster while scout bees look for a more permanent place for their new hive.
Experienced beekeepers often use nucs to capture swarms found in the area.
Some prefer getting their bees this way, as they believe it will increase their hives’ chance of success due to their strong genetics.
Swarms are local to the areas they are found, which means they survived winter in that climate and were strong enough to split at the beginning of Spring.
These beekeepers also help others in their communities by removing swarms in unwanted places and finding a more suitable home for them. Using a nuc makes this process easier as its transportation is a lot more manageable than moving a full-sized hive.
Conclusion
Because a nuc has so many uses, it’s a good idea to have a nuc box during your beekeeping journey. This means you can act quickly should you ever need one.
When To Add A Brood Box Or Honey Super To Your Beehive
When To Add A Brood Box Or Honey Super To Your Beehive
Bees need space to store honey. In the wild, they would build more comb as they need it. However, when you have bees in a hive on your property, you are the one who decides when to give them the extra space they require.

The addition of another box or super usually takes place in the warmer months as flowers bloom and nectar and pollen becomes bountiful and when the colony increases in size and activity.
In this post, I will give you a few guidelines to help you determine when to add an extra box.
Brood Box Or Honey Super?
In structure, there is no difference between a brood box or honey super. They are both specifically designed to hold frames without a lid or a base, which means you can mix-and-match with other boxes or supers.
The boxes look the same. Only their purpose is different, which depends on the needs of the hive during the seasons.
A brood box is used to give the queen space to lay eggs. The term brood refers to the eggs, larvae, and pupae of the honeybee.
The box frames are called brood frames because the majority of the cells have brood in various stages of development. The drawn cells on the frame are made from wax, which the worker bees secrete from special glands on their bodies.
A honey super is used by the worker bees to store honey. It could be called ‘honey box’, but the word ‘super’ is used, meaning ‘to be placed above or over’ as in ‘supersede’ (technically not a noun, but has been used as one).
Therefore, the honey super is the box placed above the brood chamber to store the honey collected by the worker bees. Between the brood box and honey super is often placed a queen excluder which, as the name suggests, prevents the queen from entering and laying eggs.
The queen excluder is a grid with spaces large enough for the worker bees to pass but not for the queen
When To Add A Brood Box
When you receive your first hive, it will most likely have one box containing the queen, bees, brood and honey. Once you have positioned the hive in your yard, allow the colony to orientate themselves for at least a week before you inspect the hive.
If you have acquired your hive from another beekeeper or from a beekeeping supply store you should receive some information about the hive from them. Ask if you can inspect the hive before you receive it as this will give you a lot of information about the health of the colony.
When you open your hive, what you see will determine whether you need to add another box. In the warmer months it’s wise to conduct inspections every two to three weeks, as the situation inside the hive can change rapidly.
When I recently opened my single box hive in early Spring (September in southern Australia), I discovered the worker bees had built burr comb in the lid and had begun to store honey in it. As I inspected each frame, I found the central six frames, out of eight, were full of brood and honey.
The outer two frames next to the walls of the box were empty, but the wax had been drawn in readiness.
In addition, there was a healthy population of bees spilling out of the box and on the lid also, so I decided to add a second brood box to accommodate them. As this was a new hive, my goal was to make it a strong hive before taking any honey. I’m happy to wait for another season.
So, in summary, add a second brood box when you notice the following:
- The brood box is full (or nearly full) of brood and honey. As a rule of thumb, at least six out of the eight frames in the hive have bees and brood on them, and there is evidence of nectar being stored.
- The bee population is healthy. You will see this when bees spill out of the brood box every time you take off the lid.
- There is burr comb inside the lid and top of the frames, indicating they need more space.
How To Add A Brood Box
Adding a second brood box is quite straightforward but note in the beginning, the bees are generally reluctant to move up into a new empty box. To encourage them to do so I suggest you follow the steps below.
- Use frames that have drawn out comb in the new box if possible, so the bees don’t have to do this from scratch and the queen can begin laying eggs immediately. Nevertheless, it is normal to not always have for drawn-out frames available because, as a new beekeeper, you most likely only have new waxed frames to use.
- From the new box, remove two frames and put them to one side. Push the remaining frames against the hive walls.
- From the original hive, remove two frames that have brood on them and place them into the centre of the new box.
- Carefully, push the other frames from the original hive together and add the two new frames, one against one wall and the other against the other wall.
- Place the new box on top of the original brood box and replace the hive mat (if using one) and the lid.
It’s not necessary to have the queen on one of the brood frames going into the new box. It’s probably better if she remains in the existing brood box to avoid any possibility of her getting injured or lost.
Placing frames with brood into the new box will ensure the worker bees will move up to attend to the existing brood.
When To Add A Honey Super
Generally, a honey super is added when the brood box has approximately six out of the eight frames with bees and brood, as well as stored nectar.
If you have a ten-frame hive, then approximately eight out of the ten frames should have bees and brood on them. As a rule of thumb, 80% of the brood box should be full.
A honey super is usually a shallower sized box and is meant for honey collection only. It is smaller in size because it doesn’t take the bees too long to fill. A shallower honey super is also less heavy to manage.
I use full-depth, otherwise known as Langstroth, brood boxes so the queen has maximum space in which to lay eggs.
How To Add A Honey Super
After determining your colony needs a honey super, place the shallower new box, complete with waxed frames, above the brood box and replace the hive mat (if using) and lid.
If you have frames with drawn comb that is clean and in good condition, use those in the honey super to speed up honey storage.
This time, there is no need to interchange frames from one box to the other.
I place a queen excluder between the brood box, or boxes and the honey super to prevent the queen from entering the honey super and laying eggs.
One Brood Box Or Two?
Many beekeepers like to add a second brood box before the honey super to ensure their colony is strong and the queen has plenty of room to lay eggs. Adding a second brood box may help deter the hive from swarming, but this is not guaranteed.
Depending on where you live, the weather and the availability of suitable flora can help determine if two brood boxes are necessary.
Using two brood boxes gives the queen plenty of room to lay eggs, but it may be difficult to locate her, particularly if she is unmarked.
It’s a good idea to consult other beekeepers in your local area to find out whether they use one or two brood boxes and why. This can help you decide if one brood box or two is best for your colony.
Conclusion
There are no hard or fast rules as to when to add a brood box or honey super once the warmer weather begins.
Each hive is unique and therefore must be monitored and inspected to find the right time to add a brood box or honey super.
My suggestions are intended as a general guide only. Take into account the weather patterns in your area and find out what other beekeepers in your local area do to determine what will best work for you.
How Many Hives Should You Have?
How Many Hives Should You Have?
Source: https://busybeekeeping.com
Keeping bees can be an addictive hobby. When starting out, you probably feel very enthusiastic and keen to get started and this enthusiasm is maintained as you realise how fascinating bees are.
However, new beekeepers may be tempted to overestimate the number of hives they can look after.

It’s essential to take the following into consideration before making your investment.
- Why am I keeping bees?
- What do I need to know first?
- How much time do I have to look after them?
- What am I willing to invest in terms of money?
- Where will the hives be kept?
Why Am I Keeping Bees?
If you want to keep bees, what is your reason or goal for keeping them? Do you want to keep them as a commercial venture, or as a hobby?
Commercial Venture
To keep bees as a profitable business requires a significant financial outlay initially. A large area of suitable land will be needed to house the hives and to provide enough suitable flora for the bees to forage on. Consider if you have enough space for many hives or will you need to rent land instead.
Other costs will be the hive bodies, bases, lids, frames, wax and other essential equipment such as a bee suit, hive tools, brushes, smokers and extracting equipment. To reduce the possibility of spreading disease it is best to own a few hive tools and brushes as spares for when others are being disinfected.
To promote your business it’s a good idea to have a website which is another cost, unless you design and maintain it yourself. This is a personal choice. You will also need insurance for your investment, as the amount of honey you will produce from year to year will vary according to the seasons.
Consider whether you will sell other bee related products such as beeswax, lip balm and hand cream. Renting your bees for pollination of crops such as almonds is another consideration.
If you have a few hundred hives to maintain then hiring suitable staff will be necessary too. That’s another cost to factor in.
Hobby
Each hive will take somewhere between 20 and 40 hours a year to maintain, so as a hobbyist I suggest obtaining one or two hives to begin with to determine if it’s a hobby you would like to continue with. Then if for some reason you find beekeeping is not for you, you haven’t outlaid too much money.
Remember you will need to purchase a beekeeping suit or jacket as well as the hive hardware, hive tool, brush and smoker.There is another alternative to owning and maintaining hives. Some beekeepers will situate a hive on your property at no cost. They will come and maintain the hive for you and in return for using your land will give you some of the honey harvested. If you would rather not have to look after bees, but enjoy the honey and want to benefit your plants, then this is a great idea. It gives you the opportunity to find out what beekeeping is about at no real cost.
What Do I Need To Know First?
Learn as much as you can before you take up beekeeping. By becoming informed you can decide if beekeeping is actually the hobby for you.
As there are so many aspects to beekeeping from purchasing the hardware to extracting the honey, it’s best to learn from an experienced beekeeper who lives in your area. Join your local club and ask if you could ‘shadow’ an experienced beekeeper for a few weeks.
There are online courses and day or evening courses on aspects of beekeeping. Your local club will cover seasonal topics during their meetings too.
In addition there are books you can borrow or buy. Just be sure the text you are reading is relevant and refers to beekeeping in your particular country and local area.
How Much Time Do I Have To Look After Them?
Approximately 20 to 40 hours per year are needed to maintain one hive. Beekeeping is a seasonal activity, there’s a lot more work to do during the Spring and Summer months when the bees are most active and plants are flowering.
In Autumn and Winter there is less to do, maintaining and purchasing new hardware and the occasional inspection on sunny days to check on the health of the hive.
Your personal circumstances will determine the amount of time you have. Your usual activities can easily be maintained even if you take up beekeeping as a hobby and only have one or two hives.
When I retired, I decided I’d like to keep bees as a hobby, so I purchased one hive. Holidays to escape the Winter months still took place as the weather was too cold to inspect the hive anyway. Helpful members of the beekeeping club offered to take a look at the hive if needed while we were on vacation.
So the amount of time needed to manage a hive is really very little. It all depends upon you and how serious a pastime you want to make of beekeeping.
What Am I Willing To Invest In Terms Of Money?
In addition to having done some background research, deciding your reasons for keeping bees and how much time you can devote to looking after them, assess the costs involved in setting up your apiary.
Once you know how many beehives you intend to keep you can determine your cost. Essentially you will need:
1. Hive bodies, base and lid
The cost of these depends upon the type of hive you purchase, whether it is new or used, assembled or unassembled and where you purchase it from.
New Langstroth hive bodies, plus a base and a lid can range from approximately $100 to $300 in Australia. Costs vary depending on where you live in the world, so do some preliminary research.
The price varies, depending whether you make your purchase online, from a member of your bee club or a beekeeping supply store. Hives can be made from other materials other than wood too, such as polystyrene, and their cost will be different again. Buying in bulk and assembling the hives yourself also reduces cost.
I’d be wary of buying any used wood ware because it may harbour disease. If you do choose a used hive, check to see if it’s in good condition and have it irradiated first to kill any possible disease.
2. Bees
The cost of a starter package of bees with a queen can be free if you catch a swarm. Bees are available in the Spring when the weather warms up, plants are in flower and bee numbers increase.
Your local beekeeping club may have a swarm collection and allocation service in Spring through to Summer. Put your name on their list, then offer to go out with the beekeeper to collect the swarm when it’s available.
A bee ‘package’ is a small colony of bees that have been split or created from a larger colony. They are often known as a nucleus hive because the hive is centred around a queen bee. Nucleus hives of bees can be purchased online or from some beekeeping supply places. They are seasonal and are often booked in advance.
For an outlay of approximately $200 to $400 Australian you can purchase a queen, bees, brood in various stages of growth and a five frame nucleus hive (or ‘nuc’ for short). The nucleus hive should also have some honey stored in the frames too. An instruction sheet explaining how to care for the hive is usually included.
Additional costs include protective clothing, hive tools, bee brush and smoker. There are other items you can purchase to make your work as a beekeeping easier. Investigate each additional item before purchase to evaluate if it is really necessary.
The costs outlined above are made at the beginning and are relatively inexpensive. Over time though some of the hives will need repairing or replacing so that is an additional cost. If the bees die for some reason or decide to leave then additional bees will have to be obtained too.
Selling your honey will help recoup some of your expenditure.
Where Will You Keep The Hives?
The area of land needed for your hive or hives depends upon how many hives you intend to keep. The first thing to do is to check with your local council to determine how many hives you can house on your property.
Around each hive leave approximately one metre so you can easily walk around the hive and have room to place boxes and frames during an inspection.
If your intention is to make beekeeping a profitable commercial enterprise then you will need a much larger parcel of land to house your hives. You may be able to lease some land, or the owner of the property may pay you to site your hives on their land. The number of hives you want depends upon how many you can physically manage.
Conclusion
If after all your research you decide you don’t wish to keep bees, then some beekeepers allow you to host a hive for a one off cost. All the work of managing the hive is done for you and you can join in hive inspections if you wish.
Another added benefit is increased production in your orchard and/or veggie patch, as well as some of the honey from the hive at harvest time.
Beekeeping is a fascinating pastime and a wonderful way to help the environment. If you are interested in keeping bees but aren’t sure just how many hives to have or how much time you wish to devote to managing them, then I strongly advise you to do some research.
Reading books and going online are a good start, but I believe your best strategy is hands on learning. Become a member of your local beekeeping club, or find a beekeeper who will allow you to shadow them for a few weeks.
By doing so you can discover if keeping bees is really for you and just how much time you’ll need to maintain one hive or several.
Essential Beekeeping Tools for Beginners
Essential Beekeeping Tools for Beginners
Source: https://busybeekeeping.com
As a new beekeeper, there are several basic pieces of equipment you will need to work with your bees. These items include a smoker, a bee brush, one or more hive tools and some form of protective clothing.

When choosing equipment, there are various designs available and it can become confusing as to which style would be the best one for you. I’d suggest you talk with an experienced beekeeper to find out what he or she uses.
An even better idea would be to ask if you can attend their next hive inspection. This will give you first-hand experience and a close look at what tools the beekeeper is using, as well as how he or she uses them. Experienced beekeepers are usually very willing to share – observe closely and ask questions as the inspection proceeds.
What Tools Do You Need For Beekeeping?
Here are the tools I recommend as absolutely necessary when starting as a beekeeper:
The Hive Tool
The hive tool is a robust metal tool used to remove the lid and the frames from the hive without damaging them. It’s also used to remove burr comb from around the frames, sides of the box and under the lid. Bees build a lot of extra comb which can make removing the lid and the frames difficult.
There are two designs of hive tool, the Australian and the American. I prefer the Australian design, though both have advantages. Within each design there are different styles and sizes. As you gain knowledge and experience in using your hive tool, you will be able to work out which one suits you best.
I think it’s actually a good idea to have more than one. First of all, if you have more than one hive to inspect, using a separate hive tool for each reduces the risk of possible disease being transferred between them. Secondly, you may misplace one of them so a spare is always handy.
After each inspection, I clean my hive tool in a bucket with some bleach, as well as scraping off any sticky comb with a scourer. The hive tool can also be cleaned by placing it inside a burning smoker, effectively sterilizing it too. I’ve never tried this method but it makes sense, given the smoker is used during an inspection anyway.
The Australian or J-tool
The Australian hive tool is often called a J-tool because one end of it looks like a big metal J. It’s usually the most preferred tool of choice for beekeepers.

The end with the J hook allows you to easily remove frames by hooking the J under the end of one frame and levering it up. The other end of the hive tool has a sharp, chisel-like edge and this is effective in opening up the lid, levering apart frames and boxes that the bees have glued together with excess comb.
It’s also useful to remove burr comb from inside the lid and boxes. Burr comb is the small pieces of wax workers build in places other than the central part of the frames.
The American Hive Tool
The American hive tool has a crowbar shaped hook at one end instead of the J and a chisel-shaped edge at the other end, just like the Australian hive tool. The crowbar shaped hook isn’t as effective when attempting to separate frames that have been glued together by the bees because it is thicker than the J tool and can’t as easily get between the frames. The J tool can more easily raise the frame enough for the beekeeper to get a good grasp on the top of the frame.
However, the American hive tool can be a better choice if you have many hives to inspect. When removing a glued lid, the beekeeper inserts the chisel-shaped end between the lid and the box and hits the palm of the hand against the bent crowbar end. If a beekeeper has many lids to lever open each time, the bent crowbar end can be hit with the palm of the hand without the hand getting too sore.

Just make sure when choosing your hive tool that the chisel end is sharp and can be levered between the lid and the box to open it, as sometimes the chisel end is too thick and won’t do the job as effectively. If it’s too thick then you can end up damaging your hive or lid.
Bee Smoker
One of the most important tools a beekeeper uses when inspecting a hive is a smoker. It’s used by beekeepers because the smoke from it helps to calm the bees and diverts their attention to the protection of the hive and away from the beekeeper.
I’d recommend you purchase the best quality one you can afford because it’s a tool you will use often, and for a very long time.
A smoker is comprised of several parts: a steel cylinder that holds the burnable fuel, the leather or vinyl bellows that keep the fuel alight and the lid from which the smoke issues. Many smokers also have a heat shield around the outside that protects you from getting burnt. I recommend when you purchase one to get one with the heat shield.
Before purchasing a smoker I’d suggest that, as a new beekeeper, you go to a more experienced beekeeper for advice about the size and type of smoker he or she uses.
If you only have a few hives to inspect then a medium-sized smoker should be suitable for you. It’s convenient because it is not too heavy to carry. Just make sure you take extra fuel with you to the hive site to ensure you’re prepared in case the smoker should go out. I’ve sometimes been so enthralled at looking inside the hive that I’ve forgotten to activate the bellows to keep the cool smoke going. You don’t want that to slow down your inspections!
I purchased a small smoker at first but after a few inspections I bought a medium-sized smoker because I could light it more easily and it stayed alight for longer too.

Unless you’re a commercial beekeeper with many hives to inspect then you probably won’t need a large smoker with a greater capacity to hold fuel and to stay alight longer. These are naturally heavier to hold and operate.
Bee Brush
The bee brush is not an expensive piece of equipment, but it is essential. It’s used to gently remove bees from frames or the edges of the hive box or lid, so when you replace the lid there’s less likelihood of squashing any bees.
Usually, nylon or horsehair bristles are used. Either is fine, just as long as it’s a brush specifically used for bees. The brush will have a single row of bristles so that during use bees won’t become trapped in the bristles. I prefer horsehair as it’s a ‘natural’ type of product and is softer, but I find the horsehair bristles lose their shape after a few rinses and splay out. The nylon bristles on the other hand don’t lose their shape when you wash them, but aren’t soft.

It’s entirely up to you what you prefer, just don’t try using a brush from a dustpan as it will trap and annoy the bees. As well as trapping bees, other debris can get caught in the bristles too. As with the hive tool, you must clean your brush as it can harbor and transmit disease. I put mine in a bucket with some bleach in it.
Summing Up – Tools You Need For Beekeeping
The three basic tools you need as a new beekeeper are the hive tool, the smoker and the bee brush. These items come in various designs so it’s a great idea to talk to an experienced beekeeper about what they are using before you visit a beekeeping supply store to look at what they have available. In my opinion, buy the best you can afford as you want the equipment to feel comfortable and serve you well. A well-designed tool, if properly taken care of, can last many years.
What to Do During Your First Beehive Inspection(s)
What to Do During Your First Beehive Inspection(s)

Once you have your first hive in place, you’ll be keen to conduct your first inspection. Beekeeping is seasonal, with different tasks for each season. However, in the first year of hive management, as a new beekeeper the main aim is to gain confidence and experience in opening the hive and learning about the colony of bees.
You will need to learn about their behaviour and their health by close observation of the hive, and the activity of the bees both inside and outside. You can learn a great deal by observing the bees coming and going to the hive.
How Often Should You Inspect Your Hive?
In your first months as a beekeeper, it’s a good idea to conduct inspections approximately every two weeks, weather permitting. It’s not necessary to remove all frames during the fortnightly visits, as this may disturb the bees. The main aim of your first inspections is to gain experience and confidence in opening the hive.
Keep a Diary After Each Inspection
Before my first inspection, I decided to use an exercise book as a diary to record what I saw. It’s a great resource as it helps you record your observations and it reminds you what was going on last time you conducted an inspection.
You can record not only what you saw, but also what you might need to do the next time you inspect the hive. I always re-read what I wrote the previous time before I undertake the following inspection to serve as a reminder.
Your log entry should begin with the date and weather conditions. I then use headings to remind me what to look for. These include:
Food: Is there honey and pollen stored in the frames? If so, how much?
Eggs: Are there eggs (tiny white specks) or larvae at the bottom of the cells? Look for eggs or larvae if you can’t see the queen.
Space: Is there enough space for the queen to lay eggs or for honey to be stored?
Disease: Are there any signs of disease or pests?
Ask for Help During Your First Inspection
As well as a logbook, I would ask a more experienced beekeeper to help you during your first inspection or inspections. If you are a member of a local bee club or association, talk with members to find an experienced beekeeper that lives near you.
Experienced beekeepers are usually very willing to help. With their guidance, you will gain knowledge of what to look for and what to do during inspections. You will become more confident in yourself too. Confidence helps you inspect without fear of being stung!
Inspecting the Brood Box
Before you inspect the hive, assemble your tools, put on your suit or other suitable beekeeping clothes and light your smoker. As well as the smoker, your tools will include a hive tool, which is used to prise open the lid and manipulate frames, and a bee brush used to gently brush the bees from the frames.
Another useful, optional tool is a frame holder that is attached to the super. This will hold removed frames rather than resting them on the ground against the brood box. An alternative to this is an empty box or super in which to place the frames. I place my empty super on the upturned hive lid as it will prevent any bees from ending up on the ground and getting squashed.
Ensure your smoker is well lit and emitting plenty of cool smoke before you approach the hive. I carry my smoker in a metal bucket to keep it off the ground and upright during an inspection. I also have the bag of fuel nearby in case I need to add more to the smoker.
Before opening the hive, administer a few puffs of smoke directly into the hive entrance. Then move around to the side of the hive and slide the lid open enough to add a few puffs of smoke. Wait about 30 seconds, then remove the lid and rest it upside down beside the hive.
Direct a few more puffs down between the frames. This will send the bees down further between the frames. Look down between the frames to check how many bees you can see in the hive.
Remember, it’s important to remind yourself not to use too much smoke. You only need enough to quieten the bees. Too much smoke and the colony may require several days to recover. However, if the bees are agitated or a bit aggressive, you may need to use smoke during the inspection.
In the beginning, inspections can take a while because you are learning what to do, so the bees may get annoyed. That’s when it’s handy to use a little bit more smoke, but just a couple of gentle puffs.
Using your hive tool, remove the second frame in from the side nearest you. This is the first one you will inspect.
Gently brush or shake the bees back into the hive. Look at both sides of the frame and check for eggs, larvae, brood (capped larvae), pollen, capped and uncapped honey. Can you see the queen bee? It’s worth trying to find her. She’ll most likely be on a frame that has larvae and eggs, towards the centre of the hive. Don’t worry if you can’t see her. She’s difficult for a beginner to spot, but it’s worth trying.
Take a mental note of what you see before placing the frame gently on the ground against the brood box. Alternatively, if you have an empty super or frame holder, you can put the frame in there.
It’s important to start with the second frame in as the bees may have secured the first frame to the side of the box. If you try to force it away, it may become damaged. If you have an experienced beekeeper guiding you, be sure to ask questions about what you see and what, if anything may be of concern.
Now that the second frame has been removed, use your hive tool to gently pull the first frame away from the side of the box and lift it up. This is the second one you are inspecting. You’ll be looking for the same things as before: eggs, capped or uncapped larvae, pollen, capped and uncapped honey.
Pollen is the protein component of a bee’s diet and is carried to the hive on its hairy legs. Pollen has distinct colors which are easily identified in the frame cells. Once again, after inspection leave this frame outside the hive, by leaning it up against the brood box, in the frame holder or in the empty super.
Next, gently lever the third frame away from the fourth one and remove it for inspection. After you inspect this frame, place it back in the hive slightly away from the other frames to allow yourself plenty of room to examine the fourth, and then the remaining, frames.
You don’t need to take them all out completely – removing the first two will give you ample room to examine the rest comfortably. Once you have inspected all the frames, place them back into the brood box in the order you removed them.
Finishing Up
While the hive is open, take the opportunity to scrape off any burr comb from the walls or frames too. Burr comb is the extra comb bees often build between and on top of the frames, and it prevents you from removing the lid and separating the frames.
As you get experience, there’s no need to examine all the frames each and every time you conduct a hive inspection. With experience, you will obtain enough information by removing two or three random frames during an inspection, as well as looking down between the frames to see how healthy the bee population is.
Knowing how to inspect your hive is an essential skill that ensures the health of your bees. Keeping bees is a fascinating and enjoyable pastime, and as you gain knowledge and confidence in handling your hives, it will become even more so.
Why Do Beekeepers Use Smoke?
Why Do Beekeepers Use Smoke?
Source: https://busybeekeeping.com
You may have seen videos or pictures of beekeepers using smoke when they inspect a beehive. Perhaps you’ve even witnessed it firsthand. This comes from a smoker – a steel cylinder which contains smoldering material that emits a cool, white smoke. A smoker is one of the most important tools of a beekeeper, as they use it to pump smoke into the hive immediately before, and during, an inspection. Why is this important?
Beekeepers use smoke because it calms the bees and allows the beekeeper to inspect the hive more easily without being stung. Not a lot of smoke is needed, and the interruption that’s caused by the smoke is temporary, allowing the bees to recover within 30 minutes. This enables beekeepers to inspect the hive without harming bees unnecessarily.
Smoke Subdues The Defensive Alarms Of Honey Bees
Although bees are typically friendly, they do become defensive during a hive inspection because they have brood (babies), a queen and honey inside. That’s why bees are very protective of their hive and will quickly defend it if they perceive danger.
To alert other bees of the threat, bees secrete a chemical substance from glands on their bodies. This chemical substance is sometimes known as an alarm pheromone. It is called this because it stimulates an alarm response in other bees.
Upon detecting the alarm pheromone, other bees will become aware that the hive is under attack. They will do two things. Firstly, they will emit more of the alarm pheromone to alert other bees. Secondly, they will defend the hive against the attacker, usually by stinging. As more and more bees emit the alarm pheromones, a greater defense will mobilize against the predator.
When inspecting a hive, smoke is an excellent tool to prevent bees from attacking you. Smoke is effective because it dulls the bees’ sense of smell. This reduces their ability to detect the alarm pheromones from other bees. The bees will calm down as they no longer think the hive is being attacked, leaving them less likely to sting as a result.
An injured bee will also secrete the same pheromone to attract other bees to its location. That means that, if a bee stings you, other bees will become alert and may try to sting you as well. However, a few puffs of cool smoke will calm the agitated bees and allow you to proceed with the inspection more comfortably.
Inside the Hive, Bees Go into Survival Mode When They Detect Smoke
Besides subduing the defensive alarms of honey bees, smoke has another effect. When bees smell smoke, they associate it with fire. Their immediate reaction is to begin gorging themselves on the available honey from the hive.
The reason bees do this is that they perceive the hive is being threatened by fire, and they need to look for a new home away from the danger. If they do leave the hive, the bees will build a new one in another location. To do so, they need a lot of honey. This is why they begin gorging themselves when they sense smoke.
When bees become engorged with honey, they are usually more docile and less likely to sting as a result. A word of caution, though – use smoke in moderation. Using too much of it will cause larger numbers of bees to eat up honey and to leave the hive.
How To Use A Smoker
A smoker is an essential piece of equipment for the beekeeper. Smokers are made of hard-wearing stainless steel, with bellows to depress to get the fuel burning and to keep it going.
Smokers vary in size from small to large with a lid and a spout. They have a grill inside the cylinder which helps distribute air and stops the fuel burning through the base of the smoker. Your smoker should have a metal cage around it so that you won’t burn your hand on the hot cylinder.
My initial purchase was a small smoker, which I thought would be sufficiently large enough for me as I just had one hive to attend to at the time. As a new beekeeper, I was hesitant and a bit slow with my inspections, and I soon discovered that occasionally the smoker would go out before I had finished.
I was so absorbed in what I was doing that I often forgot to keep depressing the bellows. As a result, I would end up having to either cease the inspection quickly or try to get the smoker going again by furiously pumping the bellows.
Therefore, for the novice beekeeper with one or two hives, I recommend using a medium-sized smoker because of its convenience. It’s not too heavy to hold and can stay alight for longer. This allows you to conduct your inspection thoroughly without worrying about the smoker going out, and you can inspect more than one hive.
Naturally, as you gain more experience and confidence, you will be able to inspect the hive more efficiently and thus disturb the bees less.

What To Use For Fuel
I always ensure I put plenty of fuel in the smoker to keep it going for a reasonable amount of time, and I take the bag of fuel with me to the hive, so I have it at hand should the smoker need to be topped up.
To fuel the smoker initially I insert some shredded or torn newspaper into the cylinder and set alight. I use long-stemmed matches, but a barbecue lighter is also a good idea. It has a long metal end that can be pushed into the fuel inside the cylinder, therefore more successfully keeping the smoker alight.
When lighting your smoker, keep the lid open and gently squeeze the bellows to stimulate the flame. Once alight, extra fuel can be added. This can be pine needles, dry gum leaves, old hessian sacking, paperbark or cardboard.
My preference is pine needles as I have access to plenty of them, but you can use whatever you have at hand. Just experiment to see what works best for you and what will produce the cool white smoke needed.
When using smoke on your hive, remember that you don’t need a lot. Only use a few puffs at the entrance, as well as an occasional puff during the inspection.
Other Methods Used To Smoke Honey Bees
Essential oils such as lemongrass, spearmint and peppermint oil can be added to the smoker too. The addition of these oils is meant to enhance the effectiveness of the smoke and further depress the alarm pheromones in bees. Essential oils also have some antibacterial and antifungal properties that some people believe is beneficial to the hive.
I have never tried essential oils, so I can’t comment on their effectiveness. However, it is certainly worth considering and something for you to decide personally. Check with an experienced beekeeper to find out what they use and ask for any recommendations.
Can you Inspect A Hive Without Using Smoke?
Some beekeepers prefer not to use smoke when inspecting a hive. There are numerous reasons for this, and they depend on the beekeeper. Some prefer a completely natural style of beekeeping. Others believe it will affect the taste of their honey.
These beekeepers instead open their hive without smoking the bees. They take great care not to accidentally kill any bees (so as not to set off the alarm pheromone).
While it is certainly possible to inspect a hive without smoke, I prefer not to do so. Most beekeepers who do inspect a hive without smoke tend to be highly experienced, understand the best times of day to open their hive and how to do so without disturbing their bees.
If you are a novice beekeeper, I suggest using smoke. It has proven to be an effective method of calming bees over many years and will help you get used to inspecting your hive.
Conclusion
Beekeepers use smoke to calm bees. This is done to calm the bees, making it easier to inspect the hive without getting stung. While it is not absolutely necessary to use smoke when inspecting a hive, I believe it is a good idea, especially for beginners.
Where To Get Bees For Your New Beehive
Where To Get Bees For Your New Beehive
Source: https://busybeekeeping.com
Not sure where to get bees for your new beehive? It’s a common dilemma when taking up beekeeping. But it’s one that’s easy enough to solve.
There are a few options to choose from when getting bees for a new hive. They are:
–Purchasing a nucleus hive
–Buying a bee package
–Purchasing a second-hand hive
-Collecting a swarm
Each one of these can be a great choice, depending on your situation and individual preferences. However, as a new beekeeper, making the decision can be a daunting task. That’s why I recommend finding and joining a local beekeeping club in your area. Most members will be passionate about beekeeping, and you’ll almost always find someone eager to help newcomers such as yourself.
Seek Advice Before You Get Bees For Your New Hive
If you’re unsure whether or not there is a beekeeping club near you, you can start by typing in ‘beekeeping club’ + your location into Google and see what comes up. If there isn’t a local club, there may be an apiarist association. Here in Australia, for example, there are associations in every state and territory. These associations can be a helpful place to start.
Beekeeping clubs usually hold regular meetings and often have presentations by a guest speaker. They often run courses for beginners to learn about the workings of a hive. If you decide to take part in a course, it’s important to find out first if the course will involve some hands-on experience of looking inside a hive and handling the bees.
Having the hands-on experience will be beneficial as you will meet other new beekeepers too. It’s also confidence building for you as a beginner to be handling the bees under the guidance of an experienced beekeeper.
Getting to know the other beekeepers in the club will make the hobby more fun and increase your knowledge at a rapid rate. Many beekeepers are accommodating and keen to share their knowledge. They may invite you to inspect some of their hives and, with their help, you’ll gain valuable experience in handling frames and boxes or supers full of bees.
At my beekeeping club, part of each meeting is dedicated to getting together with other beekeepers who live nearby. I found this helpful because when I needed advice, these beekeepers were just a few minutes away. We could exchange information about local conditions, what was in flower and the general health of the hive. A beekeeper never stops learning!

Talking with members from your local club will often be the starting point for getting your first bees. They will provide advice and guidance on how to obtain your first colony.
Where To Get Bees For Your New Hive
Now it’s time to discuss the main options when getting bees for a new hive. Here they are:
A Nucleus Hive
A nucleus (or nuc for short) hive is a small hive is made up of a box, four or five frames of brood (or baby bees), bees, a queen and honey. It is often created from an established hive and is housed in a small box ready to be taken to your property and placed in your hive.
A nucleus hive can be obtained online from sellers and often comes with instructions about how to transport it, as well as when to transfer the bees to your hive.
Remember, if you buy a nucleus hive, the frames need to match those in your hive. You should also have your hive ready and in position before transferring the bees.
Talk with the seller and ask them about the type and temperament of the bees and the queen you are purchasing. If feeling confident, you can transfer them yourself, or ask for help from a member of your local club.
A Bee Package
A bee package consists of a queen in a cage, approximately 8,000 to 12,000 bees and a feeder of sugar syrup to feed the bees.
Bee packages are available from beekeeping equipment shops or bee suppliers in Spring. I’d recommend you check with your local beekeeping club to find a reputable supplier.
Contact the supplier you choose as you may need to order the package of bees in advance. You should also ask the supplier about the temperament of the queen and the colony. Sourcing bees this way has the advantage of a young queen and a healthy bee population.
The bee supplier should provide you with instructions on installing the package of bees into their new home at your place and introducing the queen bee to the workers.
Usually, the queen comes in a small, separate cage. This cage is placed between two frames, and the worker bees eat their way through the food plug in her cage. By that time her pheromones (scent) will have permeated the hive, and she will be accepted. Once again, depending on how confident you are feeling, you could install the package yourself, or ask for help from a member of your beekeeping club.
An Existing Hive
If you want to buy an existing hive, enquire with your local bee club first to find a reputable seller. You could go online and purchase one by yourself, but I don’t recommend it to new beekeepers who may not know what to look for. You could be making an expensive mistake unless you and a more knowledgeable beekeeper can do an inspection first. This may be impossible if the hive is some distance from you. Possible problems include:
- The boxes could be in poor condition and need repair
- The colony may be diseased or cranky
- The queen may be old and need replacing
Getting a hive from a reliable source has many advantages. First of all, you should be able to inspect the hive and ask questions of the seller, such as the age of the queen and the temperament of the colony.
Secondly, you can inspect the condition of the boxes and the frames, base and lid. Remember, the hive you purchase should be housed on the same sized frames you have.
A reputable seller will generally be happy for you to take a good look around, as they will be proud of their apiary. They’ll also most likely advise you on where to place your hive.
A Swarm
Obtaining a swarm is the least expensive way to get bees for your beehive. A bee swarm consists of a queen and several thousand bees that have decided to leave an existing hive. They most often do this because they perceive there is insufficient space in the hive, so a new queen is developed and the older queen, along with approximately half of the bees, leave the hive to look for a new home.
Bees swarm in the Spring and Summer seasons. Before doing so, the worker bees eat as much of the honey as they can – because they don’t know where their new home will be. They leave and cluster together in a temporary location while several bees fly away in search of a suitable location.
Bees in a swarm are generally submissive and good-tempered because they don’t have food or a brood (baby bees) to defend. It’s a different story if the bees have established themselves in an area, have built comb and have a queen that is actively laying. They can be protective and act aggressively if you disturb them. You’ll need to wear protective gear when catching a swarm, even if the bees seem calm.

If you decide to obtain a swarm, then assemble your hive first, set up the bottom, the frames inside the box and the lid, and position it on your property.
If you let your local club know, they can get a swarm for you and help you to place it in your hive. They may charge a small fee for doing so. Ask if you can join them and help capture the swarm. It’s a great experience, and the more hands-on involvement you acquire, the more confident you’ll become.
At our club there is a contact person called a swarm coordinator who’ll take your details and let you know when a swarm in your area becomes available.
The most significant advantage of obtaining a swarm is the cost. On top of that, by taking a swarm, you may be doing a community service – because the bees may be in an unwanted location.
If you or another beekeeper can remove the swarm humanely, then methods that are detrimental to the bees and the environment, in general, are avoided.
Obtaining a swarm has its disadvantages too. The queen may be old, and the bees unfriendly. They may have a disease or a pest that has been carried from their previous home and into yours.
These problems can be hard to detect until after you have placed the swarm in your hive, by which time it will be a more challenging issue to solve.
Conclusion
There are several choices and considerations you need to make when obtaining your first bees. I would recommend you learn as much as you can before getting your first colony.
Attend hands-on workshops, ask to visit experienced beekeepers and inspect their hive under guidance. Ask to join in when catching swarms. All these opportunities help develop your knowledge and confidence around bees.
In my experience, it’s a better alternative than learning after you have acquired your first hive. Because I lacked sufficient knowledge when I obtained my very first hive, I was unaware of what to look for and where to go for advice. Sadly, I lost my hive during the Winter as a result. This could have been avoided by getting more experience before setting up my hive.
So join a club or association, become educated and then choose how you will obtain your first bees!
where should i place my beehive?
where should i place my beehive?
Source: https://busybeekeeping.com

Where to place your beehive is one of the first decisions you will make after deciding to take up beekeeping. There are numerous factors you should consider before settling on a long-term home for your bees.
Paying attention to each one can help your bees to thrive. Do NOT just place it in a random spot in your backyard and hope for the best.
Place your beehive somewhere easily accessible, in a location which receives morning sunlight which is not subject to any substantial wind. This will protect the hive from harsh weather conditions and ensure your bees remain active. You should also alert your neighbors you are getting a hive and check your local council regulations so you can adhere to any siting restrictions.
Check With Your Council Or Local Government
It’s worth contacting your local council or governing authority to find out the regulations about keeping bees in your area before you even purchase your first hive. Laws differ from country to country and state to state. Some areas may have strict rules which could affect your decision to take up beekeeping. Others may be far more relaxed.
Your local government will be able to tell you everything you need to know about the relevant legal restrictions in place. This will include where you can and cannot place your hive, how many hives you are allowed to have according to the size of your land, and how close to a neighboring fence or house you can place your hive.
Allow For Easy Access
Your chosen location must be easily accessible. You will be visiting the site regularly to check on the hive. From time to time, you may also need to be able to carry heavy equipment or supers full of honey to and from the hive.
Leave enough space around the outside of your hive, so you have room to access the colony from any side. Cut down any long grass and make sure you keep it low, especially from the front of the hive. The bees need a clear landing area. You can elevate the hive using large bricks or blocks of wood. I have also found it’s beneficial to keep the hive off the ground, as it allows air to circulate underneath.
Bees Love The Morning Sun
Warmth is essential for Bees. They need a body temperature of at least 35°C or 95°F to fly. That’s why you’ll notice far less activity from your beehive during the colder months.
For this reason, it is best to have the entrance of your hive facing the morning sun. The morning sun will stimulate your bees, and get them moving early so they can maximize the collection of nectar and pollen.
Consider Your Climate
You also need to consider the climate in which you live, as it plays an essential role in deciding where you place your hive. Is it boiling warm in Summer or freezing in Winter? Will your bees have both sun and shade to avoid the weather extremes? You want to choose the best location for your hive so your bees can be kept happy, healthy and productive – and this can change depending on the time of the year.
Summer
If you live in an area with hot summers, it’s best to locate the hive near some trees that will provide shade during the warmest part of the day. Providing shade during the hottest part of the day will help the colony more easily maintain a constant temperature. As a result, your bees will be under less stress – and more productive.
Winter
During Winter, your hive needs to receive sunlight too. Too much shade and the bees will have to expend more energy to keep the colony warm. This could also cause the hive to be subject to mold inside, as bees breathe out moisture just like we do.
I like to have my hive tilted forward slightly. This will help any condensation to drain out. If the hive is level, the condensation can pool inside without being able to escape. It’s also a good idea to keep the hive in an elevated location, not down in a valley where fog or mist may accumulate.
Move Your Hive To Avoid Extreme Temperatures
Depending upon where you live and your climate, you may consider moving your hive from its regular site in the Summer to another location during the Winter. If your climate is tropical, for instance, you can move your hive to a shady part of the yard during Summer. This will ensure your bees can continue to live in the best conditions possible all year round. Just remember, get some advice from an experienced beekeeper in your area before deciding to move your hive.
Give The Hive Protection From Wind
Strong winds hamper the bees’ ability to fly and therefore their ability to collect nectar and pollen. Heavy winds can also topple your beehive or blow off the cover, which could be disastrous for your colony. I keep a heavy brick on the lid of my hive to secure it.
Even if you weigh down your hive, you still need to consider wind when choosing where to place it. Try to avoid anywhere which attracts strong drafts and look for a location close to a shed or tree line to give the hive some protection against the wind.
Ensure There Is A Fresh Source Of Water
Like all living creatures, honeybees need water. This becomes especially important during warmer months. While bees can travel up quite a distance for water, you should ensure you have a clean source for them to drink a lot closer to their hive. Travelling that far for water is tiring work and the bees won’t have as much energy to forage for essential pollen and nectar.
Providing your bees with multiple sources of clean water will ensure they don’t have to go searching elsewhere for it. You don’t want them to rely on a neighbor’s swimming pool or dog bowl. This can create problems. You don’t want your bees drinking chlorinated water – but you also don’t want your neighbors complaining that their kids were stung while swimming.
To avoid this problem, find a few spots in your backyard close to your hive and place a container filled with fresh water. I use saucers and the bases of pot plants filled with water, but any small, shallow container will work well. Place stones or pebbles in the container for the bees to land on. Another alternative is a birdbath with some sticks or rocks as landing pads. Just make sure the water is replenished when needed.
Face Away From Nearby People
While bees generally stay within 3 km or 2 miles of their hive to forage, they have been known to travel much further in search of nectar and pollen. That’s why you should consider the area surrounding your property, as well as your backyard itself.
It’s a good idea to keep your hive from facing roads, footpaths or garden paths where the bees are likely to establish a flight path and run into unhappy pedestrians or vehicles.
Keep Your Backyard Clean
While your bees will keep the interior of their hive in a very clean condition, they will drop their excrement as they fly. Of course, this will not cause as big of a mess as a bird might. However, I would still make sure your bees flight path is not over your washing line, or your clothes and sheets will end up having peculiar, orange-colored spots on them.
Check With Your Neighbors
As a beekeeper, you have a duty of care to your neighbors. You need to make sure that your hive will not be a nuisance to them. It’s an excellent idea to keep ‘calm’ bees. An aggressive colony will be harder for you to manage and increase the chance of a problem with your neighbors.
When purchasing bees, opt for a gentle bee package from your seller. Bee sellers can be found on the internet, or you might find a contact through talking to members of your local beekeeping club. When buying bees, contact the seller and ask if you can go and inspect them first. Get someone experienced in beekeeping to go with you so you can see they are indeed a passive colony.
You should also follow any guidelines your government has in relation to keeping bees. In Australia, for instance, there is an Apiary Code of Practice for each state and territory. It outlines the best way to keep bees so they will not be a problem to others. If you are following this Code of Practice and there’s a complaint, and you can show you are following the code for your state, then you most likely will be supported by those investigating.
Conclusion
As you can see, there are many things to think about when placing a hive on your property. Make sure you take each of these factors into consideration when siting your beehive. This will give your bees optimal conditions in which they can thrive, and a positive experience for you!
Types of Beehives For Beginners: The 3 Best Options With Pros And Cons Of Each
Types of Beehives For Beginners: The 3 Best Options With Pros And Cons Of Each
Source: https://busybeekeeping.com

Choosing the best beehive for a beginner can be a daunting task. There are many options available and each one has different advantages and disadvantages. Taking the time to understand the different hives can help you make the right choice and avoid any headaches down the track.
To help make things easier, I’ll go over the three most popular options – the Langstroth, Warré and Top-Bar. Regardless of which one you pick, all three are great beehives for new beekeepers.
The Langstroth Hive

Probably the most commonly used beehive today is the Langstroth hive, named after it’s American inventor, Reverend Lorenzo Langstroth. The Langstroth is a modular beehive, made up of individual oblong timber boxes stacked on top of one another. Each hive needs a lid and removable base as well.
The bottom of the stacked boxes is called the ‘brood box’ – because it houses the queen and the brood. All of the above boxes are referred to as ‘supers’.
The boxes come in different depths, ranging from ‘full depth’ to the shallower ‘ideal’. Usually, the ‘full depth’ box is used as the brood box, because it allows the most room for the queen to lay eggs or brood. The boxes above become the honey boxes (‘supers’) and can be full depth or shallower.
The size you choose can depend upon your age and the strength of your back. A full honey super can be incredibly heavy (up to 40kg, or 90lb).
I use the WSP size, which stands for W.S. Pender named after its Australian designer. I find even when they are full of honey, they can be lifted and carried without back strain.
Inside each box are removable frames. The number of frames in each box will either be eight or ten, depending on whether you opt for an eight-frame or ten-frame Langstroth hive. Each frame has fine taught wire across them to support the wax sheet, which is gently melted onto the wire to keep it in place.
Whether you choose an eight or ten-frame hive you should, for practical reasons, stay with your initial choice and use the same size box for all your future hives. By doing this you will find you can rearrange the boxes in your apiary (bee yard).
The only exception to this rule is if you intend to keep several hives – then you can use both ten-frame and eight-frame hives because you’ll have enough of each to change between the boxes as you wish.
Pros And Cons Langstroth Hives
| Pros | Cons |
| The most commonly-used beehive, meaning measurements are standardised, and equipment and resources are more readily available than other options. | Each box can become quite heavy once filled with honey, making it difficult to lift. |
| The foundational frames allow for more stable comb and are great for new beekeepers. | Removing the lid to inspect the hive is more obtrusive to the bees, meaning you may need to use your smoker more often. |
| The most commonly-used beehive, meaning measurements are standardised, and equipment and resources are more readily available than other options. |
There are two other common types of hives you can consider using apart from the Langstroth. These are the Warré hive and the Top-bar hive.
Both of these hives promote a more natural approach to beekeeping. They use frames, but the frames may consist of only a top bar, or a top and sidebars.
The idea behind these frames is that bees are able to make natural comb according to their needs without the restrictions of a bottom bar or sidebars on the frames.
The Warré Hive

The Warré hive was designed by the French inventor Abbé Emile Warré. While it is also a modular design, the frames in the Warré hive differ from the Langstroth frames. Not only do they lack a bottom bar, but they also have a thin starter strip of foundation across the top, allowing the bees to build the comb the size and shape they need for their colony.
The original design contains no sidebars either, but these can be added to prevent the comb being attached to the sidewalls of the hive.
Another difference between the Warré is that it has an extra small box placed between the top super box and the lid, called a quilt. The purpose of this box is to absorb moisture and provide extra insulation for the colony.
It has a floor made of hessian or cloth and can be filled with insulating materials such as dry leaves, straw or scrunched up paper. The base on the quilt box prevents any of the material falling into the hive.
The management of the Warré hive is also different from the Langstroth hive. When a new box is added, it is inserted at the bottom of the hive, instead of the top.
The bees build comb from top to bottom, meaning the upper boxes are the first to fill up with honey. To harvest, you simply remove the top box as it becomes full. Some Warré hives have viewing windows on each box, making it easy for you to see when they are ready to harvest without disturbing the hive.
Pros And Cons Of Warré Hives
| Pros | Cons |
| Requires less hands-on maintenance than a Langstroth, meaning less disruption for the bees. | Not as common, making it more difficult to find equipment or resources. |
| You can harvest entire boxes of honey at once. | Can become difficult to add boxes to the bottom of the hive, due to the weight. |
| The foundation-less frames allow for a more natural style of beekeeping. |
The Top-Bar Hive

The top-bar hive has two variants – the Kenyan top-bar hive and the Tanzanian top-bar hive. The difference between the two is the sides. The Kenyan top-bar hive has sides that slope towards the base, whereas the Tanzanian top-bar hive has vertical sides. Otherwise, they are constructed the same way.
These hives are less well known than the Langstroth, but they’re considered to be a more natural way to keep bees. Because the frames are foundation-less, they allow the bees to build the comb to the shape and size they need.
Top-bar hives are often called horizontal top-bar hives because the extra space for growth of the colony is obtained by placing the frames along the bar horizontally.
This differs from both the Langstroth and Warré hives, where the colony is expanded vertically by adding boxes. In the top-bar, bees build their comb downwards from the tops of each frame.
Top-bar hives have some distinct advantages – they can be built so that the top is at waist height, making them easy to inspect without any lifting of heavy boxes. Frames can also be easily removed.
When the colony needs extra room, it’s simply a matter of adding extra frames horizontally. An internal partition, called a follower board, is used to give the colony the right amount of room and is simply moved along when more space is needed.
The top-bar hive allows for sidebars to be added to the frames if the beekeeper wishes to use them. This can be a good idea, as it prevents the bees from attaching the comb to the sides of the hive, which then makes the frame difficult to remove.
Top-bar hives are generally inexpensive and easy to make if you have practical know-how, with instructions available in books or online. The hives can be made out of scrap wood or wood purchased inexpensively too. Commercially-made hives or those that come as a kit are more expensive.
Top-bar hives are not as common as Langstroth hives, so individual parts may be difficult to find. However, as more people become interested in beekeeping, particularly natural beekeeping, horizontal top-bar hives are likely to gain more popularity.
Pros And Cons Of Horizontal Hives
| Pros | Cons |
| Great if you have physical limitations because you can place the hive at your desired height. | Not as common, making it more difficult to find equipment or resources. |
| Easy to inspect without the need to lift heavy boxes. | Designs are not standardized, so measurements vary from hive to hive – this can make it difficult to find the correct size parts. |
| Th Less invasive for bees, meaning you won’t have to use your smoker as frequently. | Not as user-friendly for new beekeepers, as frames are foundation-less. |
| Can be a more economical option for those on a budget. |
Summing Up… The Best Type Of Beehive For Beginners
The Langstroth, Warré and Top-Bar are all good beehives for beginners. Ultimately, the one to choose is up to you.
If you’re not sure which beehive is best for you as a beginner, a good idea is to ask local beekeepers or beekeeping club which hives are commonly used in your area. This will ensure you can find support when starting out.
As for my personal preference – I use the Langstroth. It is the most common and resources and equipment are widely available. This makes it easy to find solutions to any problems I encounter along the way. The added peace of mind has made it the ideal first beehive.
Uniting Two Bee Colonies: When To Do It And How
Uniting Two Bee Colonies: When To Do It And How
Source: https://busybeekeeping.com
As a beekeeper, there are times when you might need to unite two bee colonies together.
Should you have a weak colony, for example, you can unite it with a strong one to ensure its survival. Alternatively, if you have two weak colonies, you can combine them together to create a single, stronger colony.
Your bee colonies will not unite naturally because each has a distinct scent. As such, any bee from another colony will be recognized as an intruder and attacked. Therefore, uniting two bee colonies must be done slowly, giving enough time for the two odors to merge.
Combining Two Bee Hives With Newspaper
I think the best and most straightforward way to combine hives is the newspaper method. For the newspaper method, you should place the weak hive on top of the strong one, with a layer of newspaper in between.
The newspaper method allows the two hives to unite gradually because the pheromones from each one will merge over time through the layer of newspaper. The bees will slowly chew through the newspaper barrier between them. By the time they do, the colonies will be used to each other and unite without fighting.
When To Combine Two Beehives
Hives that are healthy and working well on their don’t need to be combined. However, there are certain situations when combining two hives may be the best way of solving a problem. Here are some of the reasons to combine two hives together:
One Of The Hives Is Weak
Combining two hives can be performed if you have one weak hive and one strong hive. In this instance, you should use the strong one as the base and place the weak one on top.
If the weak hive has a queen, you will need to remove her before uniting them. Don’t leave both queens to fight it out. Although the strong queen will most likely prevail, she may get injured in the confrontation.
One Hive Is Queenless
If the queen dies or has gone missing, you can rescue the hive by requeening. However, sometimes a new queen isn’t available for purchase, especially in the cooler months, so combining two hives becomes a better option.
In this scenario, you can leave the hive with the queen in its location and place the queenless hive on top.
Two Hives Are Weak
If you find yourself in a situation where two of your hives are weak, combining them is a good way to improve the strength of the colonies. This can only be done when at least one hive has a queen.
If both hives have a queen, it’s best to remove one of them before combining. When a new queen becomes available, you can requeen the hive.
Combining two weak hives before Winter is beneficial if the hives have little honey reserves.
Best Time Of Day To Unite Bee Hives
When uniting two beehives together, you should prepare each one during the day when most of the bees are out foraging. This way, you’ll have fewer bees to deal with and less chance of being stung.
Choose a day when the temperature is above 18°C (64°F), and there is little wind. The best time of day to do the actual uniting of the two colonies is late in the afternoon when most of the foraging bees have returned, and the hive is quiet.
The best time of year to unite the two colonies is Autumn, after the honey has been harvested, because it’s easier to join the two colonies together without having to lift the heavy honey supers as well.
If both of the colonies are queenright (that is, both of them have a queen), you will need to decide which queen you are going to keep and destroy the other one.
Uniting Two Bee Colonies: Step By Step
Unite your two bee colonies by taking the following steps:
1. Determine the stronger colony
Identify which of the colonies is the strongest by checking the number of bees in each. Which hive has the most bees? Leave the strongest colony in its location. The weaker one will be placed on top.
2. Smoke and open the weak hive
If the hive is in two boxes and can be consolidated into one, then manipulate the frames so you end up with one box. Do this by finding the best 8 or 10 frames – the frames with the most capped brood, eggs, and honey.
If all the frames in the two boxes are full or nearly full, then leave them intact.
Find the queen if there is one, and remove her before you combine the two hives.
3. Smoke and open the strong hive
Remove the lid from the stronger hive and place one sheet of newspaper on the top of the frames.
If it’s windy, keep the paper in place with drawing pins in the corners.
Put a few holes in the newspaper, first – this will allow some of the scent to pass between the two colonies and speed up the unification process. Then replace the lid of the hive and wait until later in the day.

4. Place the weak hive on top of the strong hive
Later in the day, when most of the bees have returned, you can unite the two colonies.
Remove the lid from the strong colony. The bees won’t be disturbed because there is newspaper there acting as a lid.
Carefully place the weaker hive on top of the newspaper, then replace the hive mat (if you are using one) and put the lid back on.
5. Shake any remaining bees in front of the hive
If you have any bees remaining on the base of the weaker hive, you can shake them onto the ground in front of the strong one. They should find their way inside the entrance.
Alternatively, you can shake them directly into the top of the hive (before placing on the lid).

6. Check back on the hive after a few days
Leave the hive alone for a few days to allow the two colonies to combine into one. When you see bits of newspaper being ejected from the front of the hive, you can assume the two colonies have united.
Providing the weather is warm enough, you can inspect the hive and remove the newspaper. When you do, it’s a good idea to rearrange the frames so that all of the brood is together in one area.

Final Thoughts About Uniting Two Bee Colonies
It is helpful to know how to unite two bee colonies, and the newspaper method is really quite straightforward. However, if you are relatively new to beekeeping or would like some advice about uniting two of your colonies, get in touch with your local beekeeping club and talk with an experienced member.
I find it’s best to talk with an experienced local as the advice and help you’ll receive will be specific to your area and situation. They will be willing and able to advise you and may offer to come and help you unite the two colonies if, in fact, it is necessary to do so.
Is Beekeeping Expensive?
Is Beekeeping Expensive?
Source: https://busybeekeeping.com

If you’re interested in becoming a beekeeper, one of the first questions you’ll probably ask is about the cost.
Is beekeeping expensive?
The answer depends a little bit on your definition of the word expensive, and what other hobbies you compare it to. If your hobby is riding motorbikes, for example, beekeeping is not that expensive in comparison. But if your interest is hiking, then you will probably think it is.
Let’s look at the approximate cost across a few different countries to give you an idea of exactly how expensive beekeeping is.
In the U.S.A, beekeeping is a moderately-priced hobby, with startup costs typically ranging between US$220 and US$520, not including bees and a honey extractor.
In Canada startup costs are between CA$400 – CA$600; in Australia, you’ll have to spend between AU$350 – AU$550 to get started; and in the U.K. you need somewhere between £350 – £600.
The good news is that, once you’ve bought all the necessary equipment, there are very minimal ongoing costs you will need to cover.
| U.S.A | Canada | UK | Australia | |
| Startup cost (without bees) | US$220-US$520 | CA$400-CA$600 | £350-£600 | AU$350-AU$600 |
| Startup cost (with bees) | US$420-US$720 | CA$650-CA$850 | £600-£900 | AU$650-AU$900 |
Please note: these estimates do not include equipment used for extracting honey
Startup Costs Of Beekeeping
Let’s look at the basic costs you will need to get started, including the hive, tools and of course, your bees.
These costs are an estimate only. The truth is prices can vary greatly, depending on the quality of equipment. I’ve tried to give an accurate estimate of costs in the middle price range.
It’s also important to note that the hardware costs (hive body, frames, base, and lid) are based on the most popular type of hive which is called the Langstroth hive. The hive body can hold either eight or ten frames. Here I am referring to an eight-frame hive.
Some of the hardware you purchase is less expensive if you buy it in pieces and assemble it yourself, which is why I’ve outlined the estimated cost for both unassembled and assembled items.
Bees
While you can actually get bees for free by capturing a swarm, it’s more common for new beekeepers to buy a nuc, or nucleus colony. A nucleus colony is a small colony of bees with a queen, housed in a small box, usually with five frames inside.
On at least four of those frames there will be brood, pollen, approximately 2000 to 3000 bees and a laying queen bee.
No sugar syrup is provided, as the bees have stored their food as honey on the frames in the nuc.
Nucleus colonies are usually picked up by the new beekeeper from the seller, and sellers are often found locally.
How much do bee nucs cost?
| U.S.A | Canada | UK | Australia | |
| 5-frame nuc | US$150-US$250 | CA$200-CA$300 | £200-£300 | AU$250-AU$350 |
Hive bodies (Boxes) or Supers
A hive body (box) is sometimes called a ‘super’, depending upon its position in the hive. Initially you will need to buy one of these to house your bees.
You can either buy them pre-assembled, or purchase a flat pack version and assemble it yourself. An unassembled one will typically cost less money.
The assembled hive bodies that are available in Australia are often wax dipped and painted. Wax dipping is a process which dries and preserves the timber of the box. The box becomes water repellent and lasts much longer. Painting the box helps it stay weatherproof.
How much does a hive box (or super) usually cost?
| U.S.A | Canada | UK | Australia | |
| Assembled hive box/super | US$25 – US$28 | CA$18 – CA$30 | £27 – £35 | AU$54 – AU$56 |
| Unassembled hive box/super | US$18 – US$20 | CA$16 – CA$18 | £26 – £31 | AU$22 – AU$28 |
Frames
Frames are the structures that slot into the hive and hold the wax upon which the bees build honeycomb for brood or honey.
Frames can be removed in order to inspect the health of the bees or to extract the excess honey. They can be bought with or without wax foundation and even with plastic foundation. The wax or plastic foundation has a hexagonal pattern imprinted into it which gives the bees a pattern on which to build their comb.
Frames without foundation of any sort allows the bees to build the comb to their own needs, but they will take longer to do so.
Like supers, frames can be bought either unassembled or assembled.
Here’s what frames typically cost:
| U.S.A | Canada | UK | Australia | |
| 8X assembled frames | US$24 – US$30 | CA$24 – CA$32 | £35 – £50 | AU$64- AU$72 |
| 8X unassembled frames | US$13 – US$14 | CA$14 – CA$16 | £14 – £17 | AU$13 – AU$16 |
Bottom Board Or Base
The hive body needs a base, with an entrance for the bees to come and go. A base provides protection for your hive from the cold ground and the elements.
A screened bottom board will provide ventilation in warmer or humid climates. The screened bottom board has a removable insert which you can take out to allow more ventilation.
How much does a bottom board cost?
| U.S.A | Canada | UK | Australia | |
| Bottom board | US$22 – US$40 | CA$24 – CA$32 | £19 – £31 | AU$25 – AU$40 |
Lid
The lid or cover on your beehive ensures your bees are protected from the weather and helps the colony to maintain a constant temperature which is necessary to keep the brood alive.
It’s best to get one that will last well in all sorts of weather. A timber lid covered in metal is a good idea. One with holes at either end that are covered with mesh help keep air circulating throughout the hive.
Here’s what a beehive lid usually costs:
| U.S.A | Canada | UK | Australia | |
| Beehive lid | US$25 – US$30 | CA$28- CA$30 | £17 – £51 | AU$20 – AU$30 |
Smoker
One of the important tools a beekeeper uses when inspecting a hive is a smoker. It’s used by beekeepers because smoke helps to calm bees and diverts their attention to the protection of the hive and away from the beekeeper.
I recommend you purchase the highest quality one you can afford because it’s a tool you will use often, and should last for a very long time.
A smoker is comprised of several parts: a steel cylinder that holds the burnable fuel, the leather or vinyl bellows that keep the fuel alight and the lid from which the smoke issues. Many smokers have a heat shield around the outside that protect you from getting burnt.
How much does a bee smoker cost?
| U.S.A | Canada | UK | Australia | |
| Smoker | US$30 – US$50 | CA$32 – CA$40 | £8 – £65 | AU$70 – AU$90 |
Protective Clothing
While bees tend to be friendly, they will attack if they believe their hive is under threat. That’s why almost all beekeepers wear protective clothing such as a beekeeping suit.
A beekeeping suit is typically white because most bees associate dark colors with predators. Suits are usually made from layered fabric to stop a bee’s sting from getting through, just in case. It also comes with a hat and veil to protect your face – which is the most painful area to get stung.
I recommend a lightweight suit that’s breathable because it can get very hot underneath – especially when you’re moving around heavy frames full of honey!
Alternatively, if you don’t want to purchase a full-length suit, you could simply buy a beekeeping jacket. A jacket typically comes with included hat and veil to protect the sensitive facial area.
If you don’t wish to wear either, you can purchase a hat with veil separately, and just wear that with long-sleeved pants and a top to cover your skin.
Here’s what protective clothing usually costs:
| U.S.A | Canada | UK | Australia | |
| Bee suit | US$80 – US$160 | CA$147-CA$160 | £60 – £153 | AU$70 – AU$210 |
| Bee jacket | US$70 – US$120 | CA$129-CA$143 | £49 – £90 | AU$60 – AU$100 |
| Hat with veil | US$13 – US$31 | CA$20 – CA$28 | £7 – £24 | AU$21 – AU$46 |
Gloves
Most beekeeping gloves are made from calf or cow leather and have a long sleeve (or gauntlet) with an elasticized top that prevents bees from crawling inside.
Although gloves provide good protection against stings, the thick material makes it difficult at times to manipulate components of the hive because feeling is lost.
Some beekeepers may decide to use thick rubber gloves or other protective gloves they have at home rather than purchasing a specialized pair, but these don’t provide a long sleeve for protection and there is the possibility of your wrists becoming exposed. Also, they tend not to offer the same level of dexterity when working in the hive.
Costs of beekeeping gloves:
| U.S.A | Canada | UK | Australia | |
| Beekeeping gloves | US$13 – US$28 | CA$21- CA$29 | £1.50 – £47 | AU$20 – AU$42 |
Hive Tool
A hive tool is an essential piece of equipment for a beekeeper. It has multiple uses, allowing you to remove and clean the frames. It can be used to remove burr comb from the lid and top of the hive.
Here’s what a hive tool costs:
| U.S.A | Canada | UK | Australia | |
| Hive tool | US$7 – US$20 | CA$10- CA$12 | £5 – £15 | AU$14 – AU$18 |
Honey Harvesting Equipment
As a first-time beekeeper, you will be excited to extract honey from your hive and you may be wondering how to do it. You may not need to think about when first starting out, as it’s best to grow a strong hive before harvesting any honey. It takes a year or more to get honey from a new hive.
However, when it does come time to harvest honey, you could consider buying an extractor. An extractor makes removing honey easier, quicker and keeps the comb on the frame intact. It’s useful if you have more than one hive and many frames of honey to extract at once. If you join a bee club they often have extractors for hire.
However, an extractor is an expensive piece of equipment and is not the only way to harvest honey. If you only have a few frames ready for honey extraction, then you can use a sieve or strainer to drip and filter cut comb. This way is inexpensive and is a simple way to extract your honey. The disadvantage is this method is slower and doesn’t leave the comb intact for the bees to reuse.
Here’s what an extractor typically costs:
| U.S.A | Canada | UK | Australia | |
| Honey extractor | US$473-US$585 | CA$336- CA$430 | £179 – £742 | AU$704-AU$1124 |
Ongoing Costs Of Beekeeping
The ongoing costs of keeping bees will depend on whether or not you as a beekeeper wish to expand your enterprise. If you view beekeeping as a hobby and wish to keep only one or two hives then your ongoing costs are naturally lower than if you decide to expand your apiary.
How many hives you can manage at once varies from person to person and depends on the amount of time, money, and space you have to keep bees.
Most beekeepers start out with one hive and that’s a good way to go in your first season. I’d suggest after the first season when you are getting the hang of things to consider adding another hive.
Ongoing costs are very low, as your hives will last you for many years, particularly if you buy good quality equipment to begin with.
The following is the cost of extra hardware if you want to increase the number of hives you own:
| U.S.A | Canada | U.K. | Australia | |
| Extra super (box) | US$20 – US$28 | CA$17-CA$23 | £50 – £69 | AU$28 – AU$54 |
| Bottom Board | US$22 – US$40 | CA$24 – CA$32 | £19 – £31 | AU$25 – AU$40 |
| Beehive Lid | US$25 – US$30 | CA$28- CA$30 | £17 – £51 | AU$20 – AU$30 |
| Frames (10) | US $20 – US$40 | CA$0 – CA$40 | £21 – £63 | AU$17 – AU$90 |
In Summary… Is Beekeeping Expensive?
Whether beekeeping is expensive or not depends on your definition of the word expensive, as well as the number of hives you decide to keep. However, compared with most hobbies, beekeeping is reasonably inexpensive.
The more hives you have, and the larger these hives become, the more expensive beekeeping will be as a hobby. I recommend starting small to see if you enjoy beekeeping first, as you can always buy more equipment and bees later on.
Brood Box Vs Super: What Is The Difference?
Brood Box Vs Super: What Is The Difference?
Source: https://busybeekeeping.com
When I first started beekeeping, there were a lot of new terms I had to learn that I found confusing. Two of these were ‘super’ and ‘brood box’.
These terms are used often because they describe where the bees and queen live, the brood is raised and the honey is stored. Where most of the action ‘happens’ is in either the brood box or honey super.
But what does each term refer to? And what is the difference between the two?

Brood Box Vs Honey Super
A Langstroth Hive (the most commonly-used beehive in the U.S) is made up of smaller parts, the majority of which are similarly proportioned boxes stacked on top of each other. Each one of these boxes is either referred to as a brood box or a super, depending on what it is used for.
A brood box is the box that’s used to house both the queen and the brood. It typically sits on the bottom of the hive and forms the base of the structure. A super, on the other hand, usually contains just honey (though it can contain brood as well if a queen excluder is not used). It is often therefore referred to as a honey super.
What Is A Super?
The word ‘super’, in beekeeping terms, is short for ‘superstructure’.
A superstructure is an upward extension of an existing structure. Think of it like adding an upper story to your single story home. The bottom level is the structure, and the additional levels become part of the superstructure.
The same is true in a beehive. The base (or structure) is almost always the brood box. Therefore, every additional box that is added is referred to as a super, because it forms part of the superstructure.
A ‘super’ is also sometimes to referred to as a ‘honey super’, because they are used almost exclusively to store honey.
A super typically comes in 3 different sizes – deep, medium and shallow. A deep super is 9 and 5/8 inch tall, medium super is 6 and 5/8 inch tall, and a shallow super is 5 and 3/4 inch tall.
They house either ten or eight frames of wax foundation, depending on whether they are for an 8-frame Langstroth hive or a 10-frame Langstroth hive. These frames are used by bees to build comb and store honey.
A honey super is usually of a shallower depth than the brood box because when a honey super is full of capped honey it’s extremely heavy to lift. Therefore many beekeepers prefer to use two shallower supers rather than a single deep one. It gives them the flexibility to add additional supers in Spring when the bees store a lot of honey.

You should make sure all of your supers are the same depth as this allows you to interchange frames between each one. My honey supers are medium depth so I can more easily lift and maneuver them.
You can use as many supers on your hive as your colony needs – something that will be determined by where you live, your local weather patterns and the amount and type of flora available.
In Spring and Summer when the weather is warmer and there is more food available your colony will expand and need extra space for brood and honey storage. That’s the time to add one or more supers above your brood box, as many as your colony needs.
In Autumn and Winter when the weather becomes cooler, the queen lays fewer eggs and not as much honey is stored. The colony cannot keep the brood box and supers warm during the cold weather. That’s the time to reduce the size of your hive by removing one or more of the supers above your brood box.
In order for the bees to use the super exclusively for honey (as opposed to both honey and brood), a queen excluder needs to be placed between the brood box and the honey super. Otherwise the queen may lay eggs in the honey super and then the honey can’t be harvested because it will be contaminated by brood.
A frame that has once had brood in it can’t be used as a honey super because the cells have had bee larvae in them and there may be remnants of baby bees left in the cells and your honey will be affected.
However, you can use a honey frame in your brood box. The bees will utilize the remaining honey, and clean out the cell ready for the queen to lay in it.
What Is A Brood Box?
A brood box is a box that’s used exclusively by the queen to lay eggs, or brood. It can either house eight or ten frames, depending on the size, with the frames nearest the two sides usually housing honey.
A brood box is usually of maximum depth to allow the queen plenty of room to lay eggs.

A brood box, or boxes, will form the base of your hive, with a board that has an entrance for the bees to come and go.
Depending on the strength of your colony, more than one brood box may be used. Often a second brood box is added in early Spring to give the bees more room, which reduces the impulse to swarm.
The super or supers are placed above the brood box.
Conclusion
As a new beekeeper there are many things for you to learn and understand about beekeeping and sometimes it can be very confusing.
When I first decided that I wanted to become a beekeeper, I found some of the terminology confusing. By doing a bit of reading and researching on the internet, I was able to learn more.
By far the best way to learn for me was to talk with an experienced beekeeper and attend meetings of my local bee club. That way I could learn in a hands on fashion about brood boxes and supers and other things associated with beekeeping.
Demaree Method Of Swarm Control
Demaree Method Of Swarm Control
Source: https://busybeekeeping.com
The Demaree method is a popular method of swarm prevention invented by American George Demaree who published the details in the American Bee Journal in the late 1800s. It involves rearranging the boxes vertically before the signs of swarming occur.
The idea behind the Demaree method, as with other swarm prevention models, is to separate the queen and the forager bees from most of the nursery bees.
As a result of this separation, the forager bees will believe the colony has swarmed because of the reduction in number of the nursery bees – and the nursery bees will think the colony has swarmed because of the reduction in number of the forager bees.
In effect, the queen and the colony have been ‘tricked’ into thinking that swarming has already taken place because congestion has been reduced, creating plenty of room for the queen to lay eggs.
The Demaree Method: A Step-By-Step Guide
The method is best applied when, after you examine your hive, you find that seven out of eight frames are full of brood, with bees covering most of the frames. When checking your hive, you should also look for any queen cells and remove them.
Here are the basic steps of the Demaree method:
- Remove the brood box from the base of the hive and put it carefully to one side.
- On the base, put a new (second) brood box filled with frames of empty drawn comb if you have them. If you don’t have enough to fill this new box, use as many as you have and place them in the center. Then, fill the outer gaps with frames with wax foundation.

- Take two frames of drawn comb from the center of this second brood box and put them to one side.

- Go back to the (first) brood box you removed from the base and find the queen.

- Place the queen and two frames of brood in the center of the brood box on the base. Most of the worker bees will remain in the box you removed from the base.

- Place a queen excluder on the second brood box with the queen.
- Above the queen excluder, put one or more empty supers (with frames) that will be used to store honey.

- Place another queen excluder above this honey super.
- In the first brood box, push the brood together and fill the outer gaps with the frames that you had removed in step 3.

- Place this box, which contains most of the worker bees, on top of the second queen excluder.

- Replace your hive mat (if using) and lid.

- After a week, remove the lid and look through the top brood box to remove any queen cells.
Does The Demaree Method Of Swarm Control Work?
Though I have not used it myself, many beekeepers have found that the Demaree method is a very effective swarm control technique.
As with other methods of swarm control, the Demaree works best if the beekeeper is observant, understands what is happening, knows what action to take and when to take it.
The Pros and Cons Of The Demaree Method
Pros Of The Demaree Method
The pros or advantages of the Demaree method are:
- It’s an effective method of swarm control.
- The colony is kept together in the hive which keeps it strong and able to produce a good honey crop.
- You can gain new queens should you want to increase your number of hives or replace an old queen in an existing hive. This is because the scent of the queen decreases in the top box and the bees may try to raise a new queen.
Cons Of The Demaree Method
The cons or disadvantages of the Demaree method are:
- It involves a lot of manipulation of heavy boxes.
- The queen may get injured or lost as the boxes are moved around.
- You have to keep an eye on the top box and remove any queen cells the bees make.
Methods Of Swarm Control
The urge to swarm is a natural impulse of the honeybee and is a part of their reproductive cycle.
Any method of swarm minimization works best if the beekeeper is observant, understands what is happening and knows what action to take and when to take it. The following are steps you can use to minimize swarming.
- Make sure your hive is not congested with bees. When you open the lid, are bees spilling out over the sides? Is each frame packed with bees? Time to give them more room.
2. Make sure your bees have plenty of room to store pollen and honey. If there is a strong honey flow, the bees will use the brood frames for storage, leaving less room for the queen to lay eggs. Remove the capped honey frames and replace them with empty, drawn comb if you have them. Or use frames with wax foundation. Otherwise, you can add another super.
3. Provide sufficient ventilation so that the hive is kept cool on hot days.
4. Requeen your hive with a young healthy queen sourced from a reputable supplier. A young queen will rarely swarm until she is a year old.
5. Select a queen that is from a lineage that is less likely to swarm. Professional queen raisers rear queens with desirable traits and one of these could be a lower propensity to swarm.
Conclusion
Swarming is a natural part of the reproductive cycle of the European honeybee and it can be managed by careful observation and action by the beekeeper.
If you live in a suburban area with close neighbors, it’s important to take action to minimize the chance of your colony swarming. Most neighbors won’t be happy to receive a swarm of bees from your hive.
If you are a new beekeeper, it’s a great idea to find an experienced beekeeper from a local club who can help you during a hive inspection so you can understand what you are seeing and what you need to do about it.
How To Store Bee Frames Over The Winter
How To Store Bee Frames Over The Winter
Source: https://busybeekeeping.com

Australian beekeepers, depending on where they live, need to think about preparing their hives for the Winter during Autumn (between March and May).
In the northern hemisphere, the timing of the Winter shutdown will be different, and the methods used there will vary according to climate.
For beekeepers in the northern states and territory of Australia where the climate is milder, the time to begin closing their hives down for Winter will vary, or it may not happen at all in tropical areas.
Where I live, in Victoria, the most southern mainland state, I need to start thinking about shutting my hives down for the colder months during Autumn and this means removing a super or two and storing the frames that are inside.
Why Do I Need To Store Frames?
In Winter the colony of bees form a cluster to keep warm and they do this when the air temperature is between 10 to 14 degrees Celsius (or 50 to 57 degrees Fahrenheit).
This cluster is located in the central area of the hive which is the warmest, so the bees are not using most of the area around them.
The extra super or supers and their frames are too many for the cluster of bees to keep warm and they expend too much energy trying to do so.
Storing frames of wax and honey securely is important because you need to reuse them in the Spring when the weather improves and the colony quickly needs room to expand.
You don’t want to discover in Spring that your frames have become infested with wax moth larvae or been eaten by hungry mice.
There are three types of frames that you may have to store over Winter.
- First of all, there are frames that contain brood.
- Secondly, there are frames partially filled with honey.
- Finally, there are frames full of capped honey.
These three types of frames need some form of preparation before they can be stored. Preparing frames with brood and frames partially filled with honey take a bit more time than preparing frames of capped honey.
How To Prepare Frames With Brood
It’s not all that often you store frames that have brood in them. Of course, you don’t want to kill the brood, so you need to allow the bees to hatch out first before you remove the frames and box for storage.
You might face this situation if you have a hive with a double brood box and no queen excluder. There will be brood in the top and bottom box, but you want to take the top box and frames away and store it and the frames for Winter.
In this situation you need to allow more time before removal, perhaps two or three weeks.
- Take off the top brood box and shake all the bees into the bottom brood box.
- Then, place a queen excluder on top of the bottom brood box.
- Return the top brood box and the lid. The nursery bees will move through the gaps in the queen excluder to look after the brood in the top box, however, the queen can’t move up because she is too large. Therefore she won’t be able to lay any eggs in the top box.
- Leave the hive alone for two to three weeks to allow all the brood in the top box to hatch. Then, the box and the frames that are free of brood can be removed and stored.
How To Prepare Frames Partially Filled With Honey
Some frames that need storing will be partially full of capped honey. Storing frames that contain some uncapped honey can be tricky, because if the honey isn’t ripe it will run out of the cells and create a sticky mess inside the bag you place it in.
Before I explain it though, it’s not essential to remove the honey from partially filled honey frames before storage. It’s just a method I like to use.
Ripe honey is ready to eat and it’s moisture content is low, around 18%. The bees will have capped it with wax, but not all cells on the frame may have been capped.
I’ve successfully used the following method to remove honey from partially filled frames before I store them. It’s a good method, because it allows the bees to do the work of removing the honey.
- First, I take each frame and score the surface of the capped comb with a scratcher before I place it back in the super. (A scratcher is a tool with a handle and very sharp prongs). I repeat this process until all of the capped honeycomb has been scored.
- Then I put a queen excluder on top of this super and carefully invert it before I place it back on the hive. The queen excluder stops the frames from falling out when the box is turned upside down.
- Because the cells are now facing downwards, the honey can flow out freely through the excluder into the bottom box where the bees are waiting to clean it up and store it in the lower areas of the hive. As the cells are facing downwards the bees can’t store the honey in the cells.
- After a few days, you will have clean frames that can be stored for Winter.
I’m able to use this method because my honey supers are all of a smaller size and so are not too difficult or heavy for me to turn upside down. If you are using a full sized box for your honey super and you want to try this method, it might be a good idea to get help from another beekeeper.
I use this method because I found it works for me and I like to store clean frames, but as I said it’s not essential to remove the partially filled honey frames before storage.
Storing Bee Frames
Because I live in a region of Australia that has reasonably mild Winters I use a straightforward method of storage.
Whether storing frames that once had brood, frames that were or are partially filled with honey or frames that are full of capped honey, the method I use is the same.
- Each removed frame is individually wrapped in a large plastic garbage bag that I have purchased from the supermarket.
- I tie up the bag and use strong tape to secure it before I place it in the freezer for two days. Freezing the frames in this way kills any Wax Moth or other larvae.
- I don’t have a large freezer so I can only place one frame at a time inside.
- After forty-eight hours the frame is then placed in an airtight storage bin for the Winter. Once full of frames, the storage bin is placed in a cool dark place.


Conclusion
In other regions of Australia and in other countries of the world the method of storing bee frames will most likely be different. Every beekeeper may have a different method they like to use.
However, the reasons for storing frames during Winter are the same.
Winter storage of bee frames is necessary to ensure the health of your colonies. It helps the bees maintain their Winter cluster at the required temperature because they don’t have to keep a large area warm. It also protects the hive against pests such as Wax Moth and mice.
How To Split A Beehive And Prevent Swarming
How To Split A Beehive And Prevent Swarming
Source: https://busybeekeeping.com
A colony is divided to remove the bees impulse to swarm and this method is also known as artificial swarming.

If your hive is in a suburban backyard it’s probably not ideal to allow your colony to swarm, as you need to consider the close proximity of your neighbours.
Measures such as minimising congestion in the hive, and removing drones and queen cells are really temporary measures as the bee population will continue to grow and drone and queen cells will be rebuilt.
The aim of dividing your colony is to weaken the original colony by removing much of the brood and young bees from the queen and the older bees. In essence the bees believe the colony has already swarmed.
You should divide your bee colony when you notice the first signs of swarming. The early signs of swarming include an abundance of food in the hive and little space for the bees to store more, the queen has no more room to lay brood and the bee population overflows when you remove the lid.
It’s important two regularly inspect your hive in Spring for signs of swarming, approximately every two weeks is recommended, but this depends on your area and the amount of pollen and nectar being collected by the workers.
By splitting the hive you can increase the number of hives you keep. If you don’t need or want another hive, at the end of the swarming season the hives can be reunited, forming one very strong productive colony.
Each of the methods described below require you to locate the queen. I will describe how to do this in another post.
You will need a second base, a new brood box and a second lid. This new brood box can be a used one that is clean and free of disease.
In this first method, move the first (or parent) hive a little to one side and place another new hive and base next to it, preferably with a few frames of used brood comb inside.
From the parent hive, remove about half of the brood frames and check carefully for queen cells as they can be easily missed. If you find queen cells present, put all of those frames with queen cells into the new hive.
Examine each queen cell for its shape and form. Choose two that are well formed and remove the rest. When placing the frames with queen cells into the new hive, do so carefully to avoid damaging them.
Make sure the frames with brood comb and queen cells are carefully placed in the central area of the new hive and place frames with foundation or drawn comb either side of the brood comb.
Place a hive mat and lid on this new hive.
Parent Hive
Leave the original queen in the parent hive with the rest of the brood and honey. She will think that swarming has occurred and will remain in the parent hive quite happily, while the new hive containing the queen cells will become a new colony with healthy bees.
In the parent hive also make sure the remaining frames and the frame with the queen are carefully pushed together in the centre of the hive.
Frames removed from the parent colony and placed into the new hive must be replaced either with frames of foundation or drawn comb if you have them. Place these new frames of comb at the sides of the parent hive.
Allow sufficient time for the queen to hatch and start laying before you inspect the new hive to check that she has started laying healthy eggs and in a solid pattern across the frames.
After swarming season has passed, you can reunite the two hives or move one of them to a different part of your yard.
Undertake the task of splitting a hive only when the weather is sunny and not windy. Cooler weather may chill the brood.
The Demaree Method
The Demaree method of swarm management was designed by George Demaree in 1884 and is a popular and often used method.
Once again this method requires you to locate the queen.
This is a labour intensive method of swarm prevention but can be very effective. The major difference between this and the previous method outlined is that all the bees are in the same hive.
Step by Step
Here are the basic steps of the Demaree method.
- First of all remove the parent (or original) brood box from its base and carefully place it to one side.
- On the base place a new brood box complete with frames of foundation or empty drawn comb if you have them.
- Remove the central two frames of comb from this new box and put them to one side.
- Then from the original brood box, find the queen and place her and two frames of sealed brood into the centre of the new brood box. Include any bees that are on them.
- Place a queen excluder on top of the new brood box.
- Then, above the queen excluder place an empty honey super, with frames of foundation or frames of drawn comb if you have them.
- Place a queen excluder above the honey super.
- Now place the original brood box on top of this queen excluder. Push the brood frames together into the centre and take the two empty frames you removed from the new box and place one either side against the walls of the original hive.
- Finally, replace the hive mat and lid.
Wait a week and go through the top box to remove any queen cells that have been developed. You may have to do this because the scent of the queen, who now resides in the bottom box, will have decreased and the bees in the top box may believe the hive is queenless.
The queen will have a great deal of room to lay eggs in the bottom box and will be supported by the nursery bees who remain there to look after the two frames of brood placed there.
The two brood boxes will provide room for the queen to lay and will relieve congestion. Essentially, the colony will believe it has swarmed.
Honey will continue to be stored in the honey super by the older worker bees.
You may find this method labour intensive as it involves a lot of manipulation of the hive components and a lot of heavy lifting too.
There’s also the chance you may damage or lose your queen in the process.
However, this method is effective in swarm prevention, and if you are interested in increasing the number of hives in your apiary, you can get some queen cells in the process.
Conclusion
Swarming is a natural biological process in the life cycle of the European honey bee. But if you live in a suburban area your neighbours might not like to have a swarm of bees land in their yard uninvited!
It’s a good idea then to take measures to reduce the bees impulse to swarm if you are a hobby beekeeper who isn’t looking to increase the number of hives you already have.
If you conduct regular and thorough hive inspections during Spring you should be able to identify when your hive may swarm and take any necessary action before it occurs.
The two methods of splitting your hive that I have described will help prevent your bees from swarming.
You will learn how to find the queen and develop your knowledge of beekeeping too. Beekeepers have experimented and found other methods of splitting hives that work for them. Help can be found from online forums and your local beekeeping club.
If you are relatively new to beekeeping, then it’s a good idea to ask for help from an experienced beekeeper in your area.
Join your nearest beekeeping club to meet other beekeepers. Often the club will have guest speakers and some clubs conduct hands on beekeeping courses for the beginner.
You will find experienced beekeepers helpful and ready and willing to give you advice based on their own experience.
How To Stop Bees From Swarming
How To Stop Bees From Swarming
Source: https://busybeekeeping.com
Swarming is a natural biological impulse of bees and it is their way of making new colonies. It’s a great way for a beekeeper to acquire a new hive, however it is not always a convenient or wanted event.
If you live in a built up area your near neighbours may not like a swarm of bees landing in their yard, so it’s best to reduce the colony’s swarming impulse.

There are several methods you can try to reduce the likelihood of your bees swarming and some of these are outlined below. However, they are most likely to be temporary measures for the short term only. More drastic action, such as dividing the colony of bees may be necessary.
Minimising Congestion In The Hive
Reducing congestion in the hive, in both the brood box and the honey super is an important method of swarm reduction. Here are some suggestions as to how to do this.
1. Adding A Super
Placing a super of frames with either drawn comb (if you have access to one) or with foundation on a hive will give the bees more space and will relieve congestion in the short term.
However the colony will most likely continue to expand rapidly, especially if nectar flow is strong, and it will need to be eventually divided to control swarming.
2. Removing Excess Honey
Another method is to remove frames filled with capped honey from the honey super and replace them with frames of drawn comb or wax foundation to keep the worker bees busy. Do this if there is a good honey flow and the bees can keep filling the frames
This keeps the bees busy and contented and they are less likely to swarm.
A frame of honey taken from the strong hive can also be donated to a weaker hive too if they have few honey stores.
Just make sure if you are swapping the frames between hives they are free of disease.
3. Removing Capped Brood
Relieve congestion in the brood box by removing a frame or two of capped brood and giving it to a weaker colony in your apiary. Then replace the frames you have removed with frames of drawn comb or wax.
Make sure that the capped brood is healthy as you don’t want to spread disease to your other hives.
The benefits of this method are that it will give the strong hive more room to grow, and you will balance out the number of bees in your hives.
Minimising The Number Of Drones
In Spring it is natural for a hive to raise a large number of drones in preparation for mating with a new queen. This is a sign of a healthy hive.
However, an excess of drones in the hive can indicate that the hive may swarm, so by minimising the number of drones in the colony you can momentarily reduce the swarming impulse.
Drone comb is distinguishable from regular worker comb because the cells are larger and protrude distinctively above the surface of the comb.
Approximately 15% of the population of a hive should be drones. Frames that contain a large number of drones can be removed from the brood box and placed into the honey super above a queen excluder. This ensures the queen cannot lay in them.
Then you replace the removed frames with frames of drawn comb if you have access to them. Otherwise use frames with wax foundation.
Removing Queen Cells
Queen cells are very distinctive. They are longer, are shaped like a peanut, and usually hang from near the bottom of a frame. However, that is not always the case, sometimes they are higher up on the frame.

Queen cups are smaller, shaped like a cup. They are built by the worker bees in readiness to be made into a full queen cell.
In Spring the colony will build queen cells if they perceive the hive is becoming too congested or they need to replace a poorly performing queen. They will choose a healthy larva and feed it royal jelly until it’s cell is capped and metamorphosis takes place. After sixteen days the adult queen emerges.
Examine the hive weekly to find the queen cells, or queen cups, and remove them. Remove each frame from the hive and gently shake the bees back into the hive to ensure you can locate each queen cell.
Be sure you look at each frame that the queen has access to as sometimes the cells are almost hidden.
This method of removing the queen cells will not prevent swarming, only delay it as the bees will build new queen cells. More decisive action, such as splitting a colony, will need to be taken.
Regular Re-queening
Young, healthy queens minimise swarming because they emit more pheromones than old or weak queens do. The pheromones help to impede the construction of queen cells.
Although early Spring is the ideal time to re-queen a hive, at this time can be difficult to obtain a young queen. Instead, re-queening can be undertaken in Autumn when queens are more likely to be available from queen breeders.
After re-queening, make sure there is enough room for her to lay eggs and enough room for honey storage because a new queen will lay more eggs during her first year than any other time. Space will be needed for the rapidly growing colony.
Talk with other beekeepers if you decide to re-queen your hive to find out about their experiences when dealing with professional queen breeders. Queen breeders will raise queens with certain characteristics, one of these traits may be less of a tendency to swarm.
Obtaining a queen from a queen breeder ensures a young healthy queen for your hive. She is usually marked on her abdomen with a dot of special paint which makes her easier to spot during a hive inspection.
Conclusion
The methods outlined in this post will reduce the impulse to swarm, but each method is not a guarantee to prevent swarming altogether.
If you conduct regular and thorough hive inspections during Spring you should be able to identify when your hive may swarm and take any necessary action before it occurs.
If you are relatively new to beekeeping, then ask for help from an experienced beekeeper in your area. Join your nearest beekeeping club to meet other beekeepers. Often the club will have guest speakers and some clubs conduct hands on beekeeping courses for the beginner.
You will find experienced beekeepers helpful and ready and willing to give you advice based on their own experience.
What To Do After Catching A Swarm Of Bees
What To Do After Catching A Swarm Of Bees
Source: https://busybeekeeping.com
Where I live in southern Australia, it is Spring, and it’s swarming season. This means the bee colony grows so much and so quickly they don’t have enough room. To overcome this, the workers grow a new queen and at an appropriate time, leave the hive with the old queen to find a new home.

Catching a swarm is a great way to get yourself a hive. However, sometimes the colony doesn’t like the new home you’ve given them and they leave altogether. Here are a few tips to help you to hopefully keep the swarm you have caught.
Why Do Swarms Leave?
A swarm of bees have no home. They are in a transition phase, leaving the old hive and looking for a new home. The swarm have no comb, no brood and no honey to look after, so there is nothing really to keep them in your hive. They may leave immediately, or in a few days, but there are some things you can do to keep them from leaving.
Give Them A Used Box
If you have ever removed frames of wax or burr comb from a hive, you will notice that bees are attracted to them, even when you have moved away from the hive some of them will follow you. This is because the bees recognise the scent of the hive on the frames or wax you have removed.
When housing a swarm, try to give them a used hive body, but make sure it is in good condition. You don’t want any pests lingering in the wood. The bees will be drawn to the scent of the beeswax and propolis and will be more inclined to stay. The pheromones of the previous occupants that linger in the box are attractive to the swarm and this can help to keep them from leaving.
Another potentially effective strategy I have heard of is to rub beeswax over the inside of the box to make it more attractive to the swarm. This is something I have not tried myself.
Give Them A Box Of The Right Size
House the swarm in a box that will best suit their size. Not too big or too small, just right! Too big and they will be inclined to abscond because there is too much space, too small and they most likely leave because of the lack of it.
A swarm of bees can vary in size. They are usually about the size of a basketball or football, sometimes larger. They often hang from the branch of a tree, clustering together around the queen, so it is easy to estimate their size.
If the swarm is small, use a five framed nucleus box to capture them if you have one available. Make sure the waxed frames are in the box first before you put the swarm inside. If they are on a small branch just leave a space in the centre and place the branch in.
If the swarm is larger, use a Langstroth hive body, with waxed frames inside if you have them.
Should you encounter a really large swarm, then you will need two boxes.
If you don’t have any bee hardware available and can’t borrow any quickly, then a cardboard box will be sufficient in the short term.

Give Them Used Comb Or Brood
If you can manage it, place a frame of built comb into the box where the swarm will be. This will give the queen space to lay immediately without the worker bees having to hurriedly build cells for her. The frame will have added appeal because it has the scent of a beehive, added motivation for the swarm to remain. If I have one, I’ll put a frame with some brood on it into the box.
This is an even better incentive than drawn comb because not only can the queen can lay in it immediately, the brood will be looked after by the nurse bees.
Give Them Gentle Treatment
Treat your swarm gently and they will be more likely to stay. I try to be thoughtful about how I transfer them into the box. I prefer to cut the branch they are on and lower them into the hive carefully.
If I can avoid shaking them I will, and I’d never vacuum them! If you lower them down into the hive box carefully, the cluster, with the queen in it, will more likely remain in tact. This is much less stressful for the swarm.
Move Them After Dark
If it’s possible, wait until the sun goes down before moving your swarm of bees. This will give all the flying bees a chance to return to the hive and keeps the swarm numbers intact.
Leave Them Alone For A Week
After catching your swarm and placing the hive in your preferred location, leave them alone for a week. This will allow them time to build comb and for the queen to start laying eggs.
If you disturb them before the week is up, they will likely leave. After all, they won’t have had time to make comb or for the queen to lay eggs and so they have nothing to lose. If you have a frame of brood comb or even drawn comb placed in the hive this can help them to stay as they have a reason to remain there.
You can open up the hive after a week and make changes because by that time they will have built comb and the queen will be laying. They will be unlikely to leave because they have begun to to make a home in your hive.
Conclusion
Catching a swarm is a very rewarding experience and it is worth your while making it an attractive proposition for the bees too.
I endeavour to coerce, not force them into the hive by using the suggestions above. Using the ideas listed you are more likely to retain the swarm.
You will gain a lot of valuable experience from catching a swarm and I really recommend it.

How To Catch A Swarm Of Bees
How To Catch A Swarm Of Bees
Source: https://busybeekeeping.com
What Is A Swarm Of Bees?
The term swarm usually refers to a large group of flying insects moving together, in this case bees. It’s actually a term that refers to a specific biological event the bees use to ensure the future of their species.
Around spring, there is abundant flowering flora providing plentiful nectar and pollen for the bees and other pollinators to access. The queen bee produces more offspring because of the favourable conditions.

This can result in the hive becoming overcrowded with bees, brood and honey and the colony prepares to swarm. A swarm consists of the original queen, several hundred to several thousand worker bees and a few drones. The size of the swarm depends on the size of the original hive.
Swarm Behaviour
Usually the swarm first lands approximately fifty to a hundred metres from the hive, where it forms a cluster around the queen, often on the branch of a tree. From here, scout bees are sent out to find a suitable new home.
Whenever the scout bees find a suitable home the swarm will leave, so it’s best to act quickly and house them in a hive. Sometimes their new home may be a wall cavity in a building or home and we don’t want them to choose that option!
Before a swarm leaves the original hive, they gorge themselves on honey because they don’t know when they will find their new home or where it will be. Usually, although a swarm of bees may look daunting, they are calm generally because they have no home, no brood or honey to defend.
The swarm doesn’t travel far initially because the queen cannot fly well. In fact, the workers prepare the queen by starving her a little so she is not too heavy to fly.
Once the bees have stayed in one location for a week, they’re no longer referred to as a swarm and are then known as a hive or colony. This is because a week is long enough for the workers to build comb and for the queen to start laying eggs.
Where Should You Put Your Swarm Of Bees?
When catching a swarm it’s best to choose a container that suits the size of the swarm, and it’s location.
Swarms need to be caught quickly before they start to build comb and the queen starts to lay.
Swarms vary in size, anywhere from as small as a baseball to a basketball. They may land high up in a tree branch or a pole or under the eave of a house where a ladder is necessary to collect them. Lower, dense bushes, the side of a planting box, in a compost bin or under the lid of a barbecue are other more accessible possibilities.
Various sized cardboard boxes will do temporarily and are light in weight. Buckets too are suitable. If the swarm is located high up and you need a ladder you want something that is light and easy to carry. I cut the branch if I can and drop it into the box, bees and all. Otherwise I give it a good firm shake to get in as many bees as possible the first time.
Recruit a family member or friend to hold the ladder for you if they are willing. Just make sure they have some gloves and a netted hat to wear!
If the bees are close to the ground I will position some frames in an empty hive underneath and shake them directly into it. This saves the bees from having to be moved twice. If I have one, I’ll put a frame of brood into the box as well. This gives the queen drawn comb to lay in immediately and the brood will be looked after by the nurse bees.
From the container I shake the swarm directly into the hive with the frames inside. If the bees are clustering on a small branch that will fit in, I’ll put them in the box branch and all. The frames are already in place.
Just remember when you catch a swarm in a container you have to get them into their home as soon as possible.
How To House Your Swarm Of Bees
The aim is to get as many bees as you can into your box on the first go. The queen will be at the centre of the cluster, so if you can get most of the bees into the box first time around she will be among them most likely. The other bees will follow her in.
Lowering Them In
The best way to get the swarm into the box will be to clip the branch they are on and lower them into the hive, assuming the branch will fit. Some or all of your waxed (or drawn) frames will already be in place. Just leave a gap in the centre for the branch.
If the branch is too big, just place it on top of the box of frames and the bees will run down the frames into the box. Have the frames in place first because you will squash too many bees trying to put them in afterwards.
This method of clipping the branch and lowering it in means the swarm keeps its cluster in tact with only a few bees flying around.
Shaking Them In
If the branch is too high or too thick for it to be cut off, then you will have to shake the swarm into your box. A quick sharp shake releases most bees and a majority of them will land in the box. However many will fall or fly around which takes longer to gather them up.
You should have to wait for them to settle before scooping them gently into the box. I use a soft bee brush and small plastic shovel to scoop them. Wait to see if the queen landed in the box. If she did so, then over time the rest will follow her in. You will just have to wait.
What To Do After Catching A Swarm Of Bees
Now you have the majority of bees in the box, make sure you leave the hive or box in position as close to the site of the swarm as you can to allow the remaining bees to go into the box. The remaining flying bees will return to the swarm site first so it’s important to position the box close to where the swarm was when you found it
It’s best to wait until dusk if you can to be sure all the foraging bees have returned before you secure the box and move the bees away. Then you can be sure you have left no bees behind.
Leave Them Alone
After catching your swarm, leave them alone for a week. This will allow them time to build comb and for the queen to start laying eggs.
If you disturb them before the week is up, they will likely leave. After all, they won’t have had time to make comb or for the queen to lay eggs and so have nothing to lose. If you have a frame of brood comb or even drawn comb placed in the hive this can help them to stay as they have a reason to remain there.
Conclusion
Catching a swarm is a very rewarding experience and it is a fairly straight forward one. If you are a member of a bee club ask if you can help catch swarms in your area if you have the time.
You will gain a lot of confidence from the experience and I really recommend it.
It will help also you deal with your own swarm effectively should it happen in your own backyard.
When To Inspect Your Beehive
When To Inspect Your Beehive
Source: https://busybeekeeping.com
Conducting hive inspections is an essential part of keeping bees to help you understand your hive’s workings.

Approximately one week to ten days after placing a new hive on your property you should undertake the first inspection. If it’s a new colony you can establish whether the queen has been released from her cage and has begun laying.
From my experience here in southern Australia, the hive should be inspected every two to three weeks during Spring and summer. In Autumn, the hive should be inspected approximately every month and prepared for Winter.
During Winter, there are usually no inspections as the weather is too cold. However, if there is a warm, calm day, then the hive can be opened, and the bees checked on.
Of course, the frequency of inspections depends on where you live, your climate, and your hives’ condition.
There are many inspection checklists available online to help you remember what to look for, take note of, and to do during the next inspection. Or you can make one up for yourself.
Some of the things to look out for during an inspection can include:
- Food: do the bees have enough honey and pollen stores?
- Eggs: Is there an active queen?
- Disease: Does the brood pattern look solid or spotty?
- Space: Do the bees have enough room? Do I need to add another box?
Why You Should Inspect A Hive
You’ll Recognize Your ‘Normal’ beehive
Conducting your first hive inspection can be very daunting, but it’s a task that becomes easier the more often you do it.
Regular inspections alert you quickly to what is a ‘normal-looking’ hive and what is not. All hives have a different kind of ‘normal’, no two hives look or behave in the same way. As you become familiar with yours, you’ll develop more confidence when conducting an inspection.
As you gain confidence and come to understand your own hive, the following are some of the indicators you may observe that tell you something is amiss.
- Patchy brood pattern
- Absence of the queen
- Agitated bee behavior
- A smaller population of bees
Having regular inspections and being familiar with your own hive’s usual workings mean you will spot and help the bees remedy a situation quickly. In doing so you may prevent spreading the problem to other hives or worse still, losing the hive altogether.
You’ll Gain Confidence
As with all new and unfamiliar experiences offered we can be hesitant to try them, but the more often we undertake them the more familiar they become, and the more our confidence grows.
In my experience, I was initially very nervous. Although fully protected by my white suit, I was scared of the bees flying around me and of the loud buzzing noise they made as I opened the hive.
On some occasions, I asked for help from a more experienced beekeeper, and I was able to gain some tips from him. Those tips helped me during subsequent inspections, but I gained confidence primarily because I kept conducting regular inspections.
With time, I have become more comfortable handling the bees. My actions are generally smoother and more efficient, therefore creating less agitation among the bees. If I have to spend a longer time in the hive, such as replacing or cleaning some components, I feel more relaxed doing so.
Bees are sensitive to the pheromones we emit, so the bees will sense it if we are fearful. The more often we conduct inspections, the less fearful we become, and the calmer our colony will be.
You’ll See Problems Early
As you conduct hive inspections, you will learn the regular patterns of behavior of your hive and will also be able to recognize the irregular. Regular inspections allow you to monitor the colony and detect potential problems early so you can apply the right solution quickly.
Some of the potential situations you may see in the hive are:
- Patchy brood pattern
This can indicate an ailing queen who needs replacing. - Absence of the queen
If you cannot see the queen and detect little or no brood or eggs, then it’s apparent the queen has died or left the colony. A new queen is needed quickly unless you see large queen cells on the frames, which means the bees have taken action needed. - Agitated behavior
There are many reasons for this: the weather, an aggressive queen, not enough nectar and pollen, or the absence of a queen. - A smaller population of bees
This could indicate the absence of a queen, particularly if you see little brood. Action is needed quickly to remedy the situation unless the bees have begun to take the necessary steps to replace her. The bees may also have been affected by a pest or disease, so start acting immediately to fix the problem.
When To Inspect The Hive
If you are new to beekeeping, you may be tempted to peek into your hive more often than necessary. Your enthusiasm is understandable, but inspecting the hive too often is not good for the colony.
Bees are insects that have evolved to become a finely tuned and organized community that doesn’t need humans, so be sure not to look into the hive too often even though you may be tempted!
The smoke puffed into the hive can affect the bees negatively if used too much. Smoke is used to calming bees, so an inspection is easier and sends the bees down into the frames away from the beekeeper.
For a newly installed hive, leave the bees for a week to ten days before inspecting the hive. This time allows the bees to settle in and orient themselves to their new surroundings. You will want to see if the queen has been successfully released from her cage and has started to lay.
For an established hive, during Spring and Summer, the hive should be inspected approximately every two to three weeks. These seasons are when the hive is most active, and pollen and nectar are being collected. You will want to monitor whether they have enough space to grow and whether there will be honey to extract.
In Autumn, the inspections will occur less frequently. This season is for the preparation of the hive for Winter. In late Autumn, some sugar syrup feeding may be needed, so the hive has enough honey stores to survive through the Winter.
During Winter, the hive is rarely inspected. The occasional inspection may occur to check on the colony’s health and to top up the supply of sugar syrup, but basically, the hive is left alone.
I use the Winter months to check the hive hardware and repair or replace parts as necessary.
Bees do not hibernate, but they remain in the hive to maintain sufficient warmth to keep the queen and the colony alive. They will not willingly leave the hive unless the temperature is above approximately 18 degrees Celsius or 64 degrees Fahrenheit.
Inspecting your hive should take place on a warm, calm day when the air temperature is above 18 degrees Celsius, or 64 degrees Fahrenheit. Cooler air will chill the brood, and the bees have will have to work harder to regain the temperature required to maintain the colony’s health.
The description I have given is for southern Australia’s climate and is meant as a guide only. The timing of your inspections will vary depending upon where you live, the climate, and the state of your beehives.
Conclusion
Hive inspections are a necessary component of keeping bees. For some beekeepers, this task may seem a bit daunting initially.
If you are new at beekeeping, ask for help. Joining a local club will help you find many experienced beekeepers from your area, and I’m sure many of them will be very happy to help you.
Once you have undertaken several inspections, you will gain skill in manipulating the hive components. Gradually you will gain confidence as you remember what to do and learn how your hive behaves.
Conducting hive inspections is crucial to ensure you detect possible problems early. If you do them regularly, but not too often, then you will be able to solve situations that could threaten the health and future of your colony.
How Many Hives Should You Have?
How Many Hives Should You Have?
Source: https://busybeekeeping.com
Keeping bees can be an addictive hobby. When starting out, you probably feel very enthusiastic and keen to get started and this enthusiasm is maintained as you realise how fascinating bees are.
However, new beekeepers may be tempted to overestimate the number of hives they can look after.
It’s essential to take the following into consideration before making your investment.
- Why am I keeping bees?
- What do I need to know first?
- How much time do I have to look after them?
- What am I willing to invest in terms of money?
- Where will the hives be kept?
Why Am I Keeping Bees?
If you want to keep bees, what is your reason or goal for keeping them? Do you want to keep them as a commercial venture, or as a hobby?
Commercial Venture
To keep bees as a profitable business requires a significant financial outlay initially. A large area of suitable land will be needed to house the hives and to provide enough suitable flora for the bees to forage on. Consider if you have enough space for many hives or will you need to rent land instead.
Other costs will be the hive bodies, bases, lids, frames, wax and other essential equipment such as a bee suit, hive tools, brushes, smokers and extracting equipment. To reduce the possibility of spreading disease it is best to own a few hive tools and brushes as spares for when others are being disinfected.
To promote your business it’s a good idea to have a website which is another cost, unless you design and maintain it yourself. This is a personal choice. You will also need insurance for your investment, as the amount of honey you will produce from year to year will vary according to the seasons.
Consider whether you will sell other bee related products such as beeswax, lip balm and hand cream. Renting your bees for pollination of crops such as almonds is another consideration.
If you have a few hundred hives to maintain then hiring suitable staff will be necessary too. That’s another cost to factor in.
Hobby
Each hive will take somewhere between 20 and 40 hours a year to maintain, so as a hobbyist I suggest obtaining one or two hives to begin with to determine if it’s a hobby you would like to continue with. Then if for some reason you find beekeeping is not for you, you haven’t outlaid too much money.
Remember you will need to purchase a beekeeping suit or jacket as well as the hive hardware, hive tool, brush and smoker.There is another alternative to owning and maintaining hives. Some beekeepers will situate a hive on your property at no cost. They will come and maintain the hive for you and in return for using your land will give you some of the honey harvested. If you would rather not have to look after bees, but enjoy the honey and want to benefit your plants, then this is a great idea. It gives you the opportunity to find out what beekeeping is about at no real cost.
What Do I Need To Know First?
Learn as much as you can before you take up beekeeping. By becoming informed you can decide if beekeeping is actually the hobby for you.
As there are so many aspects to beekeeping from purchasing the hardware to extracting the honey, it’s best to learn from an experienced beekeeper who lives in your area. Join your local club and ask if you could ‘shadow’ an experienced beekeeper for a few weeks.
There are online courses and day or evening courses on aspects of beekeeping. Your local club will cover seasonal topics during their meetings too.
In addition there are books you can borrow or buy. Just be sure the text you are reading is relevant and refers to beekeeping in your particular country and local area.
How Much Time Do I Have To Look After Them?
Approximately 20 to 40 hours per year are needed to maintain one hive. Beekeeping is a seasonal activity, there’s a lot more work to do during the Spring and Summer months when the bees are most active and plants are flowering.
In Autumn and Winter there is less to do, maintaining and purchasing new hardware and the occasional inspection on sunny days to check on the health of the hive.
Your personal circumstances will determine the amount of time you have. Your usual activities can easily be maintained even if you take up beekeeping as a hobby and only have one or two hives.
When I retired, I decided I’d like to keep bees as a hobby, so I purchased one hive. Holidays to escape the Winter months still took place as the weather was too cold to inspect the hive anyway. Helpful members of the beekeeping club offered to take a look at the hive if needed while we were on vacation.
So the amount of time needed to manage a hive is really very little. It all depends upon you and how serious a pastime you want to make of beekeeping.
What Am I Willing To Invest In Terms Of Money?
In addition to having done some background research, deciding your reasons for keeping bees and how much time you can devote to looking after them, assess the costs involved in setting up your apiary.
Once you know how many beehives you intend to keep you can determine your cost. Essentially you will need:
1. Hive bodies, base and lid
The cost of these depends upon the type of hive you purchase, whether it is new or used, assembled or unassembled and where you purchase it from.
New Langstroth hive bodies, plus a base and a lid can range from approximately $100 to $300 in Australia. Costs vary depending on where you live in the world, so do some preliminary research.
The price varies, depending whether you make your purchase online, from a member of your bee club or a beekeeping supply store. Hives can be made from other materials other than wood too, such as polystyrene, and their cost will be different again. Buying in bulk and assembling the hives yourself also reduces cost.
I’d be wary of buying any used wood ware because it may harbour disease. If you do choose a used hive, check to see if it’s in good condition and have it irradiated first to kill any possible disease.
2. Bees
The cost of a starter package of bees with a queen can be free if you catch a swarm. Bees are available in the Spring when the weather warms up, plants are in flower and bee numbers increase.
Your local beekeeping club may have a swarm collection and allocation service in Spring through to Summer. Put your name on their list, then offer to go out with the beekeeper to collect the swarm when it’s available.
A bee ‘package’ is a small colony of bees that have been split or created from a larger colony. They are often known as a nucleus hive because the hive is centred around a queen bee. Nucleus hives of bees can be purchased online or from some beekeeping supply places. They are seasonal and are often booked in advance.
For an outlay of approximately $200 to $400 Australian you can purchase a queen, bees, brood in various stages of growth and a five frame nucleus hive (or ‘nuc’ for short). The nucleus hive should also have some honey stored in the frames too. An instruction sheet explaining how to care for the hive is usually included.
Additional costs include protective clothing, hive tools, bee brush and smoker. There are other items you can purchase to make your work as a beekeeping easier. Investigate each additional item before purchase to evaluate if it is really necessary.
The costs outlined above are made at the beginning and are relatively inexpensive. Over time though some of the hives will need repairing or replacing so that is an additional cost. If the bees die for some reason or decide to leave then additional bees will have to be obtained too.
Selling your honey will help recoup some of your expenditure.
Where Will You Keep The Hives?
The area of land needed for your hive or hives depends upon how many hives you intend to keep. The first thing to do is to check with your local council to determine how many hives you can house on your property.
Around each hive leave approximately one metre so you can easily walk around the hive and have room to place boxes and frames during an inspection.
If your intention is to make beekeeping a profitable commercial enterprise then you will need a much larger parcel of land to house your hives. You may be able to lease some land, or the owner of the property may pay you to site your hives on their land. The number of hives you want depends upon how many you can physically manage.
Conclusion
If after all your research you decide you don’t wish to keep bees, then some beekeepers allow you to host a hive for a one off cost. All the work of managing the hive is done for you and you can join in hive inspections if you wish.
Another added benefit is increased production in your orchard and/or veggie patch, as well as some of the honey from the hive at harvest time.
Beekeeping is a fascinating pastime and a wonderful way to help the environment. If you are interested in keeping bees but aren’t sure just how many hives to have or how much time you wish to devote to managing them, then I strongly advise you to do some research.
Reading books and going online are a good start, but I believe your best strategy is hands on learning. Become a member of your local beekeeping club, or find a beekeeper who will allow you to shadow them for a few weeks.
By doing so you can discover if keeping bees is really for you and just how much time you’ll need to maintain one hive or several.
What To Do Each Season to Keep a Healthy Beehive
What To Do Each Season to Keep a Healthy Beehive
Source: https://busybeekeeping.com
Depending on the season, you will find there are different tasks required to maintain a healthy hive. For example, Spring and Summer are usually busy seasons, with many duties to ensure the hive is ready for the heavy flowering seasons.
I recommend keeping a record of hive inspections. I have a diary or logbook to write down what I observe and do each time I inspect the hive.

Record keeping can be electronic or hard copy, and it can be as detailed or as general as you choose. Just make sure you pick whatever is the easiest and most comfortable for you to maintain.
I like to keep a log or record because it helps me remember what I saw and did last time I looked in the hive and reminds me what I had planned to do if I forget on the next inspection.
Spring and Summer
In Spring and Summer, you will inspect the hive more often because the bees are more active, and the nectar flow is strong.
I also like to write down in my book the date, time, and weather conditions. It is recommended to only open the hive when the temperature is above 18 degrees Celsius (64 Fahrenheit). Temperatures lower than this can kill the developing brood. Therefore, it’s always good to check the weather before you inspect your hive.
Where I live, it’s often windy, so unless it’s only a light breeze, I won’t open the hive. In strong winds, bees are less likely to forage because of the difficulty of going from and to the hive. A strong wind could also bring down the temperature making it too cold to inspect the hive.
First Spring Hive Inspection
If this is the first time you open the hive after Winter, then you will need to undertake a thorough inspection of your hive as it has been a quite a few weeks since the hive has been opened.
Choose a sunny day in early Spring when the air temperature is above 18 degrees (64 degrees Celsius).
Remove the lid and turn it upside down on the ground, as this is where you will rest the supers (boxes) to keep them clean. Scrape off any burr comb from the lid.
Place the box(es) one by one on the upturned lid. As you place each super on the lid, I recommend rotating each one slightly as you place it down. This prevents them from sticking to one another.
Clean the base of the hive, removing any dirt or debris with a cloth. Clean each box, scraping off any sticky residue around the edges.
Return the first box on the base and inspect each frame for brood, honey, and pollen stores.
Begin by removing the second frame first and after inspecting it, place it gently against the hive, in an empty super or frame holder. Remove the second frame first as the side frames are often cemented to the sides of the box.
Check to see if the queen is present. If you can’t find her, check for newly laid eggs or young larvae at the bottom of the cells. This will confirm she has been there recently.
At this time, it’s a good idea to replace only one or two wonky frames with ones that have drawn comb if you have them. This ensures the queen can start laying in them immediately without having to wait until the workers draw out the comb.
Only replace empty frames and ensure you keep all the brood together, then honey, then the frames with drawn comb at the sides.
If you have a second box, place it on top of the first one and begin your inspection as outlined above.
Consider if the bees have enough space. If bees were overflowing from the top when you opened the hive, it’s a good idea to add a super to give the colony more space to store honey.
If adding a super is necessary, I add a queen excluder, which is a metal (or plastic) grid that sits between the brood box and the honey super. The grid spaces allow the workers to enter the top box but prevent the queen from doing so. This allows honey to be harvested without any brood present.
Replace the lid. If there was moisture in the lid, place an icy pole stick, small twig, or stone at each corner to allow for some air to circulate. Make sure no bees can leave or enter between the gap.
Control the height of vegetation around the hive by cutting it short.
Ensure your bees have access to freshwater as they require a lot of water at this time of year.
If this is a new colony of bees in their first Spring season, consider whether it’s a good idea to take honey. I don’t recommend taking honey from a new colony in the first season.
Inspecting Hives During Spring And Summer
Your subsequent inspections need not be so thorough. During Spring and Summer, approximately every three weeks or so, open your hive and check for the following:
Honey in the supers
Remove the lid and hive mat if you have one and inspect some of the frames in the super to work out how much honey is there. If most of the frames are at least three quarters or more full of capped honey on both sides, they can be removed and the honey extracted.
However, if there is much less capped honey, wait until the next inspection before considering extracting any. It will depend upon how healthy the colony is and whether there is a honey flow or not.
Check and clean the brood box
Every second or third time you inspect the hive, check for a healthy, solid brood pattern, and look for the queen. If you can’t see her, look for eggs or young larvae. This will mean the queen was on that frame only a few days ago.
If you decide to replace one or two old frames, replace them with frames that have drawn comb.
If the weather has been rough, check your hive about once a week to see they have enough honey. If you think there are not enough honey stores for the colony, start feeding them sugar syrup.
Beekeeping Through Autumn And Winter
Careful and well organized Autumn and Winter hive management is of paramount importance in the colony’s life. Observing and managing your hive at the appropriate times ensures your bees will survive through the cold weather into the Spring.
As a beekeeper, you have two principal tasks in Autumn. To protect the colony from robber bees that invade looking for food and prepare the hive to be shut down for the Winter. When performed correctly, these tasks will ensure the colony has enough bee numbers coming into Spring when the nectar begins to flow.
Autumn
Reducing the Risk Of Robbing
In Australia, if robbing occurs, it usually happens in Autumn. We have European wasps during this time of year, and they can rob the hive of honey, brood, and adult bees.
I’ve seen the occasional wasp carry off adult bees at or near the hive entrance.
To minimize robbing, you should reduce the entrance’s width to about 5 to 10 centimeters (2-4 inches), using a piece of foam cut to the size needed or a small piece of wood. This way, the guard bees don’t have to defend too much space.
When you conduct an inspection, don’t leave the hive open for too long and clean away any burr comb, sugar syrup, or frames, so robbers aren’t attracted.
Feeding The Hive Ready For Winter
Approximately 4 to 6 full frames of honey are needed for the colony to survive over Winter. Talk with local beekeepers about how much honey they leave for their bees.
Also, consider the local weather conditions. If you live in a very cold area, you may need to leave more than 6 frames, whereas, in a warmer climate, you can leave less. If you’re uncertain, it’s better to err on the side of caution and leave at least 6 full frames of honey.
If you find there are not enough honey frames for the Winter period, you will need to feed your bees. Feeding should start in late Autumn, preferably before the bees form their Winter cluster.
In Winter, the bees cluster together in a tight formation surrounding the queen. The cluster is usually located in the hive center and is designed to keep the queen and the brood alive by keeping them warm. Bees rotate through the cluster, moving to the center and out again, fanning their wings for warmth.
Promote Honey Production
Feed the colony sugar syrup. Dissolve 2 parts white sugar to 1 part water. Allow it to cool before placing it in the hive.
To administer the sugar syrup, you can use a coffee tin (or similar) filled with the syrup. Make several holes, about 1 millimeter (0.04 inches) wide across the lid, and place it upside down on top of the frames.
I usually place two rulers on the frames before inverting the tin to prevent the container to stick directly to the frames. You will need an empty super to conceal the can and the hive lid.
After three or four days (when the weather is over 18 degrees Celsius), I check to see how much sugar syrup the bees have consumed. If it’s empty, I refill or replace it with another tin.
You can also use a Ziplock bag filled with syrup and place it on the hive mat or frames directly. Using a sharp knife, scissors, or razor blade, puncture the bag to allow the syrup to ooze out. Worker bees will come up to feed.
Replace the lid and check in a few days to see if the bag needs replacing.
Feeding the colony in this manner has the advantage of preventing bees from other hives robbing the hive.
Keep in mind feeders should not be placed outside the hive. This encourages robbing by bees from other hives that could be diseased and, therefore, could spread it to your hive.
Sugar syrup is a substitute for nectar and makes low-quality honey but can be used by the bees in the short term. Honey or nectar is needed by the bees for energy, allowing them to continue to perform all their tasks.
Honey in the frames acts as insulation, too, keeping the brood warm.
Winter
Shutting Down the Hive For Winter
Your climate will determine when to close your hive for Winter. If you are unsure about when and how to do this, talk with your local beekeeping club members about what they do. They will be happy to advise you.
A tall hive with three or four boxes is too many for the colony to maintain warmth during the Winter. The queen does not lay as many eggs because there would be too many bees to feed and not enough flowers in bloom to feed them.
When you are confident that your hive has enough honey stores, on a warm Autumn day, reduce the hive down to one or two boxes and replace the hive mat (if using one) and lid.
Place the frames from the super into individual plastic bags and secure them with tape. Place them in the freezer for two days to kill wax moth or other larvae, then put them in an airtight storage container.
Winter is the time for hardware maintenance too. Tasks such as repairing or rewiring frames, cleaning, and painting supers can be undertaken. Take an inventory of existing hardware before you decide to purchase extra equipment. This should all be done in preparation for Spring.
Unless the temperature is above 18 degrees Celsius (64 degrees Fahrenheit), the hive should not be opened for very long, if at all.
Conclusion
You will find the different seasons in the year call for various tasks. Coming into the Spring season, there will be many tasks to perform, especially during the first inspection, when the hive has not been examined for weeks or even months.
The inspection’s main aim is to check on the strength and health of the colony and see if it is ready for the Spring honey flow.
Not only does the health of the hive need attention, but the hive components, including the base and lid, should also be maintained and cleaned.
Allow a warm day, with little to no wind to conduct the first inspection. Subsequent inspections during the Spring and Summer can be less thorough but will keep you aware of the health of your bee colony.
Coming into Autumn and Winter, the central jobs will focus on securing the colony’s survival during the cold months. Getting the hive ready for Winter starts during Autumn before the weather turns cold and the bees form their Winter cluster.
Vigilant and practical beekeeping during this time will ensure your hive will survive Winter and be ready to thrive during the Spring.
When and How to Harvest Honey
When and How to Harvest Honey
Source: https://busybeekeeping.com
An exciting time for beekeepers is honey harvesting time. Whether you are a new or experienced beekeeper, the enjoyment of harvesting honey from your own hives is a much looked forward to event.

Generally, it is a good time to harvest after a major nectar flow, and the hive is filled with capped honey. As this may vary according to where you are located, it’s not a bad idea to check your hive every couple of weeks during Spring and see what progress your bees have made.
For example, here in Australia, the honey harvest begins in Spring. Once the weather warms up, and flowering plants abound, I decide if, when and how to harvest keeping in mind some factors before collecting the golden nectar from the hive.
When to Harvest Honey
Collecting honey depends on three factors:
- Time of the Year
- Time of the Day
- Weather
Time of Year
The time of year will depend upon where you live. In warmer climates, the harvesting season will be longer, and more than one harvest might be taken. In cooler climates, the time to harvest will be shorter.
In Australia, I live on the mainland in the most southern location. In our climate, I usually harvest in late Spring and possibly another harvest is taken in late Summer. This only occurs if the hive is strong and there is a strong nectar flow.
Some seasons produce more honey than others and it depends upon the abundance of available flora and the weather conditions.
In other countries and climates, the timing for the harvest will vary. If you are only starting out and feel unsure about the best time to harvest in your area, it might be a good idea to seek out other local beekeepers and ask them about it.
Time of Day
Where I live it’s best to remove honey between the hours of 11 am and 4 pm approximately. Between these hours the bees are most actively out foraging, so there are fewer bees in the hive to be concerned about.
Depending upon where you live, your harvesting time may be longer or shorter. Harvesting at night is not an option. The weather will be cooler, and you risk the health of the colony. Plus, the bees would not like to be disturbed while they are sleeping!
Weather
Harvest the honey on a warm, calm and sunny day above 18 degrees Celsius. (64 degrees Fahrenheit). At this time many bees will be out collecting nectar and pollen, so once again there are fewer to be concerned about you removing honey.
How Much Honey Should I Harvest?
How much honey you will harvest depends on your local weather conditions and the strength of your hive. Discuss this with the members of your local bee club.
I err on the side of caution and take frames of honey that are about three quarters capped on both sides. If cells are open and nectar falls out, then that frame isn’t ready to be taken.
I leave the colony the equivalent of four full frames of honey spread across a number of frames. This is just in case the weather turns cold and the bees cannot leave the hive to forage.
I also don’t take honey from a colony in their first year, preferring them to become a very strong colony. In subsequent years, the honey harvest should be more plentiful.

How to Harvest Honey
Preparation
Before you harvest honey, you need to consider where you are going to extract the honey because it needs to be bee-proof and cleaned easily.
Honey is extremely sticky and gets onto everything! The worker bees will smell the honey and follow you, so I use a large, strong plastic tub to securely store the honey frames once I have removed them.
I use my laundry as my extraction room as it has a tiled floor, a sink and immediate access to the yard, making the clean-up relatively easy.
Gather all the equipment you are going to use and allow yourself enough time to harvest the honey.
It’s best to extract as soon as you can after you have removed the capped frames because the honey is nice and warm and is easy to extract. The warm weather also helps speed up the extraction process.
You will need:
- Some food grade buckets with lids and taps at the bottom
- A double strainer or sieve – This sits over your food grade bucket and strains the wax out of the honey.

- A manual or electric extractor – Suitable if you plan to extract many frames at once.
- An uncapping knife – This will be used to remove the wax capping to release the honey. The advantage of one of these is that it will remove the capping in sheets. I use two large kitchen knives heated in hot water to more easily cut through the capping.
- A capping scratcher – This tool can reach where the uncapping knife will not, but it produces a lot of wax particles that can block the sieve.

All these supplies can be bought from a beekeeping supply store, online or your local beekeeping club may have some of them.
If you want to buy an extractor, ask members of your club where they buy their extraction equipment. Many beekeeping clubs hire extractors to members which is much cheaper than buying your own. The food-grade buckets may be also purchased from a hardware store.
Using A Sieve Or Strainer
If you don’t have an extractor or access to one, you can use a sieve or strainer to filter your honey. This method is inexpensive and simple, but it takes longer.
Place your sieve over your bucket. I balance the heavy honey-filled frame on a length of wood suspended across the bucket and swivel the frame around as I cut the honey, so it falls (mostly!) into the sieve.
To begin, cut the capped comb away, beginning just under the first frame wire and leaving the comb above the wire untouched. This gives the bees a starting strip of comb when the frame is returned to the hive. It’s a good idea to cut half a length between the wires each time so it will fall into the sieve.
Gravity causes the honey to run out. This process can be sped up by cutting into the comb with a knife from time to time.

Using An Extractor
I use a three-frame manual extractor when I have many frames to harvest. It’s faster and unlike the previous method the comb is not cut away, only the capping removed. This leaves the drawn comb mostly intact and the bees can simply begin filling the cells again when returned to the hive.
To remove the wax capping you can use a knife warmed in hot water and dried, an electric knife or a capping scratcher.
I sometimes use a capping scratcher, although it has the disadvantage of possibly blocking the sieve because it produces a lot of wax particles. As a result, you will have to clean the sieve more often.
Over one on your food grade buckets, scratch the wax capping off both sides of the frame then place it into your extractor. Repeat with each frame until the extractor is full.
Using a heated or electric knife has the advantage of removing the capping in one sheet so the sieve is not blocked. Use a downward sawing action and the sharp edge of the knife will slice through. A scratcher can be used where the knife may not reach.
The extractor will include instructions as to how to load the frames and in which direction the extractor needs to spin in order to remove the most honey.
If you are using, for example, a three-frame extractor and only two frames left to extract, you will need to put an already extracted frame into the vacant spot, so the extractor remains balanced during operation.

As soon as is practicable, return the frames to the hive so the bees can clean them and reuse them to store honey.
If you can’t or don’t want to, you can place the frames into plastic bags, tie them up and place them into your freezer for 48 hours. This will kill any wax moth larvae and you can then store the frames in a secure tub ready for next season.
Conclusion
Extracting honey from your hive is an enjoyable, rewarding experience. It is a seasonal task that can be performed inexpensively and easily, just make sure you are organized. Beekeepers can extract their honey manually or using an extractor.
Have all the necessary equipment prepared the day before, ensuring you are extracting on a day when the weather is warm, and the honey will flow readily. A secure area free of bees is essential too.
If you have questions, ask a local beekeeper or a member of your nearest beekeeping club. They will be happy to assist.
How To Plant A Bee-friendly Garden
How To Plant A Bee-friendly Garden
Source: https://busybeekeeping.com

As a beekeeper, it’s worth considering the types of plants you have in your backyard. A variety of plants which flower at different times of the year will help provide bees with enough pollen to thrive.
Bees have a strong relationship with flowering plants. They rely upon them for nectar and pollen which they use for food. Without a variety of flowering plants, bees would not survive.
The male part of a flower, or anther, produces pollen which is used by bees as their protein source. It is used in the making of bee bread which is fed to the developing larvae (or babies). The pollen is noticeable as the yellow or orange substance on the bees legs, having been accumulated as the bee moves about the flower.
Nectar is a sweet, sugary solution that provides the bees their energy source. The nectar is produced in glands called nectaries and is usually in the deepest part of the flower. As the bee moves about the flower, some of the pollen it has collected will be brushed onto the stigma, or female part, thus pollinating the flower.
When observing my own foraging bees, I’ve noticed they will visit many flowers on the one plant during the one foraging trip before they return to the hive. This makes sure plants of the one species will be successfully pollinated, ensuring their survival.
Plants That Attract Bees
As a beekeeper it’s a sensible idea to ensure the area around your hives is filled with flowering plants that will provide good supplies of the pollen and nectar bees need. Like all living creatures, bees need an array of different flowering plants so their diet is varied and provides all the necessary nourishment. There are some considerations you need to think about before choosing what to plant. Before discussing these, have a look around your garden and take note of the plants you already have. Ask yourself these questions:
- Do they flower? If so, what time/s of year?
- How long do they flower for?
- Are the flowers frequented by European bees or other pollinators?
This assessment of your garden will help you determine what plants you need to add in order for your bees to have year-round access to nourishing flora. Of course, bees aren’t going to just visit your garden. They can fly several kilometers in search of a worthy food source. But it certainly helps if they do not have to expend a lot of energy in search of food.
When Does The Plant Flower And For How Long?
Before choosing plants for your bee-friendly garden you need to find out what time of year the plants actually flower – and for how long. Perhaps the plant will flower more than once in the year or it will have a long flowering season. Either of these traits mean the plant is worth considering for your garden.

Many plants just flower in the Spring, but they provide an abundance of nectar and pollen at that time. This is beneficial to the bees because it is the time of year when the hive is expanding in numbers and more food is needed to feed the developing brood.
Once you find some suitable plants limit yourself to a few to start with. Ensure the plants flower at different times of the year. Buy three to four plants of the same sort and group them together because the bees will access all the flowers from the same type of plants during one trip.
I’d suggest not buying too many in the beginning because you need to find out how well the plants will grow in your area and in your soil. It’s important to have plants that flower in late Summer and Autumn too because the colony needs to build up stores of food to see it through the Winter.
It’s worth talking with an experienced beekeeper in your area to find out what plants they have growing in their garden that attract bees. From walking around your neighborhood at different times you will soon see what plants are most visited by bees.
Also go to a plant nursery and tell the nurseryman what you are looking for. Describe your garden’s characteristics of light, shade and soil type so that you can make an informed plant choice.
Flower Color
Bees have complicated compound eyes, thousands of tiny lenses that are united by the bee’s brain to make one picture. A group of plants of the same ‘bee-friendly’ color that are flowering together will stand out more to a bee than one single specimen.
Bees are strongly drawn to the colors blue, purple, violet, white and yellow. Bees can detect ultra violet light, something we as humans cannot do. Many of the features of a flower that are attractive to bees are not seen by us. You can ensure bees are attracted to your garden by having groups of plants of different heights and sizes grouped together. Place them in sunny locations in your garden as bees prefer to visit plants that are exposed to the sun for lengths of time.

Native Plants or Exotic
My own garden is made up of mostly native and indigenous plants and this was a decision we made when designing the garden. This was before I retired and decided to take up beekeeping.
European honey bees have become well adapted to the native flora of Australia, in particular Eucalyptus trees which produce copious amounts of nectar when in flower. We live adjacent to a state park which has many eucalyptus trees.
If you have a preference for plants that are indigenous or native to your area, I’d suggest you visit native plant nurseries and consult with the nursery staff to find out which plants would be preferred by bees and other pollinators. As well as this, members of your local beekeeping club may advise you as to which plants are favored by bees.
Our garden, although mostly native, also has four vegetable plots and a herb garden. Often we allow some of our vegetables to flower in order to collect seed, and these plants are favored by the bees also. Many of the non-native plants are contained in pots and are scattered throughout the garden together in sunny locations.

The Use Of Sprays In Your Garden
A word of warning here. If you use commercial sprays or powders to control unwanted insects or weed species in your garden you must consider the effects they will have on the bees and on other beneficial insects before you use them. The sprays can be taken back to the hive via the pollen or nectar collected and can severely compromise the health of the colony.
Remember also there are most likely other bee colonies in your area that will be impacted by what you do. Insecticides and powders don’t discriminate between the pests and the beneficial insects.
There may be another non-toxic alternatives for your garden. Natural alternatives can be sourced via the Internet, books or magazines.
Conclusion
It doesn’t matter what size your garden is – you can always incorporate more bee-friendly plants. You may not want to change your existing garden too much, but you can always find an area to add to or renovate with flowering plants that are suitable for your bees and other visiting pollinators.
Why Is Beekeeping Important?
Why Is Beekeeping Important?
Source: https://busybeekeeping.com

Most people understand that bees – and beekeeping – are important. But many of us don’t know why exactly that is the case.
Beekeeping is important because of the vital role bees play in nature and human society. Beekeeping enables us to harvest valuable products such as honey, beeswax, propolis, bee pollen and royal jelly. Bees are also crucial for the pollination of the world’s crops. By keeping bees, we can understand the dangers they face, enabling us to devise strategies to eliminate potential threats and ensure the bee population can thrive.
Bees Are Important To Humans Because They Make Products We Use
Honey
Honey is the most desirable product made by honeybees and is harvested by beekeepers for a variety of uses. The main use, of course, is for food. People enjoy honey as a spread, but it is also commonly used in cooking, baking and dessert making. Because its natural properties like its high sugar content, acidity and low moisture, honey has a very long shelf life.
Beeswax
Honeybees secrete wax to build honeycombs in which they store honey. It has been used by humans for thousands of years and is still commonly found today. Perhaps the use most people think of when it comes to beeswax is to make candles. However, beeswax is also widely used in pharmaceuticals such as pills and ointments. In skincare and cosmetics, beeswax is often used because of its ability to repel water. It can be found in products such as lip balm, hand creams, moisturizers, moustache wax and pomades, eye shadow, blush and eyeliner.
Propolis
Sometimes referred to as bee glue, propolis is the substance bees make from a variety of plant resins. It is used by bees to increase ventilation against rain and cold weather, as well to protect the hive against parasites, fungus disease and bacteria. Propolis has been used in traditional medicine for many years. While many believe it to have antiviral, antibacterial and anti-inflammatory properties, there is little scientific research has been conducted to prove its effectiveness.
Royal Jelly
Royal jelly is a secretion made by bees to feed larvae. Royal jelly is often used as a dietary supplement. While some people believe it may have a variety of health benefits, there is little scientific research which proves its effectiveness.
Bee Pollen
Bee pollen is used as a supplement and is thought by some to have a variety of health benefits, such as relieving inflammation and strengthening the immune system. However, as is the case with propolis and royal jelly, there has been little scientific research to prove its effectiveness.
Bees Are Important Because They Pollinate Many Of The World’s Crops
Pollination is the movement of pollen from the stamens (male organs) to the stigma (female organs) in the same or a different flower. Pollen can be distributed by water, wind, and animals like bees. Many plants depend on these animals to pollinate.
Pollination by animals is essential because it can be more reliable and efficient than dispersion through other sources like the wind. It is also vital for crop production. Around one-third of crops needed for human food supply depend on pollination by bees.
Bees have adapted to become exceptional pollen carriers as they not only collect pollen for themselves, but they also do it to feed the young members of their colony. Bees have unique hair on their hind legs and abdomen that allow them to collect and carry significant amounts of pollen. The probability of bees transferring pollen from one flower to another is quite high as they can visit many flowers while carrying pollen before going back to their nests.
Studying Bees Gives Us An Insight Into The Threats They Face
Disease, parasites, pesticides and long-distance transportation of colonies are among the many factors that lead to colony loss. Other long-term threats to bees involve climate change and deforestation. To humans, this means a potential reduction in food crops and a risk to the economy in general.
By keeping bees, we are able to learn more about them. This gives us an insight into how they live their lives. It can help us understand why bees die prematurely and how to help them. It also provides an incentive for beekeepers to build up their gardens with more native plants as they are the primary source of food of bees.
Summing Up – Why Is Beekeeping Important?
Beekeeping can be an excellent hobby to have as it will help you relax, spend time outdoors and learn more about these incredible creatures. If you also have flower beds, fruit trees and a veggie garden, it will help to maintain them and grow them. Chances are, as you go into your beekeeping journey, you’ll also become an advocate for practices that protect bees, contributing positively to the environment and even your local economy.
What Is A Queen Excluder And Do I Need To Use One?
What Is A Queen Excluder And Do I Need To Use One?
Source: https://busybeekeeping.com
An excluder is a selective barrier used to confine the queen and drones to the brood box. It’s placed between the brood box and the honey super and allows only worker bees to pass through the holes.

This means that no brood will be laid in the honey super – so fully capped frames of honey can be taken and harvested without brood being in them.
Queen excluders are made from either plastic or metal.
Plastic excluders are much cheaper and are more popular for this reason. They have the advantage of not providing any hiding holes for pests such as the small hive beetle, however over time they can become brittle and break.
Metal excluders will last longer and they are generally easier to clean as they don’t bend when you are scraping beeswax from them. However, like all metal, they heat up on very hot days and may contribute to the hive becoming overheated.
There are advantages and disadvantages to using queen excluders and I will outline them below.
My preference is to use one because I like to know where to find the queen should I want to requeen the hive.
If an excluder isn’t used in a hive, then the queen will lay brood in an oval pattern at the center of the hive where it is warmest. This leaves the outer frames for honey storage.
Generally speaking it is up to you as the beekeeper to decide if you want to use a queen excluder. Below is a summary of the advantages and disadvantages in using one.
Advantages
- Using an excluder separates the queen from the honey super/ supers ensuring frames of honey without brood can be taken and harvested.
- The queen is confined to the brood box so she will be easier to find should you need to do so.
- The wax in the honey supers will remain clean and light in color as no brood cocoons or excrement can taint the wax.
- As many workers will remain in the brood box to tend the queen and the brood, fewer bees will need to be removed from the super when frames are taken for harvesting.
- Pollen is most often stored close to the brood because it is then readily available to feed them. As such, little will be in the honey super so the honey won’t be discolored from it.
- Using a queen excluder allows the beekeeper to manage the amount of brood the queen lays and also where it is laid. The advantage here is that a colony with less brood have less to defend and therefore are more manageable.
Disadvantages
- Using a queen excluder may restrict airflow through the hive and on very hot days the colony could become overheated and the brood could die. Metal excluders also heat up in very hot weather and this may contribute to overheating also.
- Worker bees may find it hard to get through the gaps in an excluder when they are carrying honey to be stored. This may reduce the amount of honey that gets stored in the honey super.
- Sometimes the workers’ wings may be damaged as they try to get through the gaps.
- As worker bees vary in size and shape, the width of a single gap in an excluder may not suit all the hives in your apiary.
- Queens also vary in size and may inadvertently get through the gap of an excluder and not be able to return. This is especially likely if the queen is a small virgin or newly mated queen. If she starts laying, when the bigger drones hatch they can be trapped above the brood box.
- The brood size is restricted if you use an excluder and so can encourage your bees to swarm because they don’t have room to expand. You must be vigilant, and give them more space to grow when needed.
Conclusion
Deciding whether or not to use a queen excluder is up to the individual beekeeper. You must look at the advantages and disadvantages and decide what is best for your situation and your individual hive or hives.
If you are new to beekeeping, I’d suggest talking with experienced beekeepers that you will find at your local beekeeping club and ask them their opinions about queen excluders. Weigh up their suggestions and then you will be better informed to make up your own mind.
What Is An Entrance Reducer And Should You Use One?
What Is An Entrance Reducer And Should You Use One?
Source: https://busybeekeeping.com
An entrance reducer is a tool used during the winter months, or in very cold weather, to reduce the width of the entrance to a beehive.
Reducers can be made of plastic, wood or metal. They can be homemade or purchased online or from a store that sells beekeeping supplies. They are easy to install and remove.
Some reducers slide across the entrance to narrow the width, while others block the entire entrance except for several small holes that allow single bees in and out. Others are just nailed in place for the duration of Winter then removed once the warmer weather approaches.

As a beekeeper, whether or not you use one will depend on your individual circumstances, such as the weather or if the hive is weak and at risk of being attacked by a stronger colony of bees, wasps or other predators.
If you live in a warmer, humid climate may have little use for one, whereas a beekeeper with hives located in very cold areas may use entrance reducers for several months at a time.
When To Use An Entrance Reducer
An entrance reducer is beneficial to:
- Prevent cold winds, rain or snow from entering the hive and chilling the brood. Bees need to thermoregulate the hive, keeping it approximately 36 degrees Celsius or 97 degrees Fahrenheit. This can become more difficult for them in very cold weather. The use of an entrance reducer can reduce the amount of effort required to keep the hive at this temperature.
- Help stop rodents and attacks from robber bees or wasps. Rodents seek the warmth of the hive during the colder months and can damage the comb, as well as eat the pollen, honey and comb that isn’t covered by the bees. Robber bees will attack a weaker hive to steal their honey and wasps will prey on the bees in the hive. In general, weaker hives with fewer bees are more susceptible to attacks and an entrance reducer will keep out the rodents and help the colony defend itself.
When Not To Use An Entrance Reducer
An entrance reducer is not of benefit when:
- The weather becomes warmer and the temperature in the hive is raised. Bees need to keep the hive at a constant temperature year round. In warmer weather bees will bring water into the hive to cool it. If an entrance reducer is still in place there won’t be enough air circulation to get rid of the excess moisture and the inside of the hive could become moldy. Mold will seriously affect the comb, the wooden components of the hive and the brood.
- You see many bees coming and going through the narrower entrance. In the warmer months when there is plenty of pollen and nectar to be gathered, more bees will be involved in foraging for food, so the entrance reducer needs to be removed to allow the colony to maximize its food gathering capability.
Conclusion
Whether or not you uses an entrance reducer depends upon your situation, as well as that of your individual hives. Each hive is different and requires its own particular management strategy.
In the southern part of Australia where I live, the climate is quite mild and I have never needed to use an entrance reducer. The climate here, as in many parts of the world, is changing, Summers are becoming more humid so I am more focused on allowing more air to circulate within the hive, not less.
So it’s very important that you as a beekeeper get to know each of your hives and it’s needs and whether or not it needs an entrance reducer.
Bee colonies are incredible self-sufficient super organisms and have lived without the use of an entrance reducer, so be sure to assess carefully if you need one.
How To Get Bees Out Of Your Honey Super
How To Get Bees Out Of Your Honey Super
Source: https://busybeekeeping.com
There are three methods for safely getting the bees out of your honey super before you harvest your honey.
They are:
- Shake and brush method
- Use of a clearer or escape board
- Use of a mechanical bee blower
Before I outline each of these methods, you must ensure you have enough extra honey to harvest and leave the surplus for the bees. The amount that you leave will vary according to the strength of your colony and the time of the year.

As a general rule it is essential that enough honey is left in hives for winter. If flora is plentiful and the weather is good, then you have the possibility of removing honey more than once in a season.
Combs of honey that are fully capped contain ripened honey and these are ready to be extracted.
Combs that are partially capped may be taken also. Just make sure you check that the uncapped honey on the frame doesn’t drip from the cells when you turn the frame horizontally. If it does drip then leave that frame as it’s not ripe enough to extract.
Shake and Brush Method
The shake and brush method is an easy and inexpensive way to remove the bees from the honey super. As such, it’s probably the preferred method for a beekeeper with only a few hives.
It simply requires the beekeeper to shake the bees from each comb back into the hive.
It demands no specialized equipment either, just a bee brush, a bucket of water and a spare super (box) with a lid. A large, clean plastic tub will also work if you don’t have an extra super. You will need your smoker and hive tool, too.
To begin, smoke the hive gently as you normally would for an inspection. Then, remove the lid and use the hive tool to carefully separate the honey frames apart and lift one out.
I usually take the second frame in from the side, because the first frame has usually been glued to the side of the box and isn’t so easy to remove. Be careful to not roll or squash any bees.
Next, lean the frame against the side of the hive near the entrance. You now have a gap between two of the remaining frames in the hive – and the gap is made wider when you remove the next frame.
Hold this frame firmly over the honey super (box) by the top bar lugs. Give it a sharp downward flick by snapping your wrists into the gap in the honey super. This will remove most, if not all the bees and they will fall from the comb into the gap.
Remove any of the remaining bees using your soft bee brush. The bristles can be made either of nylon or hair.
Place each of the shaken frames into your spare super and cover them with a lid to prevent any nearby bees from entering. I use a large plastic storage tub with a secure lid as I find it easier to transport to where I want to harvest the honey.
I’d also have a bucket of water on hand for washing the bee brush to keep it free of honey. The bees don’t like to be covered in honey.
When you have removed all the honey frames required, put the first frame you removed back into the hive and replace the lid.
The advantages of this method are that it is simple and inexpensive and ideal for the hobby beekeeper. It also is quite gentle on the bees and requires only one trip to the hive.
Escape or Clearer Boards
An escape or clearer board is a one way device placed on the hive below the honey super. It allows the bees to leave the honey super but not return to it.
If you are a hobby beekeeper with only a few hives this is another method you could use.
The most common type of clearer board has four escape devices, one in each corner.
Alternatively, there is one escape device in the center of the board.
You should open the hive the afternoon before you are going to remove the frames of honey, as you need to leave the escape board on overnight to allow the bees time to leave the honey super.
During the late afternoon, gently smoke your hive and open it.
Temporarily remove the super of combs to be extracted from the hive. Then put a super of empty combs in its place above the brood nest because you want the bees to have room to move down.
Next, place the escape board on top of this super, making sure it is the right way up.
Put the super with the combs of honey back on the hive above the clearer board and replace the lid.
The next day when the weather is warm enough, check the super containing the combs of honey to see if the bees have left the combs.
If only a few of the bees are left, the combs to be harvested may be removed from the super (box) and then brushed to remove the remaining bees.
If only a few bees have left the honey super, allow another day for the method to work. Check to see the none of the escape devices are blocked.
You can then remove the frames of honey and place them in a large clean plastic tub with a secure lid.
The honey super and hive cover above the escape board have to be in good condition, and importantly they should be bee-proof because you don’t want uninvited guests stealing your honey.
You should take care when using this method during hot weather because the colony cannot control the temperature in the super above the escape board, and you could find some melt down of your honey combs.
The advantages of this method are that it is simple and doesn’t require any handling of the bees by the beekeeper and therefore reduces the likelihood of being stung. As a result it causes minimal disturbance to the colony as a whole.
However, it does mean that you have to open the hive up twice in two days, so it requires a bit more work.
Mechanical Bee Blower
A mechanical bee blower is used by commercial beekeepers with a large number of hives as it is a fast and efficient method of removing bees from the honey supers.
If you are a hobby beekeeper like me, with only a few hives, you most likely wouldn’t use one of these, because it is both expensive and noisy.
If you want to explore this option further, consult a commercial beekeeper for advice. Looking on the internet for bee blower is also an option.
The blower is motor driven and it generates a stream of air that is directed along a flexible plastic hose or pipe. The air comes out of a restricted outlet and is placed between the combs to blow the bees from the frames.
This method might sound harsh but the bees are removed with being injured.
When the bees are blown from the frames they generally fly around but you have to take care not to squash them when they land on the ground.
A disadvantage of this procedure is you would be more likely to be stung as the mechanical blower is a noisy device that creates quite a disturbance.
However, to the commercial beekeeper with many hives to harvest it is a fast and efficient method of removing the bees from the hive.
Conclusion
Removing bees from your honey super without too much disturbance to your colony is an important part of managing your hives.
The first two methods I have outlined above describe how to do this quickly and effectively without needing a lot of equipment and are ideal for the hobby beekeeper.
You can then enjoy harvesting your honey knowing you have used the best and most gentle method to remove the bees from the honey frames.
How To Store Frames Full Of Honey And Drawn Comb
How To Store Frames Full Of Honey And Drawn Comb
Source: https://busybeekeeping.com
As winter approaches and the weather becomes cooler, your colony of bees will need less space than they did during the warmer months. Therefore some frames and supers (boxes) will need to be removed and stored securely until Spring. This is known as the winter shutdown.

The climate where you live will determine when your winter shutdown begins. Here where I live in southern Australia, towards the end of April to mid-May we begin the process, but in other parts of Australia and in countries where there is snow in winter, then the process will be different, as will the way in which frames are stored.
As well as the variations in climate, the shutdown is influenced by the plants that are in flower.
First, let’s get an understanding of what the bees do in winter and why removing frames helps them.
What bees do in the winter
Bees don’t actually hibernate in the winter, but follow a certain pattern of behavior to keep themselves alive.
With the arrival of cold temperatures in Australia, usually in late autumn, you will notice your bees will start to form a cluster by grouping together to conserve heat. The queen is in the center of this cluster and the cluster fills some of the gaps between the combs.
A compact outer shell of bees helps to retain the heat generated by the bees within the cluster, whereas the bees in the center can move about freely.
An extra super and frames on the hive means your bees need to warm that space as well and in doing so, they use up a lot of energy and therefore need a lot more food to keep themselves warm.
So to help them survive the winter, you need to remove excess frames and supers so they don’t have to heat such a large space while ensuring they have enough honey to survive.
Then you safely store the frames to keep them free of disease until they are needed again.
What to leave and what to take
Here in Australia with such variations in climate, there’s no hard and fast rule on how many frames you should remove over winter. It also depends on the strength of your hive as a strong hive has extra mouths to feed so you may need to leave more full frames of honey on the hive.
As a general guide, I leave four to six full frames of honey in the hive over winter to feed the bees through until Spring. The rest are taken and stored and below are the steps I take to prepare them.
How to store full frames of honey and frames of drawn comb
The method of storing frames full of honey and those with empty drawn comb is essentially the same.
Frames full of honey can be stored for your colony as emergency food supplies in case their stores become low during the winter.
I use an airtight plastic tub to store my frames and each frame is individually sealed in a large, clean plastic bag available from the supermarket.
Before I place the full frames into the plastic tub, I put the frames in the freezer for two days to kill Wax Moth and other pest larvae. Unless you have a large freezer with plenty of space you will have to place them one at a time in the freezer.
For frames with only drawn comb, they too are placed individually in clean plastic bags, taped up and placed in the freezer for two days before storing them in the airtight plastic tub. I have a tub labelled ‘drawn comb’ and one labelled ‘capped honey’.
What to do with partially filled frames of honey
It’s usually not a good idea to leave partially filled honey frames in the hive during winter, unless there’s not a lot of it, because uncapped honey left on the hive can take in moisture and ferment.
The same thing can happen if you try and store these frames in clean plastic bags over the winter, not to mention the fact that the bag becomes very sticky inside and you’ll have a mess on your hands when you try to get it out of the bag and into the hive.
There is a method you can use if you don’t want to store any partially filled frames. Get the bees to clean them up for you!
Remove each frame in turn and score the surface of the capped comb with a cappings scratcher and then return the frame to the super. Do this for each partially capped frame.
The next step is a bit tricky. You need to carefully invert this box of frames upside down and place it back on top of the hive. Because the cells are now facing downwards all of the honey will flow out into the hive and will be cleaned up by your bees.
Make sure you put a queen excluder on top of the frames before turning them over to prevent them from falling out of the box.
The bees will store the free flowing honey elsewhere in the hive because they cannot replace it in the original box as the cells are facing downwards.
After a few days you can remove and store the frames because your bees will have cleaned them up.
If you want to leave the bees frames of uncapped honey over the winter, then move them close to the bee cluster so the bees will not have far to go to use up the uncapped honey. Your bees won’t want to break the cluster as they can lose too much heat doing this.
Conclusion
Storing frames of honey and drawn comb is an important part of hive management and is most often done during winter.
It’s necessary to know how best to do store them, so there is minimum chance of pests invading the frames during the storage period.
Having frames of drawn comb and frames of capped honey ready to return to the hive gives the bees a good head start as the weather warms up.
What Protective Clothing Do You Need For Beekeeping
What Protective Clothing Do You Need For Beekeeping
Source: https://busybeekeeping.com

As a beekeeper, some form of protective clothing is essential, especially for the face. Stings to the facial area don’t happen all that often, but when they do, significant swelling can occur. I’m speaking from personal experience here. I foolishly walked near one of my hives without protection and bent down to pull out a weed. Bang! I was stung on the eyelid. It swelled so severely within minutes I couldn’t see and the swelling soon travelled to my cheeks and another eye, and a red rash progressed to my arms and stomach. Needless to say, a doctor’s visit was in order.
I was surprised at the severity of the reaction as I’d been stung before but never on my face. It may not happen to other beekeepers, but I strongly urge you to wear some form of protective clothing. Now I always have at least my hat with its built-in veil with me.
Types Of Protective Clothing
Basically, there are three types of protective clothing for beekeepers. It’s up to the individual beekeeper to decide which one suits them best and gives them sufficient confidence to examine the hive.
The three types are as follows, varying from the minimum amount of protection to the maximum:
- Veils that cover the face only.
- Jackets that include a built-in veil and provides protection from the waist up.
- Full-length suits that provide complete whole-body protection.
In conjunction with each of these are long-sleeved gloves to protect hands and fingers from being stung.
Veils
Veils vary in design. Some of them are attached to a hat, whilst others come without a sewn-in hat and are worn over a beekeeper’s hat of choice.
Although inexpensive, a veil provides the least amount of protection. It can be difficult to prevent the bees from coming in under the veil. Even if you tuck it in to your clothes initially, as you move and work in the beehive the veil moves as well. One bee or more under your veil can be unnerving, especially for a new beekeeper.
The low cost is probably not worth it and in my opinion a veil certainly doesn’t provide sufficient protection. As a new beekeeper you will want to be comfortable and have positive experiences with your bees. Good protection, such as that provided by a well-made jacket or overalls will give you more confidence than if you were wearing just a veil alone.
If you do decide to use a protective veil just make sure you choose the stronger, thicker nylon or metal gauze netting as it will last longer. The veil mesh is black because a beekeeper can’t see through white mesh.
Jackets
Jackets have the advantage of providing more protection than a simple veil. A jacket with a built-in veil is the most practical option. There are usually two types of hood to choose from, the first has a round hood and the second has a fencing style hood.
The round-hood jacket has quite a few advantages. The hood is supported by a wire band that makes sure the protective netting doesn’t come close to the face. The round hood allows for plenty of ventilation and light and the beekeeper has the ability to see clearly wherever they turn their head, giving 360 degree views. The jacket with the fencing style hood doesn’t allow the beekeeper to look around so easily because the material hood at the back can partially block the view when his/her head is turned.
Some jackets come with a zipper up the front, others are designed to be pulled over the head. If the jacket has a front zipper, just check that when zipped up to the veil there is no gap left where a bee could enter. My jacket has a Velcro patch that fits over the zippers to ensure there are no gaps. As added protection, some jackets have zippers that cross over and a Velcro patch that is secured over the top.
When considering at jackets to buy, look if the veil can be removed for washing. It’s not a good idea to launder the veil in the washing machine as washing machine cycles are too harsh for it. In any case, the veil won’t need to be washed as often as the jacket. You should hand wash the veil with a gentle soap or laundry detergent. The suit can easily be laundered in the washing machine.
It’s important to try on the jacket and see how well it fits and how easily it can be done up securely. Move around in the jacket to see how comfortable it will be when you are performing tasks in the beehive. Check the elastic at the bottom to ensure it fits you snugly and leaves no gaps where a bee may enter. Some jackets and overalls may have elastic loops attached to the cuffs. These hook over the thumbs and prevent the sleeves of the jacket riding up when putting on protective gloves.
Although more expensive than a veil, I believe the extra cost of a jacket will be worth the added protection and peace of mind it provides you.
Overalls
Overalls are the most expensive option but offer the most protection. As a new beekeeper overalls were the best choice for me as they gave me confidence knowing there were no gaps for the bees to enter.
The overalls come with elasticized ankle and wrist cuffs that are firm enough to prevent bees from crawling inside. Long gloves give an extra protective layer. I wear gumboots for added protection too.
I’d always recommend trying on overalls before buying to check for comfort and fit. Are they easy to do up? Can you move around in them comfortably? As I’m not very tall even the smallest size was too big for me so they are a bit difficult to move around in at times. Check the zippers to make sure when everything is zipped up there are no gaps. Is there a Velcro patch covering the zippers and are there elastic hoops on the cuffs?
In the Summer months beekeeping can be hot work in a full-length beekeeping suit, so it’s important to consider the type of material the overalls or jacket are made from. You will want to find protective clothing that fits well, enables you to move around easily and is long lasting.
Usually the protective clothing is made from cotton or a polyester/cotton mix and in hot weather can become uncomfortable to wear. In recent times however newer, aerated garments have become available. The garment has two strong layers of fabric that are tear resistant and keep the beekeeper cooler on hot days. Keep in mind these garments are generally more expensive but do allow the beekeeper to ‘keep their cool’ when working in the hive on hot days.
Gloves
Most beekeeping gloves are made from calf or cow leather and have a long sleeve with an elasticized top that prevents bees from crawling inside. Although gloves provide good protection against stings, the thick material makes it difficult to manipulate components of the hive because feeling is lost. You can buy gloves with aerated sleeves, but the thinner material could allow for a sting or two.
You may decide to use thick rubber gloves or other protective gloves you have at home rather than purchasing a pair, but it’s likely these won’t provide a long sleeve for protection and there is the possibility of the wrists becoming exposed. Also, they may not provide the dexterity when working in the hive.
Conclusion
You need to feel confident when working on their hive. There are a few choices of protective clothing: veils, jackets and overalls. Well-made protective clothing is a must so when considering what garments to buy you should visit a beekeeping supply store to try on the various styles. Make sure that whatever type you choose it is comfortable, fits well, is made from suitable material and is within your price range. Good quality protective clothing will be long lasting and give you the confidence to work in your hive well into the future.
How To Light And Use Your Bee Smoker
How To Light And Use Your Bee Smoker
Source: https://busybeekeeping.com

One of the most important tools a beekeeper uses when inspecting a hive is a smoker. It’s used by beekeepers because the smoke helps to calm the bees and divert their attention to the protection of the hive and away from the beekeeper.
A smoker is comprised of several parts: a steel cylinder that holds the burnable fuel, the leather or vinyl bellows that keep the fuel alight and the lid from which the smoke issues. Many smokers have a heat shield around the outside that protect you from getting burnt. I recommend purchasing one with the heat shield, especially if you are new because you will not be used to using a smoker and have a higher chance of burning yourself.
Another tip is when transporting your smoker it’s a good idea to place it in a metal bucket if you have one. This ensures your smoker remains upright when you’re working in the hive and can be placed on the floor of your car if you have to travel to inspect your hive.
What To Use As Fuel For Your Bee Smoker
I use matches and newspaper to initially light my smoker, then I add pine needles on top. Where I live, we have an abundance of pine trees. Pine needles are also a capable fuel because they burn slowly, last long and emit a cool white smoke.
Other suitable sources of fuel include cardboard, hessian sacks, paperbark, dry gum leaves, sugar cane mulch or sawdust, to name a few. If using cardboard, hessian sacks or sawdust just make sure they are free of chemicals, as you don’t want to harm your bees.
Some beekeepers I know use a barbecue lighter or propane torch to light the fuel. This is a quick and easy alternative to matches. Experiment to find out what works best for you.
How To Use Your Bee Smoker
First of all, make sure you have plenty of fuel. You’ll need a sufficient amount to keep the smoker going long enough to complete all the tasks you have in mind to do during the inspection.
Assemble all the equipment you need – your smoker, matches or lighter and fuel in the one location. I don’t light my smoker near the hive, I have it emitting cool white smoke first then I carry it in the metal bucket to the hive, along with a bag of extra fuel just in case. Bees require cool white smoke, not hot smoke.
I take a few strips of newspaper, put them in the smoker and light them. Once they are alight, I introduce a handful or two of pine needles (or other material of your choice) while puffing the bellows.
I’ll keep puffing the bellows while adding more fuel slowly, unless the fire has gone out. (In that case, I’ll start again.)
If the fire is going well, I will add more fuel and pump the bellows, adding more and more fuel until the smoker is quite full. By this time I should have a good flow of cool white smoke, so I put the lid back on. I keep puffing the bellows to ensure the fire keeps going.
Using the Smoker
Once the smoker is alight, it’s important to remember before approaching the hive, that the smoker is emitting a cool white smoke and not a hot smoke. Hot smoke can harm the bees.
It’s also essential to err on the side of caution when using the smoker. You only want to mask the pheromones of the hive, not overcome the bees with smoke. Too much smoke can negatively affect the hive and take the colony days to recover.
Before opening the hive, first emit a few puffs of smoke into the entrance. Then slide the lid across a little and puff smoke inside. I wait approximately 30 seconds for this to take effect, then I remove the lid completely and send a few more puffs of smoke into the hive. This is usually enough to calm the bees, and they will go down into the hive between the frames.
Bees associate smoke with an approaching fire, so they will eat honey to prepare for a possible evacuation. For that reason, they will not be too focused on you. If the bees in the hive are aggressive, you may have to wait a few minutes after initially smoking the hive before undertaking an inspection.
I place the smoker back in the metal bucket and away from the hive a short distance. I still want to be able to reach it should I need it – but I don’t want to kick it over while I make my way around the hive. Nor do I want the bees congregating on it as they will get toasted! The bellows will need a few puffs every now and again to keep the smoker alight.
Putting Out The Smoker
I don’t ever actively distinguish the burning materials inside the smoker. At the end of the inspection I simply place the smoker, still in its metal bucket, in an area away from flammable materials and allow it to go out by itself. I usually undertake other tasks nearby immediately after using the smoker, so I keep an eye on it as a precaution. When the burnt material is cool, I shake it out into my compost pile.
Alternatively, rather than let the fuel burn out by itself, you could use a bucket of water to extinguish it. However, I tend not to do this as it can make the smoker a bit messy. Other beekeepers suggest sticking a cork in the spout or laying the smoker on its side to prevent air from reaching the fuel, helping it to burn out more quickly.
Conclusion
An essential tool for the beekeeper is a good quality smoker and one that is not too small. I suggest talking to a knowledgeable beekeeper at your club before purchasing one to find out what they recommend. Buy the best one you can afford, and it will last you a long time and be a reliable tool for your hive inspections.
Are Bees Attracted To Light?
Are Bees Attracted To Light?
Source: https://busybeekeeping.com
Yes, bees are attracted to light. They have an innate positive phototactic response to light, which means they move towards sources of light.
This is a common behavior in many animals and insects. Fruit flies and moths are famous examples of insects that react this way when exposed to light.

Why Are Bees Attracted To Light?
The movement of an organism as a response to stimuli from light is called phototaxis. Whenever the organism moves towards it, it’s called positive phototaxis. In contrast, the movement away from light is called negative phototaxis.
Positive phototaxis is natural in honeybees. However, forager bees show a more positively phototactic response to light compared to young bees. That’s because this attraction to light doesn’t develop until bees are old enough to become foragers and venture outside the hive regularly.
During the first 2 to 3 weeks of age, bees do jobs inside the hive, like taking care of the brood (also known as nursing), where it’s usually dark.
After this stage, they transition to foraging and go through many changes, including shifts in their endocrine system, brain structure, and gene expression — and their response to light.
If you think about it, this makes sense because light becomes more present and essential in their daily activities as they start to go outside the hive.
Are Bees Attracted To Light At Night?
If bees are naturally attracted to light, does this mean they will always fly towards lights in and around your house at night?
It’s unlikely for bees to fly outside the hive at night and become attracted by lights from your house.
Forager bees sleep at night and are significantly less responsive to light during this time. And younger bees, who tend to be more active at night than forager bees, are not as attracted to light. Plus, they generally remain in the hive until they are old enough to start foraging.
What Do Bees Do At Night?
The circadian clock of forager bees is like ours. They are active during the day and inactive at night time.
Nursing bees remain active inside the hive at night, but generally don’t venture outside until they are old enough to start foraging.
Studies have confirmed that honeybees sleep. Foragers tend to do this at night
in a position characterized by a relaxed thorax, head, antennae, and minimal movement in the antennae.
There is also evidence of them being less responsive to stimuli during their deep sleep phase. And this includes the stimulus created by light. The intensity has to be 10,000 times higher for a bee in the deep sleep phase to react to light in the way an immobile but awake bee would.
Are Bees Attracted To Bug Zappers?
Bug zappers, or electrocuting insect traps, are designed to kill flying insects by luring them with a UV light bulb. Once they get close enough, the insects are electrocuted by metal grids on either side of the UV light bulb.
UV lights are most effective at night or in dark environments because, during the day, the UV light is not strong enough to overpower the light produced by the sun.
However, because bees tend to remain in their hives at night, it is not common to see them flying towards bug zappers. Theoretically, though, a bug zapper would be effective on a bee flying around at night because bees are attracted to UV light.
Do Bug Zappers Work On Bees?
Because bees don’t fly at night, bug zappers rarely kill them. However, they do kill many other insects that have an essential role in the environment and naturally control pests – including the pests you might be trying to eliminate.
Additionally, a study found the bacteria that accumulate on bugs’ bodies don’t get zapped but instead become tiny particles that fly around the area.
Reasons Why Your Bees Could Be Flying Towards Night Lights
Even when it’s unlikely to see bees flying towards the light, it doesn’t mean it never happens! I remember finding one of my bees flying around the light in my laundry room – the closest part of the house to one of my beehives.
Here are two reasons they could be doing this, and what to do about each one:
1. ‘Zombees’ – Phorid Fly, Apocephalus borealis Or Zombie Fly Parasite
In some cases, the reason why bees show a strong attraction to light at night is called Zombie Fly, or by its scientific name, Apocephalus borealis.
This phorid fly generally parasitizes other insects like ants and bumblebees. Recently, it was also confirmed that it parasitized honeybees in North America.
Unsurprisingly, this has raised significant concern as it can become a grave risk to the honeybee population.

Photo Attribution
Core A, Runckel C, Ivers J, Quock C, Siapno T, et al. (2012). “A new threat to honey bees, the parasitic phorid fly Apocephalus borealis.” PLoS ONE 7 (1). DOI:10.1371/journal.pone.0029639. Retrieved on 04 January 2012., CC BY 2.5, via Wikimedia Commons
Parasitized honeybees are called ‘Zombees’ because of their zombie-like behavior characterized by their tendency to leave their hive at night and even during adverse weather conditions. They are also attracted to lights, seem to walk in circles or look disoriented, cannot stand on their legs, and die shortly after.
What To Do If You Suspect Your Bees Have Been Parasitized
First of all, especially if you live in North America, look for other symptoms or behavior like disorientation, loss of balance, hive abandonment, and death.
I highly recommend you check the Zombee Watch website, where you will be able to find reliable information about the Zombie fly parasite, a map of reported cases, and contribute to its research.
Zombee Watch is a citizen science project sponsored by the San Francisco State University Department of Biology, the San Francisco State University Center for Computing for Life Sciences, and the Natural History Museum of LA County.
So far, there are no confirmed cases of Zombees outside North America, so if you live in other countries, it is unlikely your bees are hosting one of these parasites.
However, if you see this zombie-like behavior in your bees and suspect of Zombie Fly parasite, notify your local authorities immediately as it could represent a biosecurity threat.
Australia
Exotic Plant Pest Hotline: 1800 084 881 (plant pests and diseases, weeds and bees).
United Kingdom
Visit: https://www.gov.uk/guidance/bee-health. Government information on other bee-related pests and diseases and contact information to report them.
2. Lights Are Distracting Them Before They Reach Deep Sleep
Bees are less responsive to stimuli during their deep sleep phase – but if you turn on artificial lights at night before bees reach their deep sleep phase, it could cause them to fly towards it.
Your bees could also be bearding outside the hive at night. This would leave them susceptible to being drawn towards nearby lights.
What To Do If Your Bees Are Attracted To Light At Night
To avoid disrupting your bees’ sleep or distracting them at night, make sure your lights, especially those close to your beehives, are turned on a few hours after the sun has set.
This gives them time to reach deep sleep or regulate the temperature inside the hive.
You can also try using red lights as they can’t see this color (as reported by Karl von Frisch in his book Bees: Their Vision, Chemical Senses, and Language).
Summing Up… Are Bees Attracted To Light?
When bees are old enough to forage and leave the hive, they are more positively phototactic, which means they move towards the light. This happens as older bees need to go outside their hive to find food and bring it back to their colony.
However, forager bees are active during the day and sleep at night, reducing the chance of flying at night and therefore getting attracted to lights.
Nevertheless, there a few reasons why this could still happen.
They could be hosting a zombie fly in their bodies – a parasite that alters their behavior and circadian clock, so they tend to fly towards lights and leave their hive when they usually wouldn’t. Or, they could be distracted by lights if they still haven’t reached the deep sleep phase.
Why Do Bees Collect Pollen?
Why Do Bees Collect Pollen?
Source: https://busybeekeeping.com
Honeybees collect pollen because it is necessary for the health and survival of the colony. Bees collect pollen and mix it with nectar or honey to make bee bread, the main food source for honeybee workers and larvae.
Bee bread provides the protein, minerals and other nutrients needed for healthy brood production. It is crucial for the development of young bees and adult bees, including the queen. Without pollen, bees could not make bee bread – and without bee bread, the colony would not survive.

What Do Bees Do With Pollen?
Bees do two important things with pollen. One is essential for their survival and the other is necessary for the survival of many species of plants and trees.
1. Food Storage
Pollen collected by bees is transported back to the hive and stored in cells because it is an essential food source for developing brood and the colony.
Once the cell is about three-quarters filled, the pollen is conditioned with nectar and glandular secretions from the bee. Within the cell, it undergoes a fermentation process that makes the nutrients more readily available. After this transformation, it’s known as bee bread.
2. Pollinate Plants
Bees pollinate (fertilize) flowers using the pollen they gather from the stamen of the plant. They collect pollen on their legs and body from the flowers they visit.
During each flight, the forager bees practice plant fidelity, collecting only one type of pollen as they fly from flower to flower on the one type of plant or tree. As pollen is carried from one flower to the next, pollination takes place.
Do Bees Eat Pollen?
Not all honeybees eat pollen. Forager bees that gather pollen do not eat it themselves. This is because, when they transition to foraging, they stop producing the enzymes necessary to digest pollen.
All the other bees, including the queen and the developing larvae, eat bee bread, which is made from pollen using a fermentation process to make the nutrients more readily available.
How Do Bees Collect Pollen?
Pollen is collected by forager bees, who are the most mature bees in the hive. Before they leave the hive to forage, they have performed all the other tasks within the hive that are necessary to keep the colony functioning well.
These tasks include feeding the larvae, cleaning and building comb, producing and storing food, and guarding the hive entrance.
Once their flight muscles, exoskeleton and stinger are fully mature, they become foragers, collecting food for the hive. Foragers keep doing this until their wings wear out and they’re unable to fly anymore.
Pollen is produced by the stamen, or male part of the plant. As foragers move across the flower, the pollen sticks to the statically charged hairs on their legs.
As they clean themselves, the pollen is mixed with nectar and pushed down their bodies into the pollen baskets located on their back legs.
Foragers carry the pollen back to the hive in the pollen baskets on their back legs. Once at their hive, the pollen is transferred to worker bees, who pack the pollen into empty cells near the brood and stored honey.
How Much Pollen Do Bees Collect In A Day?
Bees can collect up to 35% of their body weight in pollen each foraging trip. In one day, they can visit up to 5,000 flowers! In a single year, a typical-size honey bee colony collects up to 57kg (125 lbs) of pollen!
However, the exact amount of pollen collected by bees in a day depends on several factors. These include:
The Season
In the warmer months, there are more plants in flower, and therefore more for the foragers to gather pollen and nectar from. Warmer weather means more foragers will leave the hive and more pollen gathered. In the colder months, there are fewer plants in flower and fewer opportunities for the foragers to leave the hive.
The Type Of Flower
Each flower has different types and varying amounts of pollen. For bees, some pollen types are more nutritious than others. In addition, the nutritional value of the pollen gathered will vary from day to day, depending on the health of the flowering plant.
The Needs Of The Colony
The nutritional needs of the colony vary from season to season. Coming into the colder months, more food will be collected and stored to sustain the colony during Winter. In Spring not as much pollen is stored because space is needed for the queen to lay her eggs in.
How Do Bees Pollinate?
Bees pollinate (fertilize) flowers using the pollen they gather on their legs and bodies from the flowers they visit. The pollen adheres to the statically charged hairs on their legs and bodies.
Pollen comes from the stamen (male part) of the flower. Bees walk across each flower, carrying pollen from the stamen to the pistil (female part), before carrying pollen from one flower to another.
During each flight, the forager bees practice plant fidelity. In other words, they collect only one type of pollen at a time as they fly from flower to flower on a single species of plant or tree.
Pollination allows the plants to produce seeds and therefore reproduce, ensuring the survival of the plant species.
How Do Bees Get Pollen Off Their Legs?
Forager bees get pollen off their legs with the help of the worker bees within their hive. The bees use their legs and tongues to transfer the pollen from the forager bee to the worker bee.
During the transfer, pollen is mixed with glandular secretions to prepare it for storage in the hive. The worker takes the pollen into the hive and stores it inside an empty cell.
Do Bees Collect Pollen And Nectar At The Same Time?
Most bees collect only pollen or nectar on any foraging flight, but a few carry both at the same time. A bee may source and carry nectar if she becomes hungry whilst foraging for pollen.
Whether bees collect pollen or nectar is determined in part by what is most needed by the colony at any particular time, as well as how much of each is available.
The pollen is packed onto the hairy areas on the bees’ hind legs, called corbiculae, whereas nectar is sucked from the flower by the bee and stored in her special honey stomach.
Summing Up – Why Do Bees Collect Pollen?
Bees collect pollen because they need it to make bee bread. Bee bread is the main protein source necessary for healthy brood and young larvae production and is also an essential part of the diet of the queen and adult bees.
If you’re a beekeeper, you’ll need to ensure your garden has many different flowering plants and trees to provide your colony with pollen. Not all pollen is equally nutritious for bees, so it’s best to provide a variety of flowering species so they have access to a variety of pollen sources.
Bee Temperature Tolerance: Can Bees Survive When It Gets Very Hot Or Cold?
Bee Temperature Tolerance: Can Bees Survive When It Gets Very Hot Or Cold?
Source: https://busybeekeeping.com
What temperatures can honeybees tolerate? Do they die when it gets too hot or cold?
The truth is that bees are very tolerant creatures and have adapted to live in extreme weather conditions around the world.
However, like almost every living thing, they too have their limits. When the temperature becomes too hot or too cold, bees will die. But what exactly are their limits?
Well, bee temperature tolerance has been found to vary across species. Honeybees that have adapted to tropical climates, for example, will have a higher tolerance to hot temperatures.
On the other hand, honeybees adapted to cooler climates are more likely to survive when the temperature becomes very cold. This is because different species of bees have evolved over time to meet the demands of their respective climates.

Do Bees Die When It’s Too Hot?
Bees can tolerate high temperatures for extended periods. When it becomes too hot, they produce heat shock proteins, which help protect their cells from thermal-induced stress. However, if the weather stays too hot for too long, they will suffer severe body water loss and die.
One study showed that California honeybees can survive for around 2 weeks when the temperature is kept at 35°C (95°F). However, when the temperature rises to 40°C (104°F), bees only survive for about 3 days. At 45°C (113°F), bees die in less than 24 hours.
It’s important to remember that this study kept bees at constantly high temperatures. Normally, bees are subjected to fluctuating temperatures as the weather becomes cooler at night and varies from day to day. However, it does show that extended periods of extreme heat can be fatal to honeybees.
How Do Bees Survive Hot Weather?
Bees are incredibly resilient creatures. They survive hot weather by working together to maintain the temperature of their hive, which provides them with a place to shelter from the sweltering heat.
Here are the main ways in which bees survive hot weather:
- Fanning their wings in a coordinated pattern to increase airflow throughout the hive.
- Placing water droplets throughout the hive before fanning their wings to evaporate the water and create a cold air current (a method similar to evaporative cooling).
- Expanding the central cluster so that there is more space between bees, allowing for better circulation of air.
- Partially evacuating the hive when it becomes too hot inside (known as bearding).
Where the hive is located can also help keep bees cool. In fact, in tropical climates, you can find bees nesting in the open instead of the hollow of a tree. This allows for extra ventilation throughout the colony.
Do Bees Leave The Hive In Summer?
Bees still leave the hive even when the weather is very hot. There are many flowers in bloom during warmer months and bees need to collect nectar and pollen to feed the colony.
Bees will also leave the hive in search of water, which becomes vital to their survival during hot weather. Not only do bees drink water, but they use it for evaporative cooling to keep the hive at a temperature that’s safe for brood development. That’s why it’s vital there is a source of water close to the hive.

Do Bees Die When It’s Too Cold?
Bees are resilient to cold weather and have adapted to live in many parts of the world where the weather reaches very low temperatures.
Bees survive Winter by staying inside the hive and working together as a team to keep warm. If a single bee ventures out into the cold, though, it’s a different story.
Studies show that a honeybee will die within an hour if the temperature drops below -2°C (28°F). If the temperature is between 9-12°C (48-54°F), bees fall into a chill-coma where they can survive for up to 50 hours if they are then warmed back up to room temperature.
How Do Bees Survive Cold Weather?
Just as they do in Summer, bees use their hive in Winter as a shelter from extreme weather. This is especially important for the brood, which needs to be kept in a stable temperature range of 34°-36°C (93°-97°F) to safely grow into healthy adults.
Here’s how bees survive cold weather:
- Vibrating their flight muscles rapidly to generate heat (because this expends a significant amount of energy, bees eat a lot of honey during Winter)
- Clustering together to stop the heat from escaping
- Plugging any unnecessary holes with propolis to stop heat from escaping
- Worker bees transfer heat to the brood by pressing their bodies on top of capped honeycomb cells containing larvae or pupae, and vibrating their flight muscles to generate heat
Using these methods, bees can survive inside their hive even if the temperatures outside are below freezing.
The hive location can also help bees survive Winter, which is why wild swarms (as well as beekeepers who manage beehives) are so careful in selecting somewhere that protects the colony from the harsh weather.
Do Bees Leave The Hive In Winter?
In cold weather, bees are much less active because they are needed inside the hive to keep the colony warm. Cold weather also typically means fewer flowers in bloom, so there is less food for bees to find in Winter.
According to one study, most honeybees stop flying when the temperature is below 10°C (50 F). At 16°C (60.8 F), bees become active and start to leave the hive again. Above 20°C (68 F), the number of bees flying increases significantly as more and more bees leave the hive searching for food.
Temperature not only affects the number of bees flying but also how far from the hive they fly. When the weather is cold, most bees don’t fly more than 50 meters (165 feet) away from the hive to forage for food. That’s compared to when the weather is warm, when bees will fly up to 13 kilometers (8 miles) or more if they have to in order to collect pollen and nectar.
At lower temperatures, high winds, rain and low light intensity also reduce the level of flight activity in bees. Almost no bees fly during the rain or during high winds, and fewer bees than normal fly when it is cloudy.

Summing Up Bee Temperature Tolerance
Honeybees have a strong temperature tolerance and have adapted to live in many parts of the world where there are extreme temperatures.
Despite their high degree of tolerance, a bee will die if it becomes too hot (above 45°C or 113°F) or too cold (below -2°C or 28°F).
When the weather reaches these extremes, bees work together as a team to implement thermoregulation methods that keep the temperature inside their hive at a safe level.
Why Are My Bees Suddenly Aggressive?
Why Are My Bees Suddenly Aggressive?
Source: https://busybeekeeping.com
Sudden aggressive behavior in bees can occur for a number of reasons. However, a usually calm colony of bees that have turned aggressive is almost always due to a change in circumstances that has made their life more difficult.
You see, bees become aggressive because they have the need to defend and protect their hive from a situation that threatens the wellbeing of the colony.

Here’s Why Your Bees May Be Suddenly Aggressive:
The Hive Is Queenless
If your bees have suddenly become aggressive, your colony may have no queen present – either because she has been accidentally killed or removed from the hive.
This is an event that the bees have not planned for. Within a few hours they will realize there is no queen pheromone in the hive and therefore no queen. They must then nurture eggs or very young larvae into queens to bring the hive back to order.
Because there is no queen present, the colony can become aggressive until a new queen emerges and begins to lay eggs. Once the colony detects the new queen’s pheromone, calm will be restored.
Bad Weather
Inspecting your hive when the weather is too cold can cause your bees to suddenly become aggressive. Opening your hive during cold, windy or rainy weather means the entire colony is inside and you’ll have to deal with more bees than usual, who are likely to become aggressive because they are trying to maintain the warmth in the hive.
Ideally, inspections should take place on a warm, calm day when the air temperature is above 16°C (60°F), between 10am and 5pm. Thousands of worker bees will be out foraging then, leaving you with fewer bees in the hive to disturb.
Using The Smoker Incorrectly Or Not At All
Using the smoker too little or not at all during inspections can cause aggressive behavior in your bees. Bees are naturally defensive and may react with aggression if you try to conduct an inspection without using smoke.
Smoke changes the bees behavior by masking the alarm pheromones given off by the worker bees when the hive is opened.
Using the smoker too much can be a problem too, especially if you’re a new beekeeper. Because of your inexperience, you are more likely to be nervous when opening the hive. Don’t use so much smoke that you deprive them of air altogether! Just a few puffs will be enough to let the guard bees know you are there.
Poor Inspection Technique
As a beginning beekeeper, your inspection technique will not be perfect. When opening the hive the first few times you may be nervous and your movements a little clumsy.
You might accidentally squash a few bees, make sudden, jerky movements or a frame may slip from your hands accidentally. All of these events will disturb the workings of the hive and can make your bees act aggressively.
As your technique becomes more refined, you will find you can do a hive inspection without creating too much aggression within the hive. You will only improve your inspection technique by practice. Getting a few tips from an experienced beekeeper can help too.
Nectar Dearth
A nectar dearth or nectar shortage occurs when there aren’t enough nectar-producing flowers for the bees to visit. As a result, the bees can become stressed and aggressive without enough suitable flora. You may find they buzz more loudly and fly around flowering plants in a more agitated manner.
Nectar is the sweet sugary liquid that supplies carbohydrates to the bee and is found generally in the deepest part of the flower, but not all flowers provide enough nectar for the worker bee to collect.
A nectar dearth often occurs during the transition from one season to the next. To help your colony in the short term, you can feed them sugar syrup from a feeder placed under the lid of your hive.
In the longer term, plant more flowering plants that provide bees with nectar throughout the year. Bees prefer simple flowers with open, cup-like petals where the nectar is readily accessible.

Aggressive Queen
Aggression in a colony can also be due to the genetic traits of the queen. In this case, the aggressive behavior is not sudden, but inbuilt. The colony will always be aggressive, regardless of the season or situation.
You may find walking past the hive, even at a reasonable distance may cause a guard bee or two to follow you and buzz loudly.
The queen in your hive will have mated with a number of drones at a drone congregation site. The genetic background of the drones are unknown and some aggressive traits may have been passed on.
To rectify this situation, you need to requeen the hive. A mated queen can be purchased from a reputable queen breeder in Spring and Autumn. Ask the breeder for a mated queen that has been bred with minimal aggressive tendencies.
Conclusion
It is natural for bees to become suddenly aggressive from time to time. With honey stored away for the Winter months, it’s understandable that your colony wants to defend itself against anything that threatens it food supply.
The aggressive behavior may be temporary and alleviate itself over time.
However, if you notice your bees becoming too aggressive for too long, it’s important to find out why.
By observation and conducting routine inspections you will be able to work out what is going on and take the necessary steps to fix the situation, therefore ensuring the wellbeing of your colony.
Are Bees Friendly?
Are Bees Friendly?
Source: https://busybeekeeping.com
Yes, bees are friendly and don’t attack or sting without being provoked. However, some factors can shape the defensive response of bees, like genetics and their roles in the colony.

Unfortunately, the perception that bees are not friendly has spread over the years. There are even movies about killer bees that infest towns and sting people to death.
But the truth is, bees are very busy minding their own business and won’t sting people unless they have a solid reason.
Knowing more about bees and their behavior will help you avoid this painful experience. Hopefully, it will also raise awareness so people will protect bees and stay out of their way instead of killing them.
Why Do Bees Sting Or Attack Humans?
The fact that bees are friendly doesn’t mean they won’t defend themselves from potential threats and intruders.
The hive or nest is the home of a bee colony. It’s where they store honey and other resources to feed themselves. It’s also where the queen always remains and lays her eggs.
So, defending the hive is extremely important. Honeybees have developed very effective defense mechanisms that allow them to protect the hive from attackers, including big predators like bears – or us!
Standing very close to their hive and manipulating it is the number one reason behind a bee attack. Doing this is guaranteed to arouse a defensive response from bees.
Other factors that raise their alarms are color, vibration, and motion because this is how they identify intruders in the wild.
Dark colors similar to natural predators like skunks, bears, and badgers will raise their alarms more than others, which is why beekeepers generally wear white.
Sudden and rough movements can also make bees less friendly and more defensive. When approaching and manipulating a hive, slow and careful movements are likely to avoid raising their defense response.
What Makes Bees Less Friendly?
Overall, honeybees are friendly when they aren’t being threatened. However, some factors can make a group more or less defensive towards people.
Their Roles In The Colony
There are three types of bees in every colony, and each has a specific job. Only female bees have a stinger, and therefore if you come across a drone, it won’t be able to sting you – their central role is to mate with the queen.
Among the worker bees, some have the specific task of guarding the hive against intruders that may steal their resources or hurt the brood and queen. They guard the entrance of the hive and make the first line of defense.
Genetic Traits Of A Colony
Different colonies may react to attackers more aggressively than others.
A small group of bees may respond to an intruder or potential threat in a ‘friendlier’ colony, while a more ‘hostile’ colony can have a larger group of bees responding to threats.
The ‘aggressiveness’ trait of a queen will be inherited by its brood and, therefore, can determine the defensiveness level of a whole colony.
This link with genetics has a very famous example – the Africanized honeybees AKA ‘Killer Bees’.
European Honeybee vs. Africanized Honeybee
Africanized honeybees have gained a pretty bad reputation due to their more aggressive defense response than European Honeybees.
This subspecies of honeybees resulted from the crossbreeding between the European and the East African honeybee (A. m. Scutellata) after its introduction in the Americas in the 1950s.
Studies into the difference in behavior between the European and the Africanized honeybees indicate the latter shows lower thresholds of response and the ability to react more intensively, faster, and in more significant numbers to defensive stimuli. But, overall, both have a similar sequence and organization of defensive behavior.
This means Africanized Honeybees won’t attack if you don’t give them a reason, but they are less tolerant to you approaching their hive and will respond to threats more aggressively.
Specifically, Africanized honeybees:
- react defensively to intruders being 328 ft. away (100 m) away or more from the hive and pursue them for a few miles or km.
- Sting 4 to 10 times more frequently, and
- chase intruders with 10 to 30 times more bees than the European honeybees.
Special Or Temporary Circumstances
Other events might make a colony of bees more aggressive, like not having enough nectar or no queen present.
I have outlined these factors in more detail in this post.
How To Prevent Being Attacked By Bees
Prevention is better than cure. If you don’t want to deal with painful bee stings, avoid disturbing them and getting too close to their nest.
Be aware of your surroundings and pay attention to signs of a hive nearby, like buzzing sounds and bees coming and going from a particular spot. Be particularly cautious around water sources as bees need water to regulate the temperature and humidity.
If you are going to areas where you know there may be bees, it’s recommended to wear lighter colors and avoid perfumes and colognes.
Whenever you are getting too close for comfort, guard bees will warn you by bumping against your body without stinging. When you notice this behavior, pay attention, you may be approaching a hive and need to distance yourself.
What To Do If You Get Attacked By Bees
Not disturbing bees and their hive is the best way to avoid getting attacked by them, but sometimes you may encounter a particularly defensive colony or get too close to it by accident.
If bees are attacking you, you can follow some recommendations to avoid a more aggressive response. This is especially important if you suspect a colony of Africanized honeybees may be around.
- Do not kill the bee or bees attacking you. This will only increase the release of alarm pheromones and attract more to the site.
- Do not attempt to swat away the bees or wave your arms, as this might provoke a more aggressive response.
- Get away from the area and go to an enclosed space. If you are near a building or a car, go inside. If this is not an option, keep running until they stop chasing you.
- Cover sensitive areas like the eyes, mouth, nose, and ears. If you have a coat or jacket, put it on your head to avoid getting stung in your face. Be careful not to obstruct your vision when running!
- If you got stung, remove the stinger from your skin by scraping instead of pinching the stinger. This will prevent the release of venom, and fewer bees will be appealed to sting you. When bees sting a target, their stinger stays in the skin, emitting an alarm pheromone attracting nearby bees.
- Seek medical attention, especially if you are allergic or suspect you could be. Bee stings can result in anaphylactic shock, which can be fatal.
Can bees become friends with Humans?
Bees’ Face-Recognition Skills
Usually, when people ask if bees are friendly, they want to know how likely they are to sting people. But what if they can develop a relationship with people?
In 2005, a group of scientists demonstrated honeybees could recognize human faces by displaying photographs of peoples’ faces and training individual bees to visit target photos. During this exercise, they rewarded bees with a sucrose solution when they landed on the target face.
In the following stage, they changed the exercise and took away the reward (sucrose solution), and added similar faces as distractors – the results were remarkable! Bees landed on the target accurately, demonstrating the ability to learn faces and tell them apart.
They repeated the test two days later with two bees, and the results showed these bees also formed long-term memory of the faces.
If bees can identify and remember faces, do they connect with certain humans, like their beekeepers?
So, Can Bees And Humans be Friends?
While the previous experiments show, honeybees can distinguish faces, it doesn’t say much about how they feel about them.
I couldn’t find studies around bees developing emotional bonds with humans; however, research suggests honeybees can have a state of negative affect or feelings after being agitated.
I also found other reports – not yet supported scientifically – indicating that honeybees learn to identify when a threat comes from the same intruder, such as a beekeeper, from a different person with the help of the color, odor, and shape of beekeepers’.
While these are remarkable discoveries that break down assumptions we’ve had about these complex creatures, it’s difficult to make any concrete conclusions about how bees feel about humans. As American ethologist James Gould says, for now, it just means our face is just another shape or pattern for bees.
Summing Up
Honeybees can be considered friendly creatures which will only respond defensively when there are threats to themselves and their hive.
Depending on the colony you encounter and the individual characteristic of the bees, their response will be different. For example, a colony of Africanized honeybees will respond differently than a colony of European honeybees.
If you want to avoid being attacked or stung, make sure you are aware of your surroundings as there may be a hive around. Bees will warn you by bumping into you, in which case the best thing to do is to back off and avoid sudden and harsh movements as well as killing them.
Interesting research into bee behavior suggests they can recognize human faces and feel ‘bad’ after a stressful event. While it doesn’t confirm if bees see us as friends, it does show these creatures are more complex than we may think.
Bee Bearding: Bees Hanging Outside The Hive At Night
Bee Bearding: Bees Hanging Outside The Hive At Night
Source: https://busybeekeeping.com
Bearding is when many bees cluster outside the hive in a shape that looks like a beard. Bees beard because the internal temperature of the hive is too hot and humid, which can cause the brood to die and make it impossible for bees to make honey.
Bearding is done to reduce the number of bees inside the hive. This allows for enough ventilation to pass through the hive, cooling the temperature and lowering humidity levels.
When bees are bearding, they typically form large clusters across the landing board or hang from the bottom of the hive.
Why Does Bee Bearding Occur?
Imagine you come home from work on a sweltering Summer’s day and go inside to find out your house is still boiling hot. You’ve got no air-conditioning to turn on, so what do you do? Simple – you open the doors and windows, then go outside onto the front porch and enjoy the nighttime breeze while you wait for the house to cool down. It’s more or less the same with bees.

Bearding is a natural behavior and happens when the temperature inside their hive is too hot and humid. Many people often confuse bearding with swarming, but don’t worry – they are different. Your bees most likely aren’t going to swarm if they are hanging outside the hive at night.
Swarming is when the queen and a large number of workers leave the hive to create a new one. It’s a natural method of reproduction that happens because the colony becomes too large for its existing hive.
Bearding, on the other hand, is when a large number of bees hang outside the hive. They have no intention of leaving. They’re merely waiting for the hive to cool down and the humidity levels to drop. Once this happens, they’ll go back inside.
Is Bee Bearding Normal?
Bees hanging outside the hive are completely normal. In fact, it’s a sign that the colony is healthy. Strong colonies have a large population, meaning there are more bees and less room inside the hive for airflow.
Fortunately, bees are experts at regulating the temperature inside their hive. Much like the way bees cluster together in Winter when it’s cold, they also have strategies for staying cool in Summer.
These include fanning their wings to ventilate the hive and regulate the flow of air, spreading water droplets on the rims of honeycomb cells that contain brood (almost like a form of evaporative cooling), and reducing the number of bees that cluster together to reduce density in certain parts of the hive.
However, when the weather becomes so hot that these measures cannot sufficiently control the temperature inside, bees will hang outside the hive instead. This reduces the number of bees in the hive, lowering the temperature and improving ventilation.
The Reasons Bees Beard When It’s Too Hot And Humid
The temperature inside the hive is very important for bees. An internal hive temperature that is too hot and humid can be dangerous. There are two reasons for this:
- The brood could die
The brood requires temperatures inside the hive to be between 34°-36°C (93°-97°F). If the hive becomes hotter than 36°C (97°F), the brood will begin to die.
- The bees won’t be able to make honey
A hive that is too hot can threaten the colony’s existence because its survival depends on the brood maturing into fully grown worker drones and worker bees.
Ventilation is essential when bees turn nectar into honey, which they do by fanning their wings until the moisture content is between 14-18%. Once the moisture content reaches this level, the honey is considered ripe and stored inside cells in the hive’s honeycomb.
The humidity inside the hive is typically between 50-80%, with 75% being the preferred number when bees are given a choice. If the humidity reaches levels much higher than 80%, bees will not be able to turn nectar into honey, no matter how hard they beat their wings. Given honey is an essential food source for bees, a hive that is too hot can cause many bees to die.
How Long Will Bees Beard For?
Bees will continue to hang outside the hive until the temperature has cooled enough for them to go back inside. How long this takes can depend on the weather. It could be a few hours, it could be a few days, or it could even take longer.
If you live in a hot climate where the temperatures exceed 40°C (104°F), or if it’s Summer and you’re experiencing a heatwave with many warm days in a row, it might take a substantial amount of time for the bees to stop bearding outside the hive.

Every hive is different, too, so there is no exact answer to the amount of time it will take for them to stop. It can depend on the size of the colony, its overall health, how old the hive is, as well as other factors that are too difficult to measure.
But, in short, bees will go back inside when the temperature has cooled down, and they’re ready.
What To Do If Your Bees Are Bearding
Bearding is a natural behavior, so it’s important not to panic if you see bees forming clusters around the front of the hive.
You should never try to stop them from bearding by force. Instead, just leave them alone to go about their business. They know more about temperature control inside a hive than you ever could.
Don’t try to fan them towards the hive, don’t use smoke, and don’t force them to go back inside – they will do so when the temperature has cooled down.
You should, however, look for signs to make sure that the colony is indeed bearding and isn’t preparing to swarm. Here’s a quick checklist with the common differences to give you peace of mind:
| Swarming | Bearding |
| Swarming typically occurs in mid-late Spring or early Summer | Bearding typically occurs during Summer when the weather is hot |
| Swarming will most likely occur during the middle of the day, between the hours of 10 am-2 pm | Bearding will most likely occur in the late afternoon or evening, as bees return to the hive after a day of collecting pollen and nectar |
| When bees are about to swarm, they will be very loud and fly around a lot | Bearding bees are quiet and tend to stay grounded in large clusters on the outside of the hive |
| If a colony is preparing to swarm, there will be queen cells inside the hive as bees need to raise another queen for the new hive | When bees are bearding, you may notice some of them fanning their wings towards the hive entrance as they try to cool it down. |
How Can You Stop Bees From Bearding?
There are a few things you can do to help your bees keep their hive at a comfortable temperature when the weather is warm. This will reduce the likelihood and frequency that bearding occurs.
- Make sure the bees have a source of water close to their hive
If you have birdbaths or containers for bees to drink from, make sure they’re not empty. Bees not only drink water, but they also carry it back to the hive to help reduce the temperature inside. If there is no water close, it could make it difficult for your bees to cool their hive – so now is an excellent time to top up all their sources of water.
- Provide shade for the bees in the afternoon
Bees love the morning sun – but being exposed to it all day can cause the hive to overheat. You can move your bees to a shadier location during the Summer, especially if there is a suitable spot nearby. This can provide shelter from the direct sun and make it easier to keep the hive cool. Alternatively, you could try using a shade cloth or umbrella. Just make sure it’s up high enough not to impact the bees’ flight path to and from the hive.
- Use a screened bottom board to improve ventilation
I have heard of beekeepers making small holes in their beehives to improve ventilation. Still, it’s not something I would do, as it could cause the hive to become too cold in Winter. A preferred solution would be to use a screened bottom board underneath the hive instead of a solid one. This helps improve ventilation. You can swap it back for a solid bottom board during Winter to ensure the hive stays warm during colder weather.
- See if your bees need more space to build honeycomb
Poor ventilation is often due to congestion inside the hive. A healthy colony will have tens of thousands of bees – and not every hive will have enough room to fit them. Take a look inside your hive and make sure your bees have enough space to make more comb. If everything is full, you can add another honey super (or bar if you’re using a top bar hive) for your bees to build on.
Bees Bearding In The Rain Or Cold Weather
We know bees beard because the internal temperature of their hive is too hot. But what about bees bearding in cold weather – even when it’s raining outside?
If your bees are bearding even when it’s cold or raining, it’s still most likely a way to regulate the temperature and humidity inside their hive.
You have to remember that there are numerous ways in which bees regulate their hive temperature. It’s essential during Winter to keep the hive warm – but sometimes it can be too warm, despite the weather outside.
Think of your own home during cold weather. If you run the heater all day, there will be a significant difference in the ambient temperature in your house when compared with your backyard. Bees might not have heaters, but they are still highly effective at increasing and reducing the internal temperature of their hive.
So, what should you do if your bees are bearding in the rain or during cold weather? When in doubt – trust your bees. They’re experts at regulating the internal temperature of their hive. If they are bearding in the rain or cold weather, it is because there is a problem they are trying to solve.
If they don’t go back inside the hive within a day or two, you can always conduct checks to make sure they have enough internal space, ventilation, water and a cover (especially if it’s raining).
Do People Actually Wear Bees As A Beard – And Is That The Same Thing?
There is a big difference between what most beekeepers refer to as bearding – bees clustering outside their hive in the shape of a beard – and the circus trick where people hang thousands of bees on their chin (which gives them the appearance of having a beard made from bees).
A bee beard is something people do to demonstrate the rapport they have with their bees and show that bees are not as dangerous as many people think. It is usually performed as a sideshow-style demonstration at agricultural shows or as part of a circus act.
Bee beards on humans are typically formed by tricking bees into thinking they are part of a swarm. Bees are fed before to prevent the chance of stinging, then the queen is removed and attached to the person’s head. The queen then emits pheromones that attract the worker bees and form a cluster.
Vaseline is often spread on the person’s eyes and lips to prevent the bees from crawling there. This encourages them to cluster at the person’s chin and form a beard-like shape.
This is very different from natural bearding that occurs outside a hive.
Wearing a bee beard is not something I have ever tried – and I certainly don’t intend to do it anytime in the future for reasons that are hopefully obvious. I would certainly not recommend you try it at home!
Summing Up
When bees form a cluster outside the hive, it’s called bearding. This happens because the hive is too hot and humid, which can threaten the survival of the colony.
Bearding is completely normal behavior and is done by bees to reduce the temperature inside the hive. You’ll most likely notice it occurring at night when the weather is very hot.
Don’t try to force your bees back inside if you notice them hanging outside the hive. They will go back inside when the temperature has cooled down.
If you want to help, make sure there is enough water nearby, put up a shade cloth to protect the hive from the direct sun in the afternoon, or swap the solid bottom board for a screened one to improve ventilation.
How To Move Your Beehive
How To Move Your Beehive
Source: https://busybeekeeping.com
When it comes to moving your hive, there is an old rule most beekeepers follow – either move your hive less than 3 feet (about a meter) or more than 3 miles (about 5 kilometers). This is because bees generally forage up to a radius of 3 miles from where their hive sits. They use landmarks as a way to orientate themselves and find their way back to their home.

If you only move your hive 1 mile, bees will still know the area and use the same landmarks to guide them back to where their hive used to be – but when they arrive, they’ll realize their home has gone, and they won’t know where to go. Some may eventually find the hive’s new location, but many will die.
If you move the hive more than 3 miles, on the other hand, your bees won’t recognize any landmarks and be forced to reorientate themselves.
Some beekeepers ‘trick’ their bees into reorientating themselves by moving the hive to a new site (that’s within 3 miles) and placing branches in front of the entrance. The bees are forced to navigate their way through the branches to exit their hive and, as such, realize that their home has been moved.
Personally, I have never tried this method, so I cannot say how effective it is. If you decide to give it a go and find a lot of bees still return to the original hive position, you can place an empty nuc box there and wait for enough bees to cluster, then close it up and return them to the hive’s new spot.
If you’re like me and prefer to play it safe with the traditional method, you can simply move your hive by following this simple, 4-step process:
Step One: Prepare The New Site
Once you’ve decided to move your beehive, the first step should always be to prepare – or at the very least, choose – the new site. You need to put some thought into the decision because you don’t want to move the beehive halfway there, realize you’ve changed your mind, and have to move it back again.
I wrote a separate post on choosing the perfect site for your beehive which you can take a look at here. If you’d prefer the abridged version, it comes down to this: choose a spot that is easily accessible, receives sunlight in the morning and isn’t subject to a significant amount of wind. This will protect your hive from extreme weather conditions and ensure your bees remain active. You should also alert your neighbors if the hive will be close to their property, and check your local council regulations so you can adhere to any siting restrictions.
Once you’ve chosen your spot, you’ll need to level out the ground and ensure there is enough room for the hive. My hives tilt slightly forward – this prevents a buildup of water in the event of heavy rain, as a damp hive can result in mold or disease.
I also raise the hive by placing it on top of a stack of bricks. This can make it more difficult for ants or other insects from entering the hive. Plus, it makes it much easier on your back during hive inspections!
Step Two: Secure The Hive
Your hive is made up of a number of separate parts stacked on top of each other. Before you move, you’ll need to secure each section together to prevent it from falling apart. Otherwise, moving the hive could cause serious harm to your bees.
Using a ratchet strap, you can temporarily turn the many moving parts into a uniform hive. You’ll need to lift up the hive and place the strap underneath first. Once you’ve done that, you can slip the strap over the top of the hive and tighten it.
You may also want to block the entrance to your hive to prevent bees from coming in and out during the moving process. Personally, I don’t bother to do this, because I only move the hive about a meter (3 feet) at a time. However, if you are moving the hive further – for example, to a friend’s place – then you’ll definitely need to do it.
Block the entrance with something that prevents bees from getting out, but also ensures the hive remains well ventilated, such as a small panel of wire mesh.
Step Three: Move The Hive 1-1.5 Meters (3-5 Feet)
The best time to actually move your beehive is at night, once all your bees have returned from foraging. Hives are heavy, so you’ll need to enlist the help of someone else to help your lift them. When moving our hive, I usually lift one handle and my husband the other.
To make things a little easier on you and your lifting partner, it’s a good idea to place some wooden boards on the ground about a meter away from your starting point, then move the hive to sit on top of the boards.
On the second night, when you come back to move the hive a little further, you can place another set of wooden boards on the ground about a meter closer to your destination. Once you lift the hive onto the new set of boards, you can move the first set of boards about a meter closer to your destination, ready for the following night.
The boards not only help stabilize the hive and ensure it sits level, but they also ease the stress on your back and prevent you from having to bend all the way down to the ground to lift it up.
It’s important not to move the hive more than 1-1.5 meters each night, as it gives your bees time to gradually reorientate themselves every day. You will likely notice some bees flying back to the previous day’s position – but, because the hive has only moved about a meter, they should be able to find it before too long.
If you want your hive to face a different direction once it reaches its final destination, then you’ll also need to slowly rotate it each time you move. This will give your bees time to adjust as you progress towards the new site.
Repeat this process of moving your hive 1-1.5 meters each night until you eventually reach your new site.
Step Four: Arrive At Your New Destination
After many nights of slowly moving your hive 1.5 meters closer to your destination, you will finally arrive. If you’ve done it properly, you won’t have lost any bees along the way!
I usually perform the final 1-meter move during the day. This is because, as explained earlier, I raise my hives a few feet in the air by stacking them on bricks – and lifting an entire hive up that high is too heavy for me to handle!
Instead, I dismantle the hive into separate parts and re-stack it together in the new spot. I do this when the weather is warm enough because I am separating the parts and exposing the colony to the weather. This also gives me a chance to inspect the hive and ensure everything has gone smoothly. Once I’ve set the hive up again, the bees are able to get to work instantly, without the need to reorientate themselves in their new home!
Why Do Bees Make Honey?
Why Do Bees Make Honey?
Source: https://busybeekeeping.com
The more I learn about bees, the more fascinating they become to me.
They are incredibly hard-workers and highly organized creatures. Everything they do has a specific purpose. One day, a seemingly obvious question popped in my head, why do bees make honey? The answer may sound obvious, but I wanted to know more about it.
Bees make honey because, during winter, the weather is too cold to forage for pollen. Therefore, they need a food source that preserves well enough to store for some time and provides a lot of energy. This ensures they can feed and keep themselves warm during winter.

Bees Make Honey Because It Gives Them Energy For:
Foraging And Flying
Bees collect pollen to feed themselves and ensure they have enough energy to complete their tasks. When the weather is warm, they will use this energy to forage, collect and transport nectar and pollen.
If you think about it, just flying takes a significant amount of energy. Honeybees beat their wings around 230 times per second. That is over 13,000 times per minute! Imagine how much energy they spend just flying. That energy requirement may be even higher when they have to carry loads of pollen and nectar in their bodies.
Clustering And Staying Warm During Winter
Other ways bees use energy, is closely related to how they stay warm during winter.
As you might know by now, bees don’t forage during the cold months because the temperature is too low for them to do so.
Bees, like all living organisms, have the objective to sustain the survival of their species. During winter, this becomes critical as the temperature lowers and the food available from flowering plants, is scarce.
Contrary to popular belief, bees do not hibernate during winter. They hide in their hive until spring comes, but they don’t remain dormant. In fact, they are very active during this period because they need to keep themselves warm, and they do this by moving — a lot.
During the colder months of the year, bees protect their queen as she is a vital piece in the reproduction process and growth of the colony. They also have to make sure there are enough workers to reach spring so they can restart their foraging process again.
To keep the queen and the hive warm, they cluster around her while moving their flight muscles to create heat. All this movement requires high amounts of energy, so they use the honey they have produced and stored in the previous months to reenergize.
This clustering process is a fantastic way in which bees regulate the temperature in the hive. The colder the weather is, the tighter the cluster will be. On days when the temperature is a bit warmer, they will separate themselves to allow airflow lowering the temperature to a more comfortable one.
Bees will also use energy defending and protecting their hive from threats like external attackers, parasites and disease.
Why Do Bees Need Honey During Winter?
As you know by now, bees collect pollen and nectar mostly from flowering plants during spring and summer. However, when the weather gets too cold, bees cannot forage without freezing to death. Even if they could, there are not enough flowers in bloom to collect adequate amounts of pollen and nectar.
While they could collect tons of pollen and nectar and store it, the water content in both of these is too high to preserve for long periods, so they would spoil before winter.
This is where honey comes in. The nectar bees have stored in their body is passed mouth-to-mouth from one bee to another, until the moisture content is significantly reduced. The result of this process is honey, which then gets stored in the honeycomb cells and capped with wax.
Honey is also mixed with pollen to make “bee bread” which is known for its high protein content. It is particularly useful to feed larvae as their nutritional requirements cannot be completely satisfied with honey.
Is It OK To Take Honey Then?
Well, it depends on how much and when.
Harvesting honey from a new colony is usually not recommended as their energy requirements are higher. During this time, they are settling in and forming their honeycomb, which requires a lot of work. You want to make sure your young colony is strong enough so they can maintain their activities and defend themselves from threats like pests.
Harvesting honey during the warmer months of the year will allow them to have enough time and pollen sources to replenish their honey stores before winter comes. Also, you want to make sure you leave good amounts of honey for them to guarantee they will have enough.
In my post about ethical beekeeping, I explain why harvesting honey during autumn can be considered unethical and how it can endanger the beehive.
Something else to have in mind is your personal beliefs. For many people, taking honey from bees is not OK. For example, people who consider themselves as vegan often decide to exclude honey from their diets as it would be considered a product that comes from the exploitation of bees, among other reasons.
Other people believe that if you harvest during the warm months of the year and leave enough stores for the colony, the honey taken is just excess that is not vital for their survival so, in the end, it doesn’t cause any harm.
Summing Up… Why Do Bees Make Honey?
Bees make honey as a reliable food source that will allow to feed themselves and replenish their energy during the cold months of winter when there are not enough flowers in bloom, and the weather is too cold to go out of their hive.
The low moisture content of honey makes it perfect to be stored for a long time without spoiling and can also be used to make other nutritious food like bee bread.
Whether you think taking honey from bees is OK or not, is up to you. However, it is always a good practice to keep in mind how the time of the year and quantities of honey harvested could potentially endanger the hive survival.
How To Manage An Aggressive Colony Of Bees
How To Manage An Aggressive Colony Of Bees
Source: https://busybeekeeping.com
For the novice beekeeper especially, working with an aggressive colony of bees can be a little daunting.

When I had an aggressive colony I enlisted the help of more experienced beekeepers from my local club. They were very willing to offer advice and practical help.
Finding out why is important as it provides the necessary information that will help you learn to manage such a hive. There are several reasons why a colony may be aggressive, however the situation is often short lived and there is always a way to reduce or alleviate such behavior.
Why Are My Bees Aggressive?
Some reasons why your bees might be aggressive are:
- There is not enough nectar and pollen.
- The colony has no queen.
- The queen is aggressive.
- You take too much time to inspect the hive.
Not Enough Nectar and Pollen
If your colony doesn’t have enough food they can become agitated. The workers may also aggressively rob a nearby hive of honey. Both situations can be avoided.
The type and number of flowers in bloom change each year with every season – no two Spring and Summer seasons are the same. Weather factors, climate changes and events such as drought, heavy rains and fire will affect what plants will flower, when they flower or if they will flower at all. Unsuitable weather conditions can prevent the bees from leaving the hive and so they must rely upon their honey stores.
As a beekeeper, it’s a good idea to maintain some form of record keeping about what is in flower in your garden, as well as nearby properties if bees from your hive visit them. The record keeping should include unusual weather patterns or events that may have occurred. This helps explain why there may be a nectar and pollen shortage at some time.
The best preventative measure is to prepare your garden even before your colony arrives with group plantings of flowering plants that attract bees. Include plants that will provide nectar and pollen at different times of the year so the worker bees have plenty to choose from and don’t have to go too far. Not all flowers provide both pollen and nectar and some look pretty but don’t attract the European honey bee.
Walk around your neighborhood to see what grows well and which plants attract bees. Ask members of your local club about bee loving plants they grow. Remember to plant a group of the same flowering plants together, not just one or two. Bees need thousands of flowers to get the nectar and pollen they require.
For an emergency situation the response if different. You will need to feed your hive a recipe of sugar syrup. Use white sugar with a ratio of two parts sugar to one part water.
Fill an internal feeder with the syrup once cooled and place it in the hive after removing an outer frame. Don’t use an external feeder as this will encourage unwanted guests!
No Queen In The Colony
If for some reason there is no queen present in the colony, bees can become aggressive. The colony without a queen will not survive as her presence guarantees the future of the hive, so the bees will work frantically to raise a new queen. They may become defensive and protective as they work to requeen the hive. Once there is a queen the tone of the hive is more settled.
If you suspect your hive is without a queen but need to confirm if your suspicions are warranted, firstly inspect the hive to find the queen. If you are new to beekeeping, enlist the help of an experienced beekeeper who is willing to join you during the inspection. The extra set of eyes is invaluable.
You should look for the queen somewhere on the brood frames located toward the centre of the hive. If you can’t see her, then the following may indicate a weakened queen or no queen at all:
- Sporadic pattern of brood or no brood present.
- The absence of newly laid eggs.
- A dwindling population of bees (as the workers die they are not being replaced).
- Several queen cells usually located at the bottom of a frame (a queen cell is much larger than usual, is shaped a bit like a peanut and hangs down from the frame).
To remedy the situation you need to make a decision quickly. Talk it over with one of your beekeeping colleagues to get their advice.
If the bees have made several queen cells then you can let nature take its course. The queen first born will kill the others and become the new queen.
However, she must then successfully return from her mating flight before she can begin laying eggs. Even if she does, it will take her one to two weeks to start laying. By this time, there may not be enough workers left alive to undertake all the work required, and the hive may still die as a result.
The other choice is to purchase a young, mated queen from a queen breeder. Ask members of your local club for a breeder they would recommend. The queen can be collected by you or can be delivered by mail. She will be in a cage with food and some attendants.
There are a few advantages if you make this choice. First of all she will be ready to lay eggs almost as soon as she is released into the hive. The cage sugar barrier will be eaten away by the worker bees and by this time her pheromones will have permeated the hive and she will most likely be accepted.
Queen breeders usually mark the thorax of each queen with a special colored marker, allowing her to be more easily spotted during an inspection. The color indicates the year the queen was born, and follows a specific pattern.
An Aggressive Queen
An aggressive queen can pass characteristics of her temperament on to her offspring, which in turn leads to an aggressive hive. I have an aggressive hive and although at times I find them difficult, they are the most active and quickest to produce honey.
Generally it’s best to replace the queen with one of a better temperament. As I mentioned before, consult members of your local club regarding a breeder they have used and would recommend. If this is not possible, then find out if your beekeeping supply store has them. Otherwise, try searching online.
Too Much Time Taken To Inspect The Hive
Bees can become agitated if you take too much time or uses too much smoke inspecting the hive. The hive can be affected and take longer, sometimes a week or two, to recover afterwards if the inspection is too long.
The bees aim to protect their colony, including the brood, the queen and the honey. They perceive your inspection as a threat and will endeavor to make you uncomfortable enough to leave them alone.
If you are a new beekeeper with limited experience, you may take longer to inspect your hive in the beginning. The key for every beekeeper is to be prepared. Have all your equipment ready by the hive before you open it. Be clear as to what you want to achieve during the inspection and consult your records as to what you found last time.
Choose a warm, calm day when many bees will be out of the hive foraging and be sure to wear white. As you become more experienced you will be able to inspect the hive more efficiently.
Conclusion
Sometimes bees become angry or aggressive and there can be several reasons why. Often it’s a temporary situation that can be alleviated by some forward planning.
Be as prepared as you can, as calm as you can and, if unsure, ask for advice from another beekeeper. As you gain experience you will feel more confident and ready to inspect your hive, cranky bees or not.
The 3 Different Roles of Honey Bees Found Inside Your Hive
The 3 Different Roles of Honey Bees Found Inside Your Hive
Source: https://busybeekeeping.com

It is important to know about the three kinds, or castes of bees in your hive and which role each of them play, so when you open up your hive you will know what kinds of bees you are looking at.
Being able to identify each kind of bee will tell you a lot about the health and strength of your hive.
The three castes of bees are:
- Queen Bee
- Worker Bees
- Drones
All three have a vital role to play in the survival of the colony.
Queen Bee
In each hive there is a single queen bee. The queen’s main function is to lay eggs into the cells on the frames. The queen begins her life as a normal fertilized egg that would usually become a worker bee, except that she is fed royal jelly for the duration of her development.
Royal jelly is a special substance secreted by the honey bee that is used in the nutrition of all bee larvae, but a queen bee is fed it in copious amounts. This diet of royal jelly triggers an epigenetic response, altering the physical structure of the bee’s DNA, turning the larva into a queen bee.
A beekeeper can recognize the cell of a queen bee because it is shaped a bit like a peanut and usually hangs from somewhere near the bottom of the frame.
Once hatched, the queen bee flies out to mate with a number of congregated drones before returning to the hive to begin laying her eggs. The semen is stored and used by the queen, in the reverse order she received it.
Queen bees are larger than both the worker bees and drones. They have an elongated abdomen that stores all the eggs they will lay throughout their lifetime. Amazingly they lay many thousands of eggs and typically live up to three years, sometimes longer. However, the length of each queen’s life depends upon how well she has mated.
Once the queen lays an egg into the cell she plays no more part in rearing the developing bee. That task is taken by the female nursery bees who are worker bees undertaking that particular role at that time.
The queen emits a pheromone, a secreted chemical factor that becomes the scent of the hive and signals to the bees that this hive is their home. At the entrance to the hive, the guard bees check each bee as it enters, testing for the right scent. They will reject any bee that does not smell right.
As the queen ages, her ability to produce the pheromone weakens and this signals to the bees that the queen needs to be replaced. The worker bees will select several eggs to become future queens and feed them royal jelly for their development. This is to instigate the epigenetic response that turns them into queens. Several eggs are selected to ensure the life of the colony continues. If only one queen is developed something may happen to her and the colony would be left queen-less.
Queens, unlike the other two castes of honey bees, are often difficult to find amongst the tens of thousands of bees in the hive. They move quickly around the frame, avoiding the light. I’ve found it best to start looking for the queen on the frames with brood on them. These are located towards the center of the hive where it is the warmest, and where the queen has been most recently.
Most people believe the queen makes the decisions for the colony, such as how many worker bees or drones will be laid, or if and when the colony will swarm. However, these major decisions are made collectively by the worker bees.
Worker Bees
Within the hive are thousands of female worker bees. They make up around 95% of the colony. Depending on the season, somewhere between 20,000 and 60,000 worker bees will be present.
In Spring there will be many more workers because the majority of plants are in flower. Worker bees undertake all the work of the colony, from tending the eggs and larvae, feeding and protecting the queen, guarding the entrance, cleaning the cells and foraging for pollen, nectar and water.
Foraging is the last task they undertake before they die. To forage, worker bees fly in a five to eight kilometer (three to five mile) radius from their hive. In total each worker makes around a quarter of a teaspoon of honey in her lifetime.
Worker bees are always looking for an abundant nectar source. When they locate one they return to the hive and communicate the location to other foragers by performing a specific dance to indicate the direction and distance of the nectar source. It’s commonly referred to as the ‘waggle dance’ because the bee will waggle is abdomen as it moves in a figure eight pattern.
When bees swarm and land nearby worker bees leave the cluster to scout for possible new hive locations. When they return they use the waggle dance to communicate to the swarm the location of their new home.
In the Summer months a worker bee typically lives between 30 and 50 days after coming out of her cell. However in very cold areas this period is quite a bit longer, because the bees are unable to leave the colony and don’t do as much work outside the hive. All the bees are required to stay inside and keep the hive warm enough for the health of the brood, the colony and the queen.
Drones
Drones are the male bees whose primary function is to mate with queens from other colonies. They are larger and noisier than worker bees and can be distinguished by their large eyes and shorter, more rounded abdomens. Drones are the result of the queen laying unfertilized eggs.
You can recognize the drone cells because when capped they create raised bumps on the frame. Usually they are located together and can be seen as the warmer Spring weather approaches. This indicates the hive is preparing for the mating season.
In the Spring the drones will fly to an area with other drones to mate with a queen bee from another hive. Unfortunately the drones only get to do this once because their genitals are damaged during the ritual and they fall to the ground and die.
Drones don’t feed themselves, they are fed by the worker bees. As Winter approaches and with no queens to mate with, the worker bees will expel the drones from the hive after chewing their wings so they can’t return. In this way the colony preserves its food supplies for the workers, developing brood and the queen.
Conclusion
Knowing the three kinds of bees and just how many there are in the hive is important information. When you conduct early inspections as a new beekeeper it can be quite daunting to see and hear the many thousands of bees swirling around the hive.
It’s a good idea to ask an experienced beekeeper if you can join them during one or more of their hive inspections when first starting out. This will give you confidence when opening up your own hive. Most beekeepers love to help other beekeepers too, so they may join you during your early inspections and point out the types of bees you are looking at.
Beehive Temperature
Beehive Temperature
Source: https://busybeekeeping.com
The internal temperature of a beehive plays a vital role in the overall health of the colony. The right temperature means the colony can raise the brood under stable conditions, as well as survive harsh temperatures in both Winter and Summer. If the temperature inside the hive becomes too hot or too cold, the survival of the colony is threatened.
The brood requires a temperature between 34°-36°C (93°-97°F) to safely develop into adult bees. For that reason, the brood area is kept inside these temperatures, while the temperatures in other parts of the hive fluctuate over a much larger range, and can reach temperatures similar to those outside the hive.

Beehive Temperature Is Important To Keep Brood Alive
The most important part of a beehive when it comes to temperature control is the area in which the brood is kept. The brood needs temperatures to be between 34°-36°C (93°-97°F). Studies suggest that a temperature outside this range can have negative effects on the health of emerging adult bees, and result in in a reduced life expectancy.
If a bee grows from larvae to adult when the hive is at a temperature of 33°C, for instance, they are significantly more susceptible to pesticides. Temperature outside the optimal range can also affect the wing development, learning ability, and even color of emerging adult bees.
In the colder months, it becomes more difficult to maintain the necessary hive temperature, so there is little to no brood rearing. Instead, bees focus their energy and resources into surviving the cold weather.
How Bees Control Hive Temperature
In many parts of the world, temperatures range from freezing cold to scorching hot throughout the year. In some areas, bees can be subjected to these temperatures in the same day. This has forced bees to develop incredible methods to help regulate the internal temperature of their hive.
Here are some of the methods honeybees use to control the temperature of their hive, also known as colony homeostasis:
Bees Choose A Site For Their Hive That Makes It Easier For Them To Regulate Temperature
Because honeybees need a nest site that’s protected from extreme temperature, swarms choose their new nest site with homeostasis in mind.
After finding their new hive, they’ll seal any unnecessary holes using propolis. During Winter in parts of the world that get especially cold, bees have even been known to use the same technique to reduce the size of the hive entrance.
Bees Contract Their Flight Muscles To Heat Up Their Bodies
Bees can increase their body temperature by contracting the muscles in their thorax (the middle part of a bees body, where the wings are located). By contracting these muscles, bees can raise their own temperature and use this warmth to heat up the hive.
This requires a significant amount of energy, which bees get from eating honey. This means that bees consume a lot of honey when it’s cold – one of the reasons why it’s so important as a beekeeper to leave your hive enough honey during Winter.
The most common way in which bees use this technique (contracting the muscles on their thorax) is to maintain the temperature of the brood so the colony can raise healthy bees. Worker bees press their thorax down onto capped cells that contain pupae in order to keep them warm. They also occupy empty cells throughout the brood area, where they insert themselves head first and transfer heat into the adjacent cells containing pupae.
Worker Bees Form Clusters And Contract The Density Depending On The Temperature
One of the main ways in which bees are able to regulate the internal temperature of the hive is by forming clusters. Bees group together to reduce or increase the surface over which temperature can be lost, depending on whether the temperature is hot or cold.
In Winter, the cluster contracts, with worker bees taking turns to leave the cluster to feed on honey, which they eat in order to produce heat. The temperature in the center of the cluster is typically maintained between 25°-35°C (77°F-95°F), which is warm enough to ensure the survival of the colony.
Bees in the center of the cluster use their thoracic muscles to create heat. Meanwhile, those in the outer shell form a barrier as insulation, to help maintain the temperature. While bees are able to maintain a warmer temperature, it would require them to consume a substantially greater amount of honey.
In Summer, the cluster spreads out and disperses, allowing for greater ventilation throughout the hive. The flow of air helps prevent the temperature from getting too hot, which can also be dangerous for the brood.
Bees Design The Inside Of Their Hive To Help Regulate Temperature
Even the inside of the hive helps bees to control the temperature. Honeycomb is not only used by bees to store food and raise the brood – the layers of comb create barriers against the cold, and bees are able to contract or spread their cluster in the spaces between each sheet of comb.
This is probably why, in tropical climates where it’s more difficult to keep the temperature low, bees build exposed nests that allow for greater ventilation through the hive.
Bees Use Their Wings To Fan Air Through The Hive
Fanning generally begins when the internal hive temperature becomes too high. Worker bees face the same direction and fan their wings to help air flow throughout the hive to prevent the brood from overheating. Other worker bees gather at the entrance of the hive and fan inwards.
Fanning by worker bees creates cooling air currents and helps to keep the hive at a desirable temperature.
Bees Use Evaporative Cooling To Create Cold Air Currents
When fanning alone doesn’t sufficiently cool the hive, bees use a method that is similar to evaporative cooling. They spread water on the capped and uncapped cells, and place hanging water droplets throughout the hive. Worker bees then fan their wings to evaporate the water and circulate the cool air around the hive.
Some bees also use their proboscis (tongue) to spread drops of water into a thin layer which can evaporate quickly – a behavior known as ‘tongue-lashing’.
Bee Bearding: Evacuating The Hive When It’s Too Hot
When the internal temperature becomes too hot, bees leave the hive and cluster together outside. This behavior is called bearding.
The purpose of bearding is to temporarily reduce the number of bees inside the hive, allowing for better ventilation to cool down the temperature. Bees often beard during Summer when temperatures reach extreme highs.
Interestingly, many beekeepers also note their bees bearding in the cold weather and rain, which shows that a low external temperature doesn’t necessarily mean the same for the temperature inside the hive.

Should You Monitor You Beehive’s Temperature?
Because the internal temperature of your beehive is important for the health of your colony, you may want to monitor it over time.
This is not something I generally do, as I live in a moderate climate where the weather doesn’t reach extreme temperatures on a consistent basis.
Besides taking care to choose the perfect location for my beehive and making sure there is enough water nearby, I generally leave the bees to regulate the temperature of their hive on their own.
Temperature control is something bees are experts at, after all – trying to alter the temperature of a beehive with artificial measures might simply make their job more difficult.
However, if you live in a climate that sees more extreme temperatures – such as snow – then you may want to monitor the temperature of the hive using something like an instant-read thermometer. This can give you an indication of your hive’s health without having to open it up for an inspection.
Beehive Humidity Is Also Important For The Health of The Colony
Like temperature, relative humidity is very important inside a beehive. A humidity that is either too high or too low can have negative effects on the health of the brood. This can both decrease the amount of eggs that hatch and also cause health problems with emerging adult bees.
Humidity levels between 90-95% are optimal for the brood area. In other areas of the hive, though, humidity needs to be kept at lower levels, especially in parts of the hive where honey is stored.
Bees make honey by collecting nectar and mixing it with an enzyme called invertase. They then fan their wings until the moisture content is between 14-18%. Once the moisture content reaches this level, the honey is considered ripe and stored inside cells in the hive’s honeycomb.
If the humidity becomes too high, it makes it difficult for bees to turn nectar into honey, no matter how hard they beat their wings. This can be disastrous for bees as they need a lot of honey to survive the Winter.
Final Thoughts About Beehive Temperature…
The internal temperature of a beehive is very important for the health of a colony. This is especially true in the area the brood is kept, which must be between 34°-36°C (93°-97°F). Otherwise, the brood is at risk of dying or having health problems when adult bees emerge. Other parts of the hive fluctuate outside of this range.
Bees are highly effective at regulating the temperature inside the hive both during hot and cold weather. Some of these methods include expanding and contracting their cluster, using their flight muscles to generate heat, fanning their wings to create air flow, and evaporative cooling to reduce internal temperature.
Moisture Content Of Honey
Moisture Content Of Honey
Source: https://busybeekeeping.com
Have you ever wondered how much moisture is in honey? The truth is that the exact amount varies depending on a given country’s food standards and the source of nectar from which the honey is made. However, in general terms, a moisture content between 17% – 21% is internationally accepted.
Moisture Content Of Honey By Country
| U.S.A (Grade A Or B) | Canada (Canada No. 1 Grade) | United Kingdom | Australia/New Zealand | |
| Moisture content of honey | 18.6% or less | 17.8% or less | 20% or less | 21% or less |
Every country has different food standards which are set by the relevant Government bodies. These food standards typically outline the accepted water level of honey. We took a look at a few different countries to give you an example – the U.S.A, Canada, the United Kingdom, Australia and New Zealand.
In the U.S.A, honey follows a grading system. There are four grades – A, B, C and ‘substandard.’
According to the United States Department of Agriculture (USDA) standards, for honey to be considered Grade A or B, it must have a moisture content of 18.6% or less.
Honey with a moisture content between 18.6 – 20% is considered Grade C. Anything with more than 20% moisture is considered substandard.
In Canada, honey that is determined to be ‘Canada No. 1’ (the highest grade) must contain no more than 17.8% moisture, or no more than 18.6% moisture if the container bears the word ‘pasteurized.’
Honey with a moisture content between 18.6 – 20% is graded Canada No. 2. Anything with a moisture content of 20% and above is graded Canada No.3.
In the United Kingdom, the grading system is different. The Honey (England) Regulations 2015 simply state that all honey must have moisture or less than 20% – except for heather honey, which can have a moisture level of up to 23%.
Food standards in Australia and New Zealand are very similar to the UK, determining less than 21% moisture content as acceptable.
How Moisture Content In Honey Is Reduced By Bees
The way bees make honey is quite fascinating and will explain where the moisture of honey comes from.
Nectar is the raw material from which honey is made. Nectar is made up of varying degrees of 3 types of sugars – sucrose, glucose, and fructose. Foraging bees collect nectar from the flowers they visit and store it in a unique organ known as honey stomach or sac.

In the stomach, an enzyme called invertase reacts with the nectar, which breaks down the sugars and converts them into a solution of glucose and water. This process is called inversion.
Once the sacs are full, the bees return to the beehive, where the teamwork begins. The solution is passed mouth-to-mouth from one bee to another until the moisture in the solution is reduced from around 70% to 20%.
The last bee then regurgitates the nectar into a cell in the honeycomb. Bees then further reduce the moisture in the nectar by fanning their wings to make some of the remaining water evaporate before they cap it with beeswax.
Another way bees promote moisture reduction in nectar is by keeping the temperature of the hive at around 93 ˚F to 95 ˚F (33.8°C to 36°C). This is another mind-blowing fact about bees. They are remarkable at regulating the temperature of their hive.
As the moisture evaporates from the nectar, it thickens and becomes honey. At this point, the water content is around 13–18%.
Why Is The Moisture Level Of Honey Important?
You are probably asking yourself, why is the moisture level in honey so important? Why is it such a big deal for beekeepers since honey is supposed to ‘never spoil’?
And it’s true. One of the extraordinary properties of honey is its very long shelf life. However, this only happens when certain conditions are met – and ideal moisture level is one of these.
Honey with a high water content has a greater risk of fermentation.
How Does Fermentation Happen?
Honey goes through fermentation when the yeast spores in it react with excess moisture.
Now, while the idea of yeast in honey doesn’t sound too appetizing, this is a natural occurrence. The bees bring yeast spores from flowers, so it’s almost unavoidable.
The good news is that, without enough water, the yeast remains dormant. However, if the water content is higher than ‘ideal’, it’s a different story.
The time it takes for a given jar or batch of honey to ferment will depend on the count of yeast spores and the moisture level it contains.
The count of yeast spores can range from one spore per gram to tens of thousands of spores per gram. As you can probably imagine, honey with a low count of yeast spores will last longer without fermenting than one with a higher count.
Honey Safety According To Moisture Content And Spore Count
| Moisture Content (%) | Fermentation Risk |
| Less than 17.1 | Safe regardless of yeast count |
| 17.1 – 18.0 | Safe if yeast count is less than 1,000 per gram |
| 18.1 – 19.0 | Safe if yeast count is less than 10 per gram |
| 19.1 – 20.0 | Safe if yeast count is less than 1 per gram |
| More than 20.0 | Always at risk |
Why Worry About Moisture Instead Of Eliminating The Spore Count?
Getting rid of all the yeast present in honey sounds like a much better approach than fixing the moisture content. That way, there’s a better guarantee that honey won’t ferment, right?
Sort of – in many cases, it’s not practical or even desirable.
To eliminate yeast, the honey must go through pasteurization, which requires heating honey at a certain temperature for a specific time.
Commercial honey producers pasteurize their honey before putting it on the shelves to make sure it has the lowest possible risk of fermenting, among other reasons.
However, temperature can also change the quality of honey. So, doing this without the proper equipment or in an uncontrolled way might end up changing some of the more desirable properties in your honey, like its taste.
Plus, pasteurizing might be easy for a big company with commercial kitchens and labs that allow for controlled and sterile conditions – but not so much for the average backyard beekeeper.
Further, given how popular raw honey has become, many beekeepers would prefer to keep their honey raw rather than pasteurize it, even if they had the equipment to do so.
So, the preferred way to ensure honey doesn’t ferment is by making sure its moisture levels are low enough to keep the yeast inactive – which in some cases is easier to do than eliminating yeast altogether.
How To Make Sure Honey Has The Right Moisture Level
The best way to ensure your honey has the right amount of moisture is by monitoring and applying corrective measures before harvesting.
Once the honey has been extracted, reducing the moisture level becomes more difficult.
Honey is hygroscopic, meaning it will absorb excess moisture from the environment.
Additionally, if you blow warm fans over jars of honey, only the layer on the surface would dry out – unless you have access to specialized equipment.
In short, if you find your honey has a higher than ideal water level, it is always easier to correct this before you extract the honey from the frames.
Capped Honey Vs. Uncapped Honey
Want to make sure you extract the honey when it’s at the correct moisture level?
Sometimes the best answer is the simplest – extract the honey only when the cells are capped.
Remember how bees make honey? The process of turning nectar into honey aims at reducing moisture because bees also need honey to last.
During the cold winter months, bees will rely on the sugary substance to maintain their energy levels and sustain life in the beehive without going out of the hive at low temperatures. Therefore, they cap the honey when it’s at the proper moisture level.

Honey extracted from capped cells usually is at the desired 13% – 18% moisture level. There are cases when this doesn’t happen, for example, when the environment is too humid and the bees struggle to reduce moisture within the hive.
However, if everything is working as it should, the water level in honey would be low, and taking honey from uncapped cells will increase the probability of having a high moisture content.
Measuring Moisture Content Before Harvesting
Besides extracting from capped cells, you can also use a refractometer to ensure the honey you will be extracting has the correct moisture level. This will give you a higher level of certainty that the moisture content of your honey is just right.
For this, make sure you have a properly calibrated refractometer and take honey from a few cells in the frame you want to extract from.

Compare the different readings you get so you can decide if the average moisture level is above or below the one you are aiming for.
Using a refractometer will be especially helpful if you plan to sell the honey as you want to meet your local regulations and food safety requirements to avoid any trouble (or unhappy customers).
Extracting As Soon As Possible
Once you are happy with the moisture level of the honey you’ve measured, the best thing you can do is extract it and store it as soon as possible.
As I mentioned earlier, honey will absorb the moisture in the environment, so the longer it stays exposed to a humid climate, the more water it will take in.
Extracting it and storing it in closed containers or jars will prevent the absorption of excess moisture.
If you live in a place where there is low humidity (50% or less), you won’t have to do this as quickly.
How To Reduce Moisture Before Extracting The Honey
Suppose you took a few honey samples from your frames and are showing a higher level of moisture than desired. What now?
There are a few ways you can bring down the moisture before extracting honey from the frames.
For this, you need to be able to control the humidity and temperature of the room you will be extracting in – unless you already live in a dry climate.
The moisture level in the honey will balance with the moisture in the air to which it is exposed. That’s why having this variable under control is extremely important.
This relationship can work for or against you. For example, if you leave honey exposed to a relative air humidity of 60% or less, your honey will release some of its water content and achieve a moisture content of 18.3% or below. This reduces the risk of fermentation almost completely.
But suppose it’s exposed to higher relative air humidity. In that case, you risk ending up with honey that can ferment quicker due to high moisture.
Relationship Between Relative Air Humidity And The Moisture Content Of Honey
| Relative Air Humidity | Honey Moisture Content |
| 50.0% | 15.9% |
| 55.0% | 16.8% |
| 57.8% | 17.2% |
| 60.0% | 18.3% |
| 65.0% | 20.9% |
| 70.0% | 24.2% |
| 75.0% | 28.3% |
| 80.0% | 33.1% |
The best thing is to use a closed room, so it is easier to adjust the temperature and air humidity level.
Also, these conditions will take longer to change in a larger space, so you might want to pick a room that is not too large, but is still comfortable to work in.
You can use a hygrometer if you want to know with certainty the temperature and the humidity in your extraction room.
At first, you might have to experiment a little to find the method that works best for you, given the equipment you have available and how much moisture your honey has.
Sometimes it will be enough to just raise the temperature in the room for the relative humidity level to drop and, therefore, for the honey to release some moisture.
On other occasions, you might need the help of a fan and a dehumidifier.
Steps To Reduce The Moisture Content In Honey
Before you begin, you will need:
- A hygrometer and thermometer.
- A base to mount your supers – this can be anything that can raise the supers above ground level and keep them stable like two bricks. The idea is to allow airflow from underneath and also stack supers on top of each other.
- A dehumidifier set between 35% to 45%
- A heater set between 77 ˚F and 86 ˚F (25˚C and 30˚C).
- I also recommend a refractometer to measure the honey’s moisture and make sure it actually gets to the right level.
- Optional: a fan
Step By Step
- Adjust the heater and dehumidifier, so the room reaches ideal conditions. Aim for the temperature to be at least 77 ˚F (25˚C) and the humidity to 55% at most.
- Put your hygrometer in a visible place so you can check on the variables.
- Leave the dehumidifier and heater running. Remember to close the door!
- Bring in your honey supers and stack them. Put the first one on the base and then stack the next one on top of it, BUT first, rotate it so it doesn’t sit neatly as it normally would, but instead, they are crossed over each other.

- The air will flow underneath and in-between the supers allowing the honey to dry up.
- Leave the supers in the room with the equipment running. Measure the moisture in the honey during the process using your refractometer. Make sure you take samples from different frames and supers to have a more accurate reading.
- The time it will take the honey to dry out will depend on several factors, including how much moisture it had in the first place, how big the room is and how many supers you have in the room.
- Once you are happy with the readings you’re getting (below 18.6% for Grade A honey), extract, bottle, and seal.
Using a fan
For this, you will need a small fan that fits inside an empty super.
- Repeat steps 1 and 2 from above
- Stack the supers neatly like you normally would but make sure the last one is an empty super to support and keep the fan in place.

- Place the fan facing down on the empty super so the air will flow from top to bottom.
- Measure your honey’s moisture every day from different spots so you can tell when it’s ready. Adding the fan can reduce the time it takes as it promotes airflow.
- Finally, extract, bottle and seal!
Additional tips
- If you don’t have a fan that sits nicely on top of an empty super, just place a fan in the room and crisscross the supers like the first method. The fan will still promote airflow in the room, helping the process.
- Don’t turn off the dehumidifier (maybe just the heater if it becomes too uncomfortable for you to work) until you have bottled the honey, and always keep an eye on your hygrometer!
- You might be tempted to leave the supers in the dry room until you get a very low moisture reading (less than 16%) but keep in mind that the less moisture honey has, the less runny it is – meaning it becomes harder to extract and work with.
How To Reduce The Moisture Content In Honey After Extraction
Hopefully, the previous steps save you from having to read this section because there are not many things you can do with extracted honey that has high levels of moisture.
If you plan to sell your honey, your last resort will be to mix a high-moisture batch with one you already know has a very low moisture level. This can be enough to bring down the overall water content and still meet the requirements to sell it.
If that doesn’t work, however…
It’s best to be safe and keep this honey just for personal use. The quicker you eat it, the better.
Storing honey in a temperature below 50˚F (11˚C) will also stop yeast activity, but the risk of fermentation returns once the temperature rises again.
You can use this honey to prepare other foods that require further processing, like baked goods or sauces that are heated.
If you are not planning on consuming it relatively quickly, keep an eye on the signs of fermentation which are:
- A visible foam or froth on the top layer of the honey
- It foams significantly while heated.
- It smells a bit like sweet wine.
- The container in which it is stored builds up in gas, so the lid of the container looks bloated or protruding outwardly.
- When you open the container, some gas is released.
- The flavor is off or acidic.
One or more of these signs might be present. So, if you see bubbles, but it tastes ‘okay,’ it can still mean your honey is fermenting.
Summing Up… What Is The Ideal Moisture Content Of Honey
- The ideal moisture content of honey varies in different countries, but it is typically between 17-21%.
- Bees reduce the moisture content of nectar to turn it into honey. They do this by mixing it with an enzyme called invertase, passing it mouth-to-mouth with other bees, and then fanning their wings to evaporate the water.
- Low moisture content is necessary to reduce the chances of fermented or spoiled honey.
- The simplest way to ensure your honey has a low water level is to only harvest capped honey.
- You can reduce the moisture content of honey before extraction through the use of airflow, as well as controlling the temperature and humidity in the room in which you perform the extraction.
- Reducing the water content in honey after extraction is almost impossible unless you combine it with a batch of honey that has a low level of water.
Can You Eat Honeycomb?
Can You Eat Honeycomb?
Source: https://busybeekeeping.com
Yes, you can eat honeycomb. In fact, the entire honeycomb – including the wax – is edible.
What Is Honeycomb?
Honeycomb is a structure of hexagonal cells made from beeswax. It is used by bees as a nursery and storage facility. The honey found inside is raw honey, which means it hasn’t gone through filtration and pasteurization processes honey typically goes through before being sold in supermarkets.
What Does Honeycomb Taste Like?
The flavor you will experience when eating honeycomb comes mostly from the honey stored in the cells. The wax doesn’t have a strong flavor.
Some people are surprised by how sweet it is when they try it. So, a little piece is enough to satisfy your sweet tooth!
I’m not a huge fan of eating the wax. I find the texture is very chewy and it gets stuck in my teeth. Some people actually really enjoy it, though, so it depends on your personal taste.

Is Honeycomb Safe To Eat?
Honeycomb is generally considered safe to eat. However, like everything in life, it’s best to enjoy it in moderation due to its high sugar content.
There are other risks associated with eating honeycomb and honey, like botulism, which is a dangerous foodborne illness that can result in difficult breathing, muscle paralysis and even death.
The population at greatest risk from this condition are children 0-12 months. Why? Because at this early stage, they don’t have a well-developed gut flora, allowing the microorganism to thrive and release harmful toxins.
Other people who may be at risk when eating honeycomb are those who have allergies to bee venom and pollen, as it might cause an allergic reaction.
Please note: this is not medical or health advice. If you’re unsure whether or not honeycomb is safe for you to eat personally, you should check with your doctor.
Benefits Of Eating Honeycomb
Honeycomb and bee products have multiple benefits that range from practical to health-related.
First, honeycomb has a fantastic flavor, and it’s very versatile. It can be used in multiple ways to raise your food to the next level! Later in this post, I will give you a list of ways you can enjoy honeycomb.
Given honey is a significant part of the comb, many of its benefits are linked to the consumption of honey.
Benefits Of Honey
Most of the health benefits found in honey come from polyphenols, compounds usually found in food derived from plants like fruits, vegetables, herbs, and even wine.
Some known types of polyphenols are:
-Flavonoids
-Phenolics acids
-Polyphenolic amides
Honey contains flavonoids and phenolic acids, which have high antioxidant and anti-inflammatory properties.
Furthermore, several studies have shown honey can be antimicrobial, antiviral, and antifungal and protect from cardiovascular, nervous, and respiratory diseases.
Honey can also promote the growth of healthy gut bacteria and even inhibit the growth of other types of microbes considered less favorable to our digestive system.
Benefits Of Beeswax
Although more research into the health benefits of beeswax is needed, studies about the antimicrobial effects of beeswax extracts and their use as a treatment for liver disease are showing encouraging results.
How To Eat Honeycomb
One of the best things about honey and honeycomb is how versatile they are. They are easy to pair with other foods and can be a great natural sweetener.
Before you start cutting, some people recommend using a plastic or wooden knife to cut the honeycomb, as metal knives can give the honey a metallic taste.
Without further ado, here are the delicious ways you can include honeycomb in your diet:
On Its Own
The simplest and quickest way you can enjoy honeycomb is by cutting a piece and eating it! Whether you want to chew the wax and then spit or swallow it, it’s entirely up to you.
Some people like it and some others don’t – maybe it’s time for you to find out which one you prefer.

As A Topping
Honeycomb can be the cherry on top of basically any meal. Break it into small pieces whenever you want a sweet touch. Here are some ideas:
– Plain yogurt with or without fruit
– Fruit salads or bowls of fruit
– Pancakes
– French toast
– Sandwiches (try a brie cheese and apple sandwich, or a turkey sandwich)
– Salads
– Ice cream
The possibilities are endless!
Spreading Honeycomb On Warm toast
You can start your day with a delicious and energetic breakfast by spreading honeycomb on warm bread or toast.
Just pop the bread into the toaster. While the bread gets warm, you can cut a piece of honeycomb. Smear it as soon as your toast is ready, so the wax melts a little and is easier to spread.

As A Meat And Cheese Platter Complement
Honeycomb can be the perfect spread to accompany a platter of cheese and cured meats. The sweetness of the honey will provide a nice balance to the saltiness of cheese and meat.
Add a few crackers, and you can build your treat by smearing honeycomb and then adding your favorite cheese.
Plus, it will make the board more visually attractive and unique – much better for photos!
In Hot Tea
Just cut a chunk of honeycomb and throw it inside your tea mug. The honey will give the drink that sweetness without having to use regular sugar, and the wax will melt, so it’s great for all those who don’t like the chewy texture of the wax.

How To Store Honeycomb
Honey – besides the amazing properties I went through earlier – takes a long time to spoil. So long, it’s considered to never spoil. In fact, archeologists have found pots of honey, still preserved, inside ancient Egyptian tombs!
Nevertheless, you’ll want to make sure you store it properly to avoid increasing the moisture content or prevent it from coming into contact with contaminants that could change its properties.
The best way is to make sure you keep it in a properly sealed container. If its original package is resealable, store it there. Otherwise, a Tupperware will do.
Where To Buy Honeycomb
I have noticed honeycomb is more available these days, so it will be relatively easy to find where to buy it.
A few places where you can buy honeycomb are:
– Your local farmers market
– Supermarkets and grocery stores, especially those that stock natural products
– Online – Here are some links where you can buy it online:
- Amazon (Australia)
- Other Sellers In Australia
- Beechworth Honey And Honeycomb – I’ve also seen this at Coles.
- Amazon (United States)
What Is Honeycomb?
What Is Honeycomb?
Source: https://busybeekeeping.com
No doubt you’ve heard of, seen or even tasted honeycomb before. But what exactly is honeycomb?
Honeycomb is a mass of wax built by honeybees and stored inside their hive. Each cell of the honeycomb is the shape of a hexagonal prism. Honeycomb is used by bees as both a nursery and storage facility.

What Do Bees Use Honeycomb For?
Bees use honeycomb to:
- Store honey – when bees collect nectar from nearby flowers, they turn it into honey by reducing its moisture content, before storing it inside the cells of the honeycomb. Once a cell is full, bees cap it with wax. This storage of honey is used to feed the colony during the winter months when it’s too cold to go outside and search for nectar.
- Store pollen – bees also collect pollen from flowering plants and store it inside the individual cells of the honeycomb. Before storing the pollen, bees typically mix it with honey or nectar to create bee bread, the main source of food for worker bees and larvae.
- Store eggs, larvae and pupae – inside the hive, a queen bee will lay eggs directly into the cells of the honeycomb. After three to four days, the eggs hatch into larvae, or bee grubs. The larvae are then fed both jelly and bee bread by worker bees for around five days before the individual cells in which they sit are capped. The larvae then pupate, growing wings, legs, eyes and all the other parts of an adult bee until they are ready to chew through the wax cap and join the other workers.
How Do Bees Make Honeycomb?
Bees build honeycomb using wax – something no other creature in the world can produce!
The worker bees develop their wax glands, which are located on their abdomens when they are 12-18 days old. Their glands allow them to secrete out a liquid that solidifies as small flakes of wax after making contact with the air.
These wax flakes are then chewed by the bees until they become soft and moldable. This allows the bees to shape them into cells and add them to the rest of the honeycomb.
Why Is Honeycomb Hexagonal?
Honeycomb is famous for its hexagonal shape. But why do bees make it that way? Well, according to scientists they don’t! They actually first mold the wax into circular shapes.
After they have created these circular cells, worker bees vibrate their flight muscles to heat and melt the wax. When the circles are melted, the flow of wax between the neighboring cells closes the gaps and cause hexagons to form! It’s kind of like the way that soap bubbles have a hexagonal shape when they’re joined together.

You see, each bee has to eat around 8 pounds (3.6 kg) just to produce 1 pound (0.45 kg) of wax. This makes it a very difficult task that expends a lot of energy. Building hexagons are more efficient than squares, triangle or any other shape that could be used to form a grid. This means bees are able to preserve more time and energy for other vital tasks – like producing honey or collecting pollen from flowers.
What Color Is Honeycomb?
If you’ve seen a frame full of honeycomb, you’ll notice that the color varies from pale yellow through to a dark brown. But when bees first secrete wax, it is actually a translucent white color. The wax changes color as it gets dirty over time.
This is because bees walk across it, dragging with them honey, propolis and different types of pollen. These substances stain the wax and give it the yellow and dark brown colors.
Think of it like a white t-shirt. When you first buy one, it might look pure white – but over time, it will probably become stained by sweat, dirt and other substances, and its white color will fade.
Uses Of Honeycomb For Beekeepers
Beekeepers remove honeycomb from a hive to harvest the honey inside once the majority of the cells are full. Because making wax is such an exhaustive process for bees, many beekeepers return the wax to the hive after they have harvested the honey.
Honeycomb can also be used to form sheets of comb foundation, which can be attached to frames and placed in hives. Bees are then able to build comb on top of the foundation with less effort.
Many people also like to eat honeycomb, which is safe for human consumption.
Why Does Honey Crystallize And How To Fix It
Why Does Honey Crystallize And How To Fix It
Source: https://busybeekeeping.com
One of the most exciting parts about being a beekeeper is eating the honey. So it can be disappointing, after all your hard work, if your honey turns cloudy or crystallizes once you’ve extracted it.

But don’t worry! Cloudy honey doesn’t mean you’ve done something wrong – it’s completely natural and is easy to fix. It’s happened to me numerous times before, so I thought I’d create a post on why it occurs and how to solve the problem – so you can get that delicious, runny honey flowing once more.
If you’re not interested in how and why it happens and simply want to fix the issue, then here’s what to do:
Place the jar in a bowl of warm water and stir until the crystals have dissolved. This will clear the cloudy honey in no time and restore the runny texture.
If you’d like to know a bit more about the crystallization process, then keep reading.
Why Does Honey Crystallize?
To explain why honey turns cloudy, it’s necessary to go over how bees make it in the first place. Bees produce honey from nectar, which they collect from flowering plants near their hive. Nectar is made up of three sugars – sucrose, glucose and fructose.
Once the bees reach the hive, the nectar is then passed mouth-to-mouth from bee to bee to reduce the moisture content. Bees also use their wings and flight muscles to further reduce the water content until it’s between 14% and 18%. During this time, the bees also add an enzyme called invertase that breaks down the sucrose into glucose and fructose.
Once the moisture content is low enough, the honey is considered ripe and placed inside a honeycomb cell. When the cell is full, it is capped by the bees using a non-porous wax cap. When all the cells on both sides of the frame are capped, you can extract the honey.
Unlike nectar, which contains three types of sugars, the honey you remove from the hive will contain just two – fructose and glucose. It is the glucose, along with other factors, which causes the honey to crystallize after you’ve extracted it.
Why Does Honey Turn Cloudy After Extraction?
The naturally occurring glucose in honey is what causes the honey to crystallize. The glucose bonds with the water in the honey to form crystals. Over time, more crystals form and create a solid layer. This gives honey that cloudy appearance.
Honey will crystallize at different rates depending on the composition of sugars from which it is made. For example, yellow box honey (from Eucalyptus) will crystallize slowly over a period of a few years, whereas canola and white honey clovers will crystallize very quickly (and may even do so while still in the comb).
Temperature is another factor that causes the honey to turn cloudy. I store my honey downstairs in a cool, dry place and over time it does crystallize. However, the honey I store in my pantry upstairs, where it is generally warmer, takes a lot longer to turn cloudy.
How To Fix Crystallized Honey
It’s very easy to restore your cloudy honey to liquid form. All you have to do is sit the jar in a saucepan or bowl of warm to hot water and stir it until the crystals have dissolved.


If you find your honey stays crystallized despite your best efforts, you can still use it as it is. Cloudy honey doesn’t affect the taste or the nutritional value. In fact, some people prefer crystallized honey because it doesn’t drip at all, making it easier to scoop out of a jar and spread on a piece of toast or bread.
In my house, if we have a jar of cloudy honey, we often use it by adding a teaspoon to a cup of tea – a healthier alternative to sugar. It dissolves easily and gives the tea a delicious sweetness.
Is Crystallized Honey Safe To Eat?
The candying or crystallization of honey is a natural process – just because it may have occurred in your honey does not mean there is anything wrong with it. It is perfectly safe, and you can most certainly still eat it!
Why Is The Honey In The Supermarket Never Cloudy?
Cloudy honey is a sign that your honey is completely natural because it has not gone through the commercial process that prevents crystallization and keeps the honey from maintaining the runny form you see on supermarket shelves.
Prior to being packaged and sent to stores, honey is usually heated and put through a filter. This heating dissolves any of the crystals already formed, while the filtration removes any of the particles. That’s why you never see crystallized honey in the supermarket.
Summing Up…
Honey that has become crystallized is perfectly fine to eat and has not lost any of its nutritional value or delicious taste.
In fact, when honey crystallizes, it proves it is a natural raw product that has not been subject to any of the typical commercial heating or filtering processes.
To change your honey back into a liquid state requires very little effort – simply add the jar to a bowl of warm water, and the crystals will dissolve, leaving you with runny honey once more.
How Long Does It Take To Get Honey From A New Hive?
How Long Does It Take To Get Honey From A New Hive?
Source: https://busybeekeeping.com
New beekeepers look forward to the time they are able to take honey from their first hive. Harvesting honey occurs in Spring and Summer, usually when there is warmer weather and an abundance of suitable flowering plants. In saying this, I have taken a small harvest in early Autumn when the weather here is still mild.

Several factors will decide if and when you can harvest honey from your new hive. Each hive has a unique population of honey bees whose characteristics can determine whether or not they produce a lot of honey.
When I talk about new hives, a beekeeper’s ‘new’ hive may be an established hive already producing honey, or it may be a smaller colony of bees that are building up numbers and yet to produce a harvest. In both these cases, I believe it’s better to be cautious and wait a season before extracting any honey from the hive. I’ve outlined below why I think it’s better to err on the side of caution.
Grow A Strong Hive First
Your primary goal when obtaining bees is to develop a strong hive. By this I mean you want to have a healthy population of bees first before anything else. A strong colony will better resist disease and pests as well as removal of honey by the beekeeper.
Your new colony may have been housed in an area completely different to yours in terms of climate and available flowering flora. It will take your bees time to orientate themselves to your garden and to discover where the best sources of pollen and nectar are.
Making honey is a strenuous process for bees. First of all they have to gather the raw materials needed to draw out the comb which is then used as cells for the queen to lay eggs and also for the storing or honey and pollen (pollen is the bees’ protein source). The laying of eggs is paramount to ensure the healthy survival of the colony.
For this to occur the bees need access to thousands of flowers of the right type to satisfy their requirements. The availability of suitable flora, the weather and the season all influence how quickly the bees can build comb.
Hopefully before the colony arrives in your garden you have ensured that the area near your hives is populated with flowering plants that will provide sufficient supplies of nectar and pollen. Naturally the bees won’t only use your garden as they fly more than two kilometers (one and a quarter miles) in search of a good source of pollen and nectar. However, if they find a reliable food source closer to home then that saves them time and energy.
By avoiding the taking of honey in the first season and waiting until the second season your hive will have the opportunity to become stronger and more established. Because your hive is now well established, it won’t take as long to harvest honey in the future.
How Much Honey Can You Expect From Your Hive?
The amount of honey you harvest will depend upon the season, the available food, the weather and how well the hive has been managed by the beekeeper. In Australia during a good year approximately 18 to 25 kilograms (40 to 55 pounds) per extraction can be harvested and this can occur more than once in a season. This harvest would come from ten to twelve full depth frames.
In any country, the geographical location of the hive will determine the climate and therefore is a factor in determining the amount of honey harvested. Each location has its own unique weather patterns and flowering plants and it’s a good idea to monitor the seasonal changes in weather and floral patterns.
I keep a record each month of what plants are in flower and which of those plants are of interest to the bees. I started to take these notes before I first got my hive onto our property, noting such things as what was in flower and which flowers attracted the European bees. By doing so, I discovered that I needed more plants that flowered in the Winter and also attracted the honeybees.
Allow plenty of time to harvest your honey and be sure to have all the equipment necessary beforehand. Choose two or three possible dates and check the weather forecast ahead of time. You’ll want a sunny, reasonably warm but not too windy day for the extraction. Only take excess honey, leaving enough stores for the bees themselves. The stronger your colony, generally the better the harvest.
Space In The Hive
Before the honey harvesting begins, ensure you give the bees a super with frames of drawn-out comb in which to store honey. Bees expend a lot of time and energy drawing out the wax to make comb, so it’s a good idea to short circuit this by providing frames already drawn out. The foraging bees can therefore use most of their energy to make more honey.
Another reason for giving the bees more space is that nectar, before it is turned into honey, is watery and it will take up a lot of room in the comb until most of the water has been evaporated. Therefore, before the honey flow begins ensure there is enough space in the hive by adding an empty super with drawn out comb.
What Is A Honey Flow?
You will begin to become familiar with the term ‘honey flow’ as honey harvesting time approaches. But what does it mean? A honey flow is a term used by beekeepers to indicate that there is one or more major nectar sources in bloom and the weather is favorable for the bees to fly and collect the plentiful nectar.
Another sign of a honey flow is the white wax was being used to build new honeycomb. The hive entrance will be very active too, with many bees coming and going.
Conclusion
Every beekeeper looks forward to harvesting honey from their hive, especially the first harvest is exciting. However, to ensure you can enjoy bountiful future harvests, I recommend waiting a season to ensure your hive is strong and able to produce enough honey for itself and you.
Why Do Bees Follow Me?
Why Do Bees Follow Me?
Source: https://busybeekeeping.com
Is there a bee following you everywhere you go? Don’t worry, it’s probably nothing to worry about!
If a single bee is following you, it’s likely because they’re attracted to your clothes, scent or something sugary you are eating. They will eventually leave you alone if you don’t try to hurt them.
However, if there is more than one bee following you, it could because they view you as a threat to their hive. If that’s the case, you should exit the area immediately.
Reasons Bees Follow You Around:
If a bee is following, there will be a good reason behind it. Here are the most common reasons a bee might be following you:

Your Clothes Look Like Flowers
Vision is important to bees, because they need to find flowers to collect nectar and pollen. Like humans, bees have the abilities to see different colors. Experiments have been conducted to show that they remember certain colors and associate them with different things.
For example, bees associate dark colors such as black with predators, because most of animals which pose a danger for bees have dark fur (which is why beekeepers wear white).
Similarly, bees can remember and associate different colors and patterns with flowers. If a bee is following you and you’re wearing bright clothing with patterns on it, it could be because they mistake your clothes for flowers.
They’re Attracted To Your Scent
Bees have an incredible sense of smell that enables them to pick up different scents mid-flight. They use this sense of smell to differentiate between flowers when foraging for food.
If a bee follows you, it might be because of your scent. Perhaps you are wearing a perfume or deodorant that reminds them of a flower. That’s why it’s a good idea not to wear any fragrances when inspecting a hive.
You Have Something Sweet
Worker bees forage for nectar, which is made up of different sugars. Because of this, they’re attracted to sweet substances.
If a bee is following you and you have a soft drink, chocolate bar or piece of fruit, there’s a chance the bee is following that sweet scent. Unless you cover or get rid of the sugary substance, they’ll continue to follow you.
They View You As A Threat
Bees are typically friendly creatures. However, if they view you as a threat to their hive, they may attack you.
In you see a single bee following you, it’s highly unlikely they’re dangerous. However, if there is more than one bee following you, and you are close to their hive, it could be a sign they view you as a threat.
When bees feel threatened, they release alarm pheromones as a signal to the colony. This draws other bees to the area to defend the hive. If the bees do think you’re a threat, there’s a high probability they will sting you.
What To Do If A Bee Is Chasing You

If a stray bee is following you, it’s important to know how to act to reduce your chances of being stung. Here’s what you should do:
Don’t Make Sudden Movements Or Swat The Bee Away
Bees are covered in tiny hairs which are sensitive to vibrations. If they detect an unfamiliar vibration frequency – such as a sudden movement – bees become alarmed.
That’s why you need to remain calm if a bee is following you. Don’t make sudden movements or try to swat it away. It will only cause the bee to feel threatened, and they might sting you.
Cover Your Mouth And Nose
Bees can detect carbon dioxide. That’s why they tend to sting more around your mouth and nose.
Getting stung on your face can be very painful and lead to significant swelling. So, if bees are following you and you’re afraid they might sting, it’s a good idea to cover your face.
Don’t Try And Kill It Or More Bees Might Come
If you try to kill a bee, it’s highly likely more will come. That’s because bees release alarm pheromones when they’re under distress. This sends a signal to other bees that there is a threat nearby.
Bees also release the alarm pheromone when they sting you. So, if you get stung, you should remove the stinger and move away from the beehive quickly.
This is especially true if you suspect the bees are Africanized honeybees, which are more relentless with their attack. They’ll chase you for longer distances than a European honeybee will and can be very dangerous.
Go Indoors To Hide From The Bee
If a bee is persistent in following you and it makes you feel uncomfortable, try going inside. Look for an enclosed space where you can simply shut the bee out. You can always wait until it leaves before going back outside again.
Do Bees Chase You When You Run?
If a bee is chasing you and has a good reason to do so, they will continue even if you run away. To make matters worse, breaking into a sprint is a sudden movement… and sudden movements could be viewed by bees as a threat. If so, the bee will likely continue to follow you and try to sting.
What To Do If A Bee Lands On You
If a stray bee lands on you, it’s most likely a worker bee out foraging for pollen or nectar who has stopped to rest. They might also be attracted by something sweet you are eating or drinking – or they might think your bright clothing is a flower.
Either way, if bee does land on you, all you need to do is to remain calm. They’re highly unlikely to sting you. They will soon realize you are not a flower and have no pollen or nectar, and leave.
If you jump up and down, wave your hands or try to squash it and fail, the bee could see you as a threat and sting you. If you simply do nothing, though, they’ll eventually fly away and go back to foraging.
What To Do If A Bee Bumps Into You
If you get too close to their hive and bees view you as a threat, they will send guards out that head-butt or bump into you. They don’t really want to sting you at this point – it’s simply their way of warning you for getting too close.
If a bee bumps into you, don’t run away. This is kind of sudden movement can raise the alarm in bees and cause them to attack. Instead, you should slowly walk away from the hive until they leave you alone.
Some people believe that, when a bee bumps into you, they are also marking you with an alarm pheromones that signals to the rest of the hive you are a threat. If you don’t walk away after a bee head-butts you, it’s likely more bees will gather and being an attack.
Summing Up… Why Bees Follow You
Bees are attracted to sugary substances, as well as floral patterns and scents. If a single bee is following you, it could be because you’re eating something sweet or have on a piece of clothing or perfume that reminds them of a flower.
Stay calm and don’t make any sudden movements – the bee will eventually get bored and move on.
If there are many bees following you, though, you should leave the area. It could be a sign they view you as a threat to their hive, and you don’t want to get stung!
Can Bees Smell Fear?
Can Bees Smell Fear?
Source: https://busybeekeeping.com

Some people think that bees can smell fear because they chase or sting people who are afraid. But can they really?
There is no scientific proof that indicates bees can smell fear in humans and interpret it as such. It is more likely that specific movements we do when we are frightened are what makes bees become defensive.
How Do Bees Smell?
Honeybees have around 170 odorant receptors, which are responsible for their remarkable sense of smell. This sense of smell allows them to locate and identify flowers as well as communicate with each other.
Bee communication is based on pheromones, chemical signals which regulate many aspects of their highly organized colony.
Besides being helpful when foraging, pheromones have an essential role in the defense mechanism of bees. Pheromones act as a signal they send each other when they perceive a threat to themselves and their hive.
For example, every time a bee stings, it releases an alarm pheromone that alerts the other bees nearby and calls them to join forces against a potential predator.
Due to their outstanding sense of smell, it isn’t crazy to think they can also perceive the smell of other beings like us, including the smells we release when we feel fear.
Given they are so good at communicating with pheromones, could they notice ours too?
Human Pheromones
Pheromones are chemical signals animals secrete. These signals are perceived by members of the same species and trigger a response in them.
Right away, this answers our question. Pheromones are meant to cause a reaction in members of the same species. Therefore, there is no evidence of human pheromones altering the behavior of bees.
Also, there is a bigger problem concerning human pheromones – we are not even sure they exist.
Researchers have tried to identify these substances for years without finding any conclusive evidence. This makes the assumption bees can smell some sort of pheromones we release when we’re afraid unlikely.
Maybe there is something else going on during our fear response that may set off an alarm in bees?
What Happens When We Are Afraid?
Bee stings are painful, and for some people, this can be a life-threatening event. It’s natural to feel fear whenever we’re close to bees.
Whenever we face a scary or stressful situation, our body goes through a series of changes to increase our chances of survival – the ‘fight or flight’ response.
To prepare our body to either fight or run away, our brain sends a series of signals to the body parts that will be needed the most, until we feel safe again.
Our adrenal gland secretes hormones that trigger a generalized response prioritizing certain bodily functions over others.
For example, the hormone adrenaline mobilizes nutrients and oxygen to our lungs and muscles by expanding our blood vessels and increasing our breathing and heart rate.
Adrenalin also activates special glands that produce sweat. This sweat is different from the one we notice when we exercise and feel hot.
This psychological or stress sweat happens due to emotional stimuli like fear and stress. It releases chemical signals, potentially communicating the way we feel.
Stress Sweat – A Smelly Giveaway?
Stress sweat contains more proteins, fats, and bacteria, making it thicker and smellier than sweat that regulates temperature.
This type of sweat is produced by the apocrine glands, primarily located in the armpits and genital area and activate during puberty.
Could this be the substance that reveals our fear?
A study found that people could identify someone else’s emotional state after smelling sweat samples from people when they were either happy or frightened.
However, there aren’t any significant studies done into bees’ ability to smell and identify our emotions.
So, Do Bees Smell And Understand Our Fear Signals?
Unfortunately, there seems to be no evidence that bees can detect and react to the chemical signals that we release when we feel fear.
The closest research done has been in dogs and horses due to their long history of domestication and the high probability they have learned to communicate with us.
During these experiments, dogs smelled odor samples from humans and reported signs of stress like higher heart rates, and seemed to seek comfort in their owners while avoiding contact with strangers.
Even though bees are great at communicating with their olfactory system, there is no evidence they can smell and interpret our chemical signals.
The reason why they seem to follow or sting people who are afraid of them might be related more to our behaviors than unconscious signals or smells we give off.
Why Do Bees Follow Us When We’re Afraid?
Bees are generally friendly. Usually, they are too busy working and gathering food for themselves and their colony. However, they do have effective defense mechanisms whenever they are interrupted by a predator or other threats.
Bees tend to warn you by bumping into you. Understandably, this can send you into panic mode, especially if you are allergic to bee stings.
Nevertheless, this is just a warning – they are telling you ‘Watch out. You are getting too close. Take a step back.’ And that’s what you should do.
It might feel like a good idea to swat your arms to drive them away or kill them, but this will raise their alarms and associate you with an attacker.
The best way to stop being stung by bees is to stay as calm as possible. Take deep breathes to prevent some of the automatic responses of your body and allow yourself to think more clearly.
Be sure to make slow movements and stay away from their hive. If you feel the bees are ready to sting, don’t swat or kill them. Instead, get away from them quickly.
Summing Up… Can Bees Smell Fear?
There are no studies that indicate bees can smell fear in humans. Despite being well-known for communicating through odors and chemical signals like pheromones, there is no data that shows they can detect ours.
Research into the ability of humans and other animals (specifically dogs and horses) to recognize human emotions from body odor shows positive results. However, it seems there are no studies done with honeybees.
A possible explanation of why honeybees seem to sting people who are afraid of them could be that many react to bees by swatting and killing them. This sets off alarms in bees and activates their defensive mechanism.
Bees Washboarding: Bees Rocking Back And Forth
Bees Washboarding: Bees Rocking Back And Forth
Source: https://busybeekeeping.com
Washboarding is a behavior where honeybees sway back and forth in a rocking motion, moving their mouths, antennae and front legs over the surface of the hive. It’s called washboarding because the movement looks almost as if the bees are scrubbing clothes on a washboard.
Bees washboard both inside and outside the hive. While there are a few theories as to why bees washboard, no one really knows for sure.
Here’s a great video I found on YouTube by AlexWild73 which shows bees washboarding.
Why Do Bees Washboard?
Although some researchers have investigated bees washboarding to try and determine why it happens, the exact reason is still unknown. However, those who have observed bees washboarding have developed theories due to the patterns in behavior.
Norman Gary, a former professor UC Davis Department of Entomology, who has kept bees for more than sixty years, suggests that washboarding is done to clean the hive. The rocking back and forth movement, during which bees make contact with the surface with their mouths, is a way to scrape and polish the hive.
In H. Storch’s book ‘At The Hive Entrance’, the author noted that washboarding was more common among colonies who were harvesting large amounts of pollen. After viewing bees through a magnifying glass, he concluded that bees washboard to remove tiny pollen grains from their bodies, because the pollen often slides into the gap between the head and the thorax and causes discomfort.
Further Research Into Why Bees Washboard
There have been a couple of noteworthy studies into bees washboarding to try and determine why the behavior occurs. One such study was conducted by Katie Bohrer and Jeffery S. Pettis in the USDA-ARD Bee Research Laboratory. They made the following observations:
- Washboarding bees are always worker bees
- Washboarding starts around 8 am, with more bees joining the activity as the day progresses. The number of bees washboarding typically peaks about 2 pm and continues as late as 9 pm after the sun has set
- There seems to be a correlation between bees washboarding and age. The majority of the bees washboarding are adolescent bees aged between 15-25 days old
- When given the choice of surfaces, bees washboard more on textures with rough surfaces (though it’s also stated that more research needs to be conducted to make any certain conclusions)
Another researcher, James F. Taulman, published an article after observing washboarding in honeybee hives found in cavities of dead trees in Douglas County, Kansas. His observations led to his belief that:
- It is probable that washboarding plays some role in cleaning the hive
- In addition, it’s likely that a major reason bees washboard is to spread pheromones from the tarsal and Nasonov glands of workers in order to help other bees find the hive entrance. The head-down position of washboarding may help bees to disperse the volatile Nasonov pheromone.
Bees Bearding Vs Bees Washboarding
Washboarding and bearding often occur on the front of a hive, which is why many people confuse the two. However, washboarding and bearding are completely different behaviors.
Bearding is when bees cluster together outside the front of the hive in shape that looks like a beard. Bees beard to regulate the internal temperature and humidity of the hive. Bearding typically occurs at night during hot weather, once bees return to the hive after foraging for pollen and nectar.
A hive that is too hot is dangerous for bees. Extreme temperatures can cause the brood to die, threatening the existence of the colony.
Further, if the hive is too humid, it makes it difficult for bees to reduce the moisture content of nectar and make honey – which is also essential for the colony’s survival.
Washboarding, on the other hand, occurs at all times of the day, generally starting at 8am and peaking at around 2 pm. Unlike bees that are bearding, washboarding bees do not cluster, but maintain a small distance in between each other. This gives them enough room to rock back and forth.
Bees Washboarding Vs Bees Swarming
Because bees that are about to swarm can sometimes cluster outside the hive, it can also be mistaken with washboarding. However, swarming and washboarding are two completely different behaviors, and there is no known link between the two.
If you see a large group of bees on the outside of your hive that are rocking back and forth, they are almost certainly washboarding – not preparing to swarm. However, if you’re still worried, you can simply conduct a quick inspection of your hive to make sure.
Swarming typically occurs as a natural means of reproduction. When there is no more room inside the hive, half the colony will leave, along with the queen, to start a new one. So, if you’re concerned your bees are about to swarm, check to see how much space they have left.
If all frames are completely filled with comb, especially if the comb cells are full of honey and brood, your colony needs more room – so you should either add more frames, another brood box or honey super, or split the hive to stop the colony from swarming.
Before swarming, bees also raise a new queen to take over the old hive once they’ve left. So, during your inspection, you should also look for queen cells. These are long, vertical cylinders that can usually be found on the bottom or outer edges of the comb. The presence of queen cells is another sign your bees could be preparing to swarm.
Conclusion
No one really knows for sure why bees washboard. Despite some research, the peculiar behavior of rocking back and forth while moving their mouths and antennae across the surface remains somewhat of a mystery.
The majority of experts believe that it is done for one, or more of the following reasons:
- To clean the hive
- To spread pheromones in order to help other bees find the hive entrance
- To remove tiny grains of pollen from their bodies
In addition to this, we also know that:
- Bees that washboard are always workers
- The activity usually starts in the morning and increases in the afternoon, continuing as late as 9pm
- Most bees washboarding are aged 15-25 days