Beekeeping

What you should know…..

Etiquette for inspecting a royal residence

Beekeeping is so much fun that it is tempting to open the hive and inspect your bees every day – however this isn’t so good for the bees. A weekly inspection through the season (from the spring to the autumn) will be fine. Throughout the winter you shouldn’t disturb them if at all possible.

Why do you inspect the hive?
You inspect the hive in order to find out how your bees are getting on. Spending time inspecting your bees is probably the most exciting and fun part of beekeeping. You get to see directly inside the colony and gather lots of information about your bees. Typically, you should be looking for the following information:

  • Is the queen present and laying?
  • Has the colony got enough room?
  • Does the colony have sufficient stores of pollen and honey?
  • Is the colony healthy?
  • Are there any queen cells?

It is good to go through these five points in your mind before you start the inspection. You may find it useful to make a note of the answers to these five points in a notebook, so that you can compare the state of the hive to the last time you did an inspection.

When is the best time to inspect your bees
The best time to inspect is between 11am and 4pm on a still, sunny, warm day when all the flying bee are out foraging.

How long should an inspection take?
Typically, inspecting your bees should take around half an hour per hive. Time flies when you are having fun and you can quite easily find yourself lost in a world of magic – however it’s important to try to keep the inspection time down to a minimum so as to reduce the stress on the bees.


Preparing to inspect your beehive

Preparing your equipment before inspecting your hive is always a good idea. Firstly, you should make sure you have all the tools and equipment together that you need for the inspection. This list will depend on what you are about to do but as a minimum you will need:

Essential Items:

  • Hive tool
  • Smoker

 Additional items:

  • Bee brush
  • Extra frames
  • Supers
  • Queen excluders
  • Clearer boards
  • Feed (either liquid or candy)
  • Queen catching apparatus
  • Queen marking cage and paint
  • Medications for treating any health problems

 Light your smoker
If you are using a traditional smoker, you should light it before putting on your veil (there have been instances of beekeepers peering into the smoker to see if it’s alight only to find that it is, when the mesh of their veil has caught fire!).

Put on your veil
Put on your veil and you’re ready to spend time with your bees.

How to smoke your bees

You can use smoke as a simple way of calming your bees while you inspect them. The smell of the smoke makes the bees think that their home is on fire and they instinctively start their fire drill. Instead of defending the hive, they start to eat honey in order to prepare to leave and find a new home. After you have carried out your inspection and stop smoking, the bees will return to normal.

How to use a smoker
You should puff a little smoke around the entrance to the hive about 5-10 minutes before you open it. This starts the fire drill and they will hopefully be full of honey and unable to sting when you open the hive. Once inside the hive – you should smoke a little on the tops of the frames as you inspect the colony.

Traditional smokers:
A traditional smoker is simply a metal container with bellows attached in which you light a small fire. The aim is to get the fuel to burn badly – producing lots of thick cool smoke. You can use a variety of materials such a old hessian sacking, dried leaves, cardboard or tightly packed dry grass. It is important that the smoke is cold and does not burn the bees. Mastering the smoker is perhaps the hardest part of beekeeping and you should practise starting and keeping it alight.

Opening your beehive

Ideally the weather will be still and warm, avoid opening the hive if it is raining. There will be fewer bees in the hive if you open it during the day when all the flying bees will be out foraging. When you take the roof off, place it to one side, don’t put it in front of the hive entrance, as anything in the path of returning bees will annoy them.

Temperament
Not every colony reacts the same to being inspected. Some are very docile and will hardly need smoking at all, some will benefit from being smoked at the entrance and then by lifting one corner under the lid a few minutes before the hive is fully opened. This allows the bees to smell the smoke and they will have time to eat some honey, which makes them easier to work with.

Looking out for the queen
Once the lid is removed, check it to make sure that the queen is not on it. It’s unlikely, but if she is then it’s important to return her to the hive. The best way to do this is to walk her back into the hive by guiding her in with your finger. Alternatively let her walk up onto your hive tool by placing it in her path. Once on the tool return her, ideally to a brood frame. Most likely she will quickly scuttle between the frames. Take great care doing this as any damage to the queen’s legs can severely impair her ability to lay eggs.

At this point you may need to apply a little smoke to the top of the frames as bees make their way back up to see what’s happening. You may notice some standing on their hind legs swivelling around following your movements. These are the guards but a little whiff of smoke will send them back down again leaving you free to carry on.

How to read the frames

Lifting out a frame
Take your time and consider the weight of the frame as you lift it. It’s interesting to note the different weight of frames containing empty cells, those with plenty of honey, and pollen stores and those covered with brood. Lift with a straight continuous motion to avoid crushing bees on the sides or rolling them over the bees on the frame next door as this also annoys them (although not as much as being crushed).

Holding the frame
Once you have fully removed the frame you can hold it up to eye level to inspect it. Avoid tipping the frame horizontally as nectar and unsealed brood are at risk of dropping out. Instead hold the frame in front of you like you would a book, with the sun at your back and begin to read the pattern. If you really need to hold the frame horizontally, just ensure that you hold the frame directly over the hive, so that anything that fails from the frame will land in the hive.

Note: The frame can be completely rotated without it ever becoming horizontal.

Identifying parts of the comb
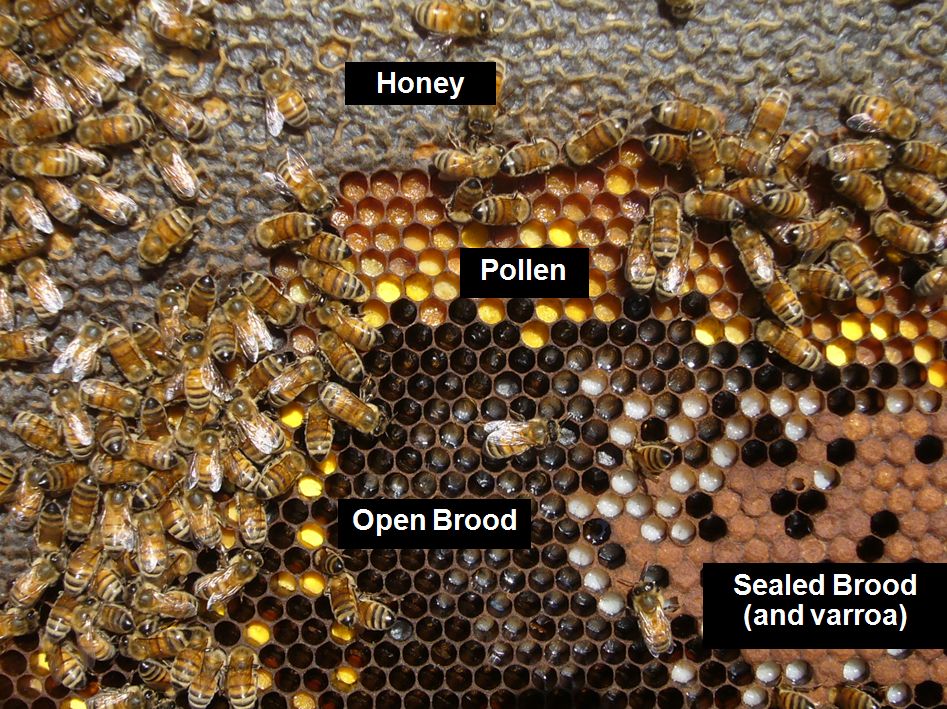
There are five sections of a frame: capped honey stores; nectar; pollen; brood; and empty cells. These are easy to identify, all are important and their quantity and distribution need to be noted.

Capped honey
There should be a reserve of capped honey at the very top of the frame, this often extends around the corners. If there isn’t, then the bees are running extremely low on food reserves and you will need to feed them. This can happen at any time of year, even in summer if the bees haven’t been able to fly for a week because of bad weather.

Nectar
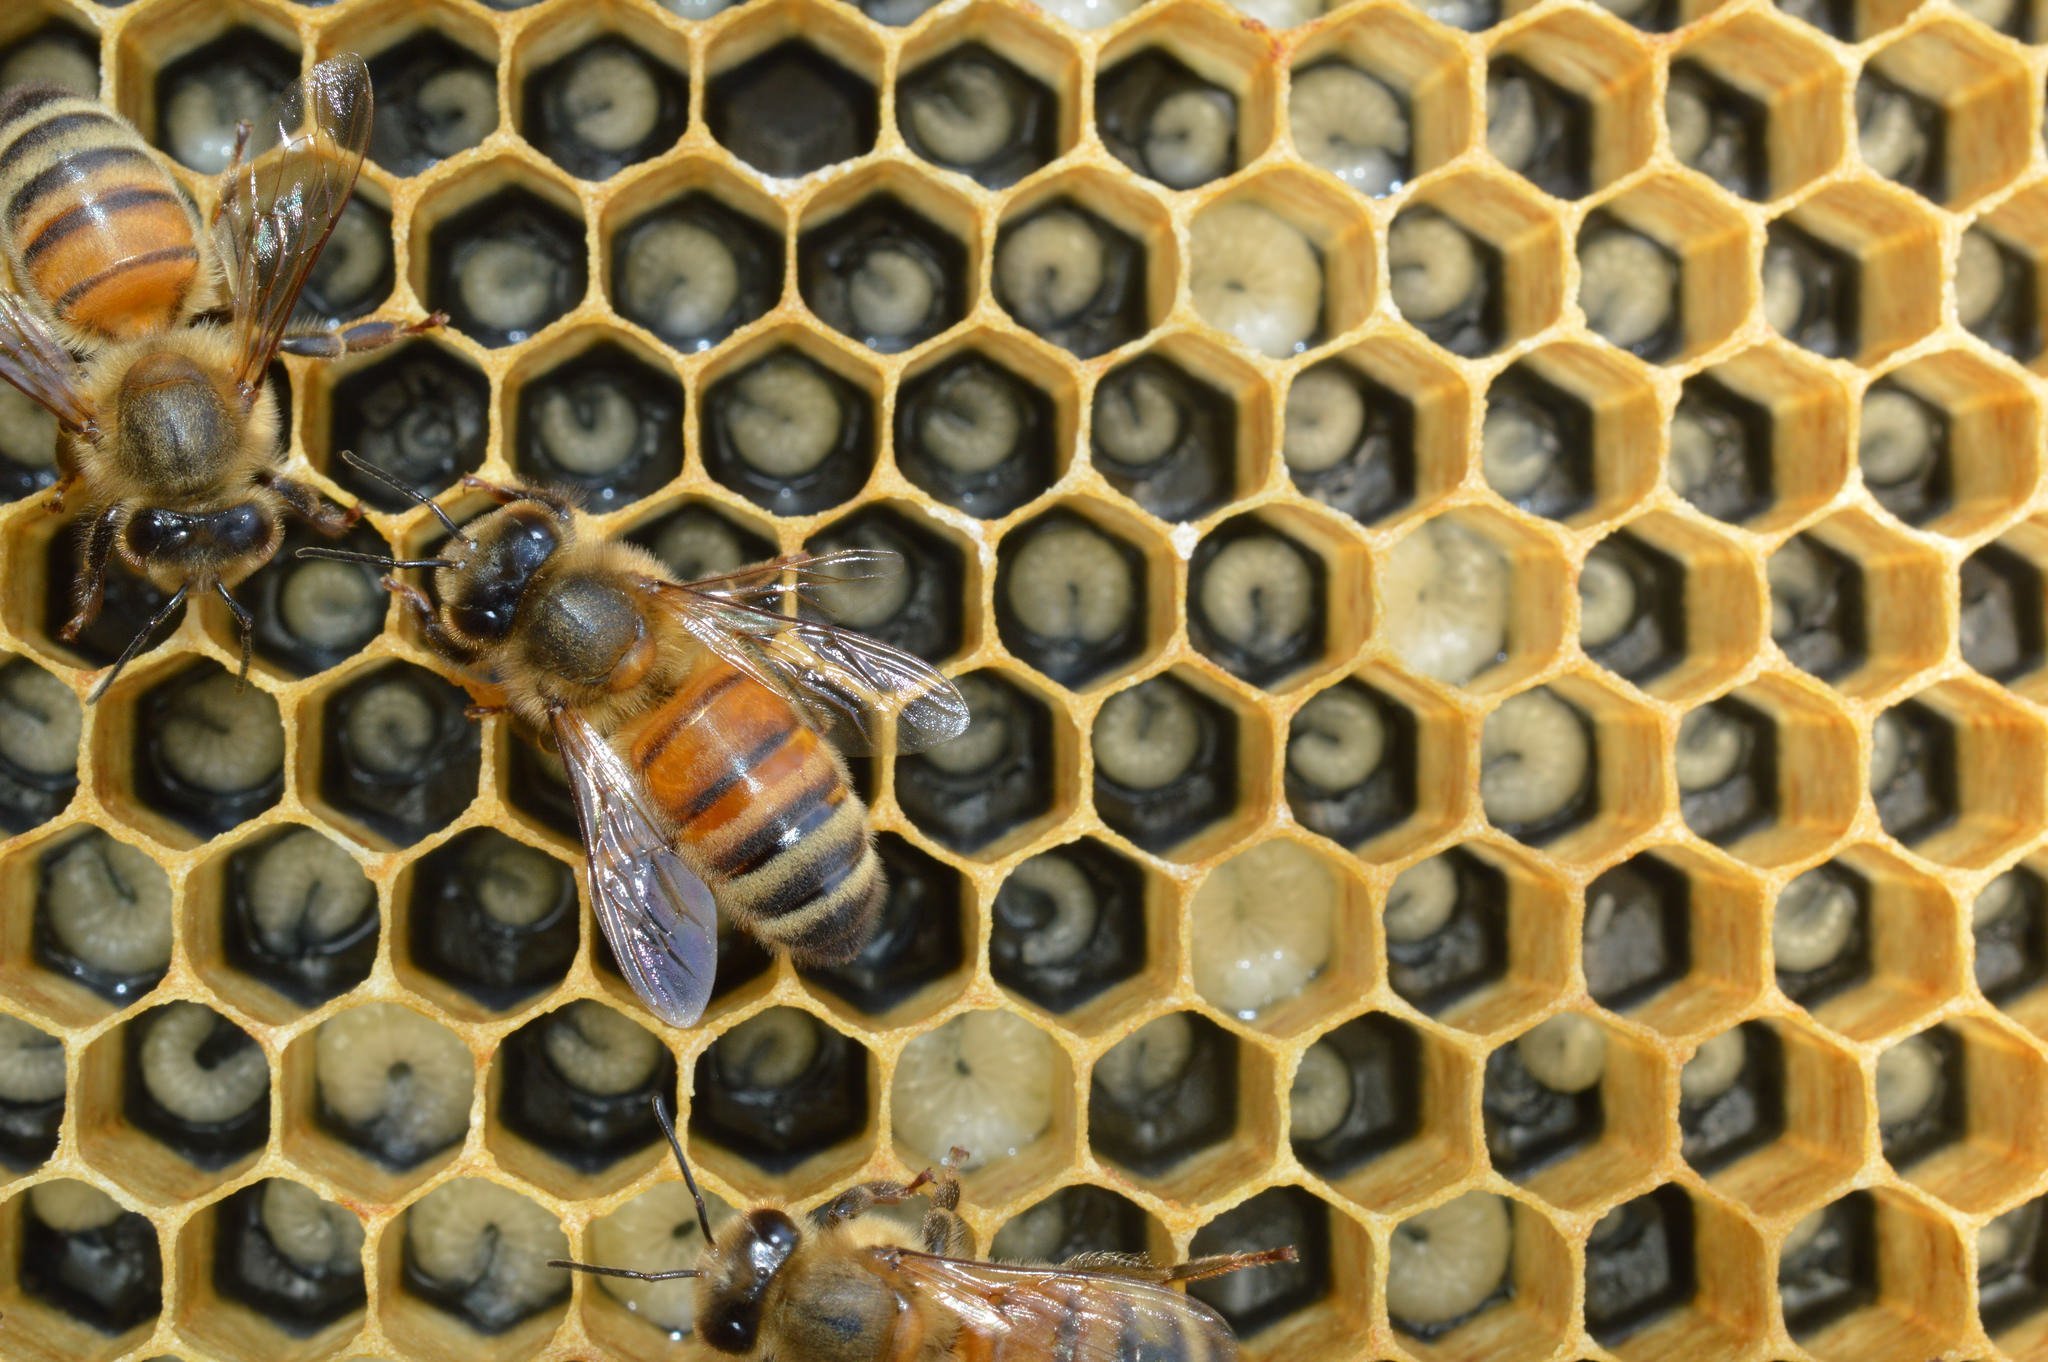
In the rows of cells immediately underneath the capped honey, there should be stores of nectar. This is a snack food for bees, the equivalent of having a bowl of nuts on your desk, which you can dip into as you work. The bees consume this and feed it to the larvae.

Pollen
Next will be pollen, this may not be so clearly defined but you should see cells packed with pollen, often different shades ranging from bright orange and red to almost black. Pollen is the protein, which bees eat, if there is none it would probably coincide with a prolonged period of bad weather.

Brood
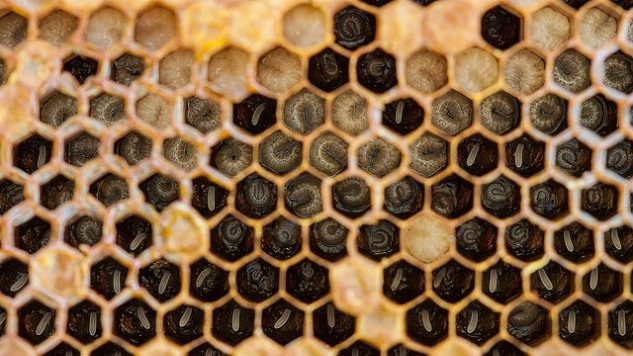
A good brood patch is circular with a high density of cells containing either eggs, larvae or sealed brood, depending on how long ago the queen was active on that frame. If the cells containing brood are sporadic, (i.e. there are a lot of empty cells) it is a sign that either the queen is failing or the bees have ejected diseased larvae.

The cell caps should be flat for female bees and raised for male (drone) bees. If the caps are sunken there could be a problem.

Queen cells
If you discover a queen cell (which suggests that the colony is making a new queen) you will need to decide whether to leave it or whether to remove it. A colony with a strong queen, plenty of space and a secure home are unlikely to be thinking of swarming.

Empty cells
During the day many of the bees are out foraging but at night they all cluster in the hive. If there are no empty cells at the very bottom of the frames then the message will spread that a new home is needed and the colony is in danger of swarming.

From spring to summer the number of active frames in the hive will increase as the colony expands but the make up of each frame will stay the same.
How to mark a queen

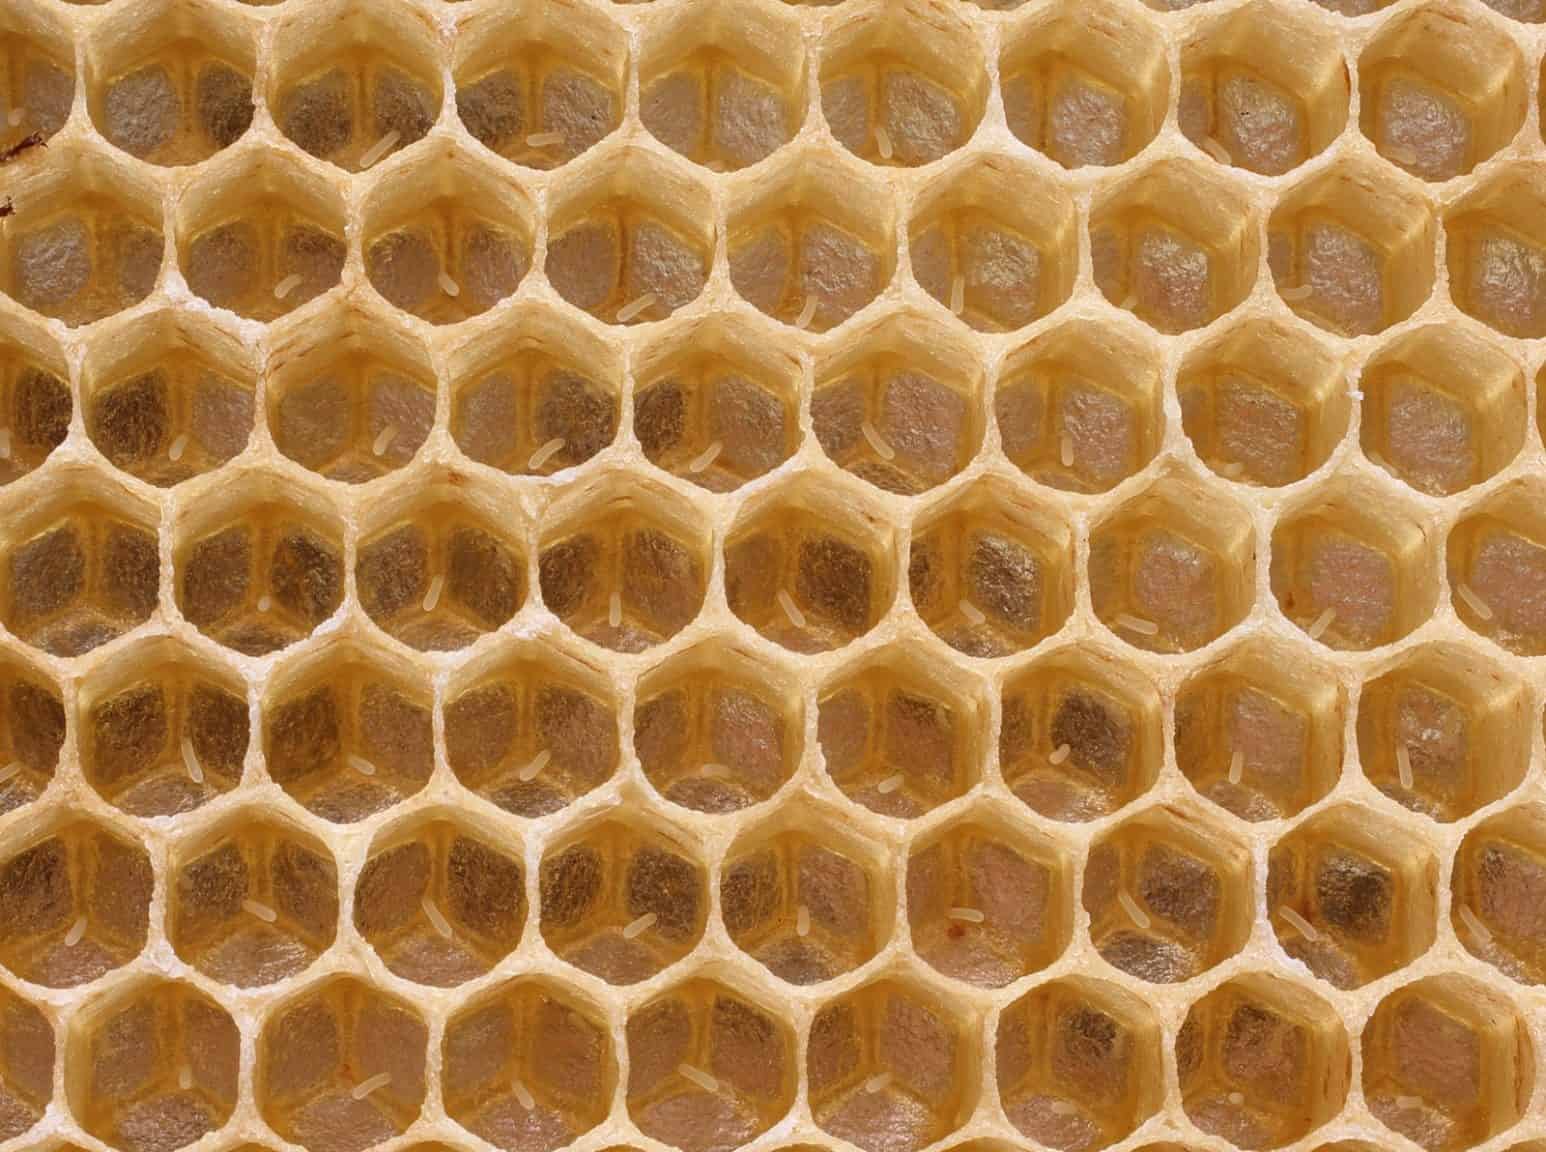
When inspecting the beehive, it can be useful to check that the queen is alive and well. However, this is easier said than done with a strong colony of over 40,000 bees. So, to make your life easier, you can mark the queen with a coloured dot on her back. Alternatively, if you see a single egg on the bottom of the cell of the brood frame you know that the queen was present in the last three days.

How to mark her
You can mark the queen with either a special colouring pen, paint or even a stick-on dot. You can buy either of these queen marking kits from most bee suppliers.

What colour or choose?
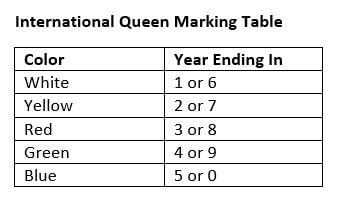
Unfortunately there isn’t a large colour swatch to choose from. In fact there is an international colour code for bees. This allows you to tell the age of any marked queen.

For example if you requeened a queen in 2022 – you would put a yellow dot on her thorax.

Finding the queen
The best time to find the queen is in October, at the start of the season when there are only a small number of bees in the colony. Alternatively, if you are buying a nucleus of bees then it is worth asking the bee supplier to mark the queen for you.

Once you have found the queen, you can either pick her up with your fingers or use a queen cage. While the queen is on the comb, you should lower the cage over the queen. The worker bees will escape from the spikes but the queen will remain. Using a queen marking pen or numbering kit – you should put a dot on the back of her thorax.

When to add a honey super

Your bees need space to store honey. Normally in the wild, the bees would simply build more comb. However, in a managed colony, you need to provide the space as the bees require it. It is unlikely that your bees will need a super when you first inspect them but in the spring you should always have supers ready in case they are required.

Preparing the supers
You can assemble the supers with the frames inside ready to pop on. You should remember that the supers will be holding honey that you will eat – so you should try to keep them ‘food safe’ (i.e. not put them directly on the ground and get them covered in mud).

Top or bottom?
You can either put you supers above or below other supers.

Queen excluder
A queen excluder stops the queen and drones from walking up into the supers. This stops her laying in the supers which are designed for honey storage.  When you first put a queen excluder on, the bees might not initially move through it. (Note: in winter you must make sure that the queen excluder is removed – to ensure that the bees and queen can get access to the honey stores without hindrance. )

Can you add supers too quickly?
Yes. If you provide the bees with too much space, you increase the amount of air that they have to keep warm and you also make it harder to inspect the hive by having to handle alot of unused boxes.

Feeding your bees

There are occasions when you need to give your bees a little boost. These tend to be when their supplies of honey are low. Typically this would occur at the start and end of the season. However, you should also give them extra feed if there has been a long period of bad weather, when the bees have been unable to forage or if you have introduced a nucleus colony.

Feeding a nucleus colony
You can help a nucleus or newly caught swarm of bees settle in by giving some extra feed.

Sugar syrup
Bees can be fed a sugar syrup. This is a simple mixture of water and the correct amount of white sugar.


Moving a Beehive

Sometimes you may want to move your bees to a different location – for example if you are moving house or rearranging the garden. The simple rule for moving bees is “You should move a beehive fewer than three feet or over three miles”

The reason for this is quite simple: Bees learn their local area by sight very accurately. If you move the hive over three feet, the flying bees will fly back to the original site, not find the hive and certainly die.

However, if you move the hive over three miles – the bees will not recognise any of the surrounding area. They will learn their new location. If you move the hive less than three miles – there is a chance that the bees will recognise their old flight area and attempt to return to their old hive position.

How to move the hive
The best time to move the hive is in winter because the bees are not flying. However, if you have to, you can move the bees in flying season and here are some simple rules:

  1. Wait till dusk when all the bees are in the colony.
  2. Block the entrance with your entrance block.
  3. Make sure that the lid is secure.
  4. Move the hive to its new location – fewer than three feet or over three miles.
  5. Once in their new location, wait fifteen minutes for the bees to settle and then open the entrance block.
  6. Stuff some grass in the entrance to slow the bees exiting the hive. This will make them realise that there location has changed. The grass will wilt overtime and fall away from the entrance.

[et_pb_section fb_built="1" fullwidth="on" _builder_version="4.16" global_colors_info="{}"][et_pb_fullwidth_slider _builder_version="4.16" custom_padding="159px||159px|||" global_colors_info="{}"][et_pb_slide heading="Beekeeping" image="https://beekeepersguild.au/wp-content/uploads/2021/11/Amateur-Beekeepers-Guild-web.png" _builder_version="4.16" _dynamic_attributes="link_option_url" background_color="rgba(0,0,0,0.29)" background_enable_color="on" background_image="https://beekeepersguild.au/wp-content/uploads/2021/05/Frame-of-bees.jpg" background_enable_image="on" background_blend="overlay" background_enable_video_mp4="on" link_option_url="@ET-DC@eyJkeW5hbWljIjp0cnVlLCJjb250ZW50IjoicG9zdF9saW5rX3VybF9wYWdlIiwic2V0dGluZ3MiOnsicG9zdF9pZCI6IjgzIn19@" global_colors_info="{}" sticky_transition="on"]

What you should know.....

[/et_pb_slide][/et_pb_fullwidth_slider][/et_pb_section][et_pb_section fb_built="1" _builder_version="4.17.3" background_image="https://beekeepersguild.au/wp-content/uploads/2022/05/Beekeepers-Guild-Footer.png" background_size="custom" background_position="bottom_left" hover_enabled="0" global_colors_info="{}" title_text="Beekeepers Guild Footer" sticky_enabled="0"][et_pb_row _builder_version="4.16" global_colors_info="{}"][et_pb_column type="4_4" _builder_version="4.16" global_colors_info="{}"][et_pb_text _builder_version="4.16" global_colors_info="{}"]

Etiquette for inspecting a royal residence

Beekeeping is so much fun that it is tempting to open the hive and inspect your bees every day - however this isn't so good for the bees. A weekly inspection through the season (from the spring to the autumn) will be fine. Throughout the winter you shouldn't disturb them if at all possible.

Why do you inspect the hive?
You inspect the hive in order to find out how your bees are getting on. Spending time inspecting your bees is probably the most exciting and fun part of beekeeping. You get to see directly inside the colony and gather lots of information about your bees. Typically, you should be looking for the following information:

  • Is the queen present and laying?
  • Has the colony got enough room?
  • Does the colony have sufficient stores of pollen and honey?
  • Is the colony healthy?
  • Are there any queen cells?

It is good to go through these five points in your mind before you start the inspection. You may find it useful to make a note of the answers to these five points in a notebook, so that you can compare the state of the hive to the last time you did an inspection.

When is the best time to inspect your bees
The best time to inspect is between 11am and 4pm on a still, sunny, warm day when all the flying bee are out foraging.

How long should an inspection take?
Typically, inspecting your bees should take around half an hour per hive. Time flies when you are having fun and you can quite easily find yourself lost in a world of magic - however it's important to try to keep the inspection time down to a minimum so as to reduce the stress on the bees.


[/et_pb_text][/et_pb_column][/et_pb_row][et_pb_row _builder_version="4.16" _module_preset="default" global_colors_info="{}"][et_pb_column type="4_4" _builder_version="4.16" _module_preset="default" global_colors_info="{}"][et_pb_text _builder_version="4.16" _module_preset="default" global_colors_info="{}"]

Preparing to inspect your beehive

Preparing your equipment before inspecting your hive is always a good idea. Firstly, you should make sure you have all the tools and equipment together that you need for the inspection. This list will depend on what you are about to do but as a minimum you will need:

Essential Items:

  • Hive tool
  • Smoker

 Additional items:

  • Bee brush
  • Extra frames
  • Supers
  • Queen excluders
  • Clearer boards
  • Feed (either liquid or candy)
  • Queen catching apparatus
  • Queen marking cage and paint
  • Medications for treating any health problems

 Light your smoker
If you are using a traditional smoker, you should light it before putting on your veil (there have been instances of beekeepers peering into the smoker to see if it's alight only to find that it is, when the mesh of their veil has caught fire!).

Put on your veil
Put on your veil and you're ready to spend time with your bees.

[/et_pb_text][/et_pb_column][/et_pb_row][et_pb_row _builder_version="4.16" _module_preset="default" global_colors_info="{}"][et_pb_column type="4_4" _builder_version="4.16" _module_preset="default" global_colors_info="{}"][et_pb_text _builder_version="4.16" _module_preset="default" global_colors_info="{}"]

How to smoke your bees

You can use smoke as a simple way of calming your bees while you inspect them. The smell of the smoke makes the bees think that their home is on fire and they instinctively start their fire drill. Instead of defending the hive, they start to eat honey in order to prepare to leave and find a new home. After you have carried out your inspection and stop smoking, the bees will return to normal.

How to use a smoker
You should puff a little smoke around the entrance to the hive about 5-10 minutes before you open it. This starts the fire drill and they will hopefully be full of honey and unable to sting when you open the hive. Once inside the hive - you should smoke a little on the tops of the frames as you inspect the colony.

Traditional smokers:
A traditional smoker is simply a metal container with bellows attached in which you light a small fire. The aim is to get the fuel to burn badly - producing lots of thick cool smoke. You can use a variety of materials such a old hessian sacking, dried leaves, cardboard or tightly packed dry grass. It is important that the smoke is cold and does not burn the bees. Mastering the smoker is perhaps the hardest part of beekeeping and you should practise starting and keeping it alight.

[/et_pb_text][/et_pb_column][/et_pb_row][et_pb_row _builder_version="4.16" _module_preset="default" global_colors_info="{}"][et_pb_column type="4_4" _builder_version="4.16" _module_preset="default" global_colors_info="{}"][et_pb_text _builder_version="4.16" _module_preset="default" global_colors_info="{}"]

Opening your beehive

Ideally the weather will be still and warm, avoid opening the hive if it is raining. There will be fewer bees in the hive if you open it during the day when all the flying bees will be out foraging. When you take the roof off, place it to one side, don't put it in front of the hive entrance, as anything in the path of returning bees will annoy them.

Temperament
Not every colony reacts the same to being inspected. Some are very docile and will hardly need smoking at all, some will benefit from being smoked at the entrance and then by lifting one corner under the lid a few minutes before the hive is fully opened. This allows the bees to smell the smoke and they will have time to eat some honey, which makes them easier to work with.

Looking out for the queen
Once the lid is removed, check it to make sure that the queen is not on it. It's unlikely, but if she is then it's important to return her to the hive. The best way to do this is to walk her back into the hive by guiding her in with your finger. Alternatively let her walk up onto your hive tool by placing it in her path. Once on the tool return her, ideally to a brood frame. Most likely she will quickly scuttle between the frames. Take great care doing this as any damage to the queen's legs can severely impair her ability to lay eggs.

At this point you may need to apply a little smoke to the top of the frames as bees make their way back up to see what's happening. You may notice some standing on their hind legs swivelling around following your movements. These are the guards but a little whiff of smoke will send them back down again leaving you free to carry on.

[/et_pb_text][/et_pb_column][/et_pb_row][et_pb_row column_structure="3_5,2_5" _builder_version="4.16" _module_preset="default" global_colors_info="{}"][et_pb_column type="3_5" _builder_version="4.16" _module_preset="default" global_colors_info="{}"][et_pb_text _builder_version="4.16" _module_preset="default" global_colors_info="{}"]

How to read the frames

Lifting out a frame
Take your time and consider the weight of the frame as you lift it. It's interesting to note the different weight of frames containing empty cells, those with plenty of honey, and pollen stores and those covered with brood. Lift with a straight continuous motion to avoid crushing bees on the sides or rolling them over the bees on the frame next door as this also annoys them (although not as much as being crushed).

Holding the frame
Once you have fully removed the frame you can hold it up to eye level to inspect it. Avoid tipping the frame horizontally as nectar and unsealed brood are at risk of dropping out. Instead hold the frame in front of you like you would a book, with the sun at your back and begin to read the pattern. If you really need to hold the frame horizontally, just ensure that you hold the frame directly over the hive, so that anything that fails from the frame will land in the hive.

Note: The frame can be completely rotated without it ever becoming horizontal.

Identifying parts of the comb
There are five sections of a frame: capped honey stores; nectar; pollen; brood; and empty cells. These are easy to identify, all are important and their quantity and distribution need to be noted.

Capped honey
There should be a reserve of capped honey at the very top of the frame, this often extends around the corners. If there isn't, then the bees are running extremely low on food reserves and you will need to feed them. This can happen at any time of year, even in summer if the bees haven't been able to fly for a week because of bad weather.

Nectar
In the rows of cells immediately underneath the capped honey, there should be stores of nectar. This is a snack food for bees, the equivalent of having a bowl of nuts on your desk, which you can dip into as you work. The bees consume this and feed it to the larvae.

Pollen
Next will be pollen, this may not be so clearly defined but you should see cells packed with pollen, often different shades ranging from bright orange and red to almost black. Pollen is the protein, which bees eat, if there is none it would probably coincide with a prolonged period of bad weather.

Brood
A good brood patch is circular with a high density of cells containing either eggs, larvae or sealed brood, depending on how long ago the queen was active on that frame. If the cells containing brood are sporadic, (i.e. there are a lot of empty cells) it is a sign that either the queen is failing or the bees have ejected diseased larvae.

The cell caps should be flat for female bees and raised for male (drone) bees. If the caps are sunken there could be a problem.

Queen cells
If you discover a queen cell (which suggests that the colony is making a new queen) you will need to decide whether to leave it or whether to remove it. A colony with a strong queen, plenty of space and a secure home are unlikely to be thinking of swarming.

Empty cells
During the day many of the bees are out foraging but at night they all cluster in the hive. If there are no empty cells at the very bottom of the frames then the message will spread that a new home is needed and the colony is in danger of swarming.

From spring to summer the number of active frames in the hive will increase as the colony expands but the make up of each frame will stay the same.
[/et_pb_text][/et_pb_column][et_pb_column type="2_5" _builder_version="4.16" _module_preset="default" global_colors_info="{}"][et_pb_image src="https://beekeepersguild.au/wp-content/uploads/2021/05/Brood-Comb.jpg" title_text="Brood-Comb" _builder_version="4.16" _module_preset="default" global_colors_info="{}"][/et_pb_image][et_pb_image src="https://beekeepersguild.au/wp-content/uploads/2021/05/bee-larvae.jpg" title_text="bee-larvae" _builder_version="4.16" _module_preset="default" global_colors_info="{}"][/et_pb_image][et_pb_image src="https://beekeepersguild.au/wp-content/uploads/2021/05/beelarvacloseup_main.jpg" title_text="beelarvacloseup_main" _builder_version="4.16" _module_preset="default" global_colors_info="{}"][/et_pb_image][/et_pb_column][/et_pb_row][et_pb_row column_structure="2_3,1_3" _builder_version="4.16" _module_preset="default" global_colors_info="{}"][et_pb_column type="2_3" _builder_version="4.16" _module_preset="default" global_colors_info="{}"][et_pb_text _builder_version="4.16" _module_preset="default" global_colors_info="{}"]

How to mark a queen

When inspecting the beehive, it can be useful to check that the queen is alive and well. However, this is easier said than done with a strong colony of over 40,000 bees. So, to make your life easier, you can mark the queen with a coloured dot on her back. Alternatively, if you see a single egg on the bottom of the cell of the brood frame you know that the queen was present in the last three days.

How to mark her
You can mark the queen with either a special colouring pen, paint or even a stick-on dot. You can buy either of these queen marking kits from most bee suppliers.

What colour or choose?
Unfortunately there isn't a large colour swatch to choose from. In fact there is an international colour code for bees. This allows you to tell the age of any marked queen.

For example if you requeened a queen in 2022 - you would put a yellow dot on her thorax.

Finding the queen
The best time to find the queen is in October, at the start of the season when there are only a small number of bees in the colony. Alternatively, if you are buying a nucleus of bees then it is worth asking the bee supplier to mark the queen for you.

Once you have found the queen, you can either pick her up with your fingers or use a queen cage. While the queen is on the comb, you should lower the cage over the queen. The worker bees will escape from the spikes but the queen will remain. Using a queen marking pen or numbering kit - you should put a dot on the back of her thorax.
[/et_pb_text][/et_pb_column][et_pb_column type="1_3" _builder_version="4.16" _module_preset="default" global_colors_info="{}"][et_pb_image src="https://beekeepersguild.au/wp-content/uploads/2021/04/queen-markings_orig-1.jpg" title_text="queen-markings" _builder_version="4.16" _module_preset="default" custom_margin="30px||||false|false" global_colors_info="{}"][/et_pb_image][et_pb_image src="https://beekeepersguild.au/wp-content/uploads/2021/05/bee-eggs.jpg" title_text="bee eggs" _builder_version="4.16" _module_preset="default" global_colors_info="{}"][/et_pb_image][/et_pb_column][/et_pb_row][et_pb_row _builder_version="4.16" _module_preset="default" global_colors_info="{}"][et_pb_column type="4_4" _builder_version="4.16" _module_preset="default" global_colors_info="{}"][et_pb_text _builder_version="4.16" _module_preset="default" global_colors_info="{}"]

When to add a honey super

Your bees need space to store honey. Normally in the wild, the bees would simply build more comb. However, in a managed colony, you need to provide the space as the bees require it. It is unlikely that your bees will need a super when you first inspect them but in the spring you should always have supers ready in case they are required.

Preparing the supers
You can assemble the supers with the frames inside ready to pop on. You should remember that the supers will be holding honey that you will eat - so you should try to keep them 'food safe' (i.e. not put them directly on the ground and get them covered in mud).

Top or bottom?
You can either put you supers above or below other supers.

Queen excluder
A queen excluder stops the queen and drones from walking up into the supers. This stops her laying in the supers which are designed for honey storage.  When you first put a queen excluder on, the bees might not initially move through it. (Note: in winter you must make sure that the queen excluder is removed - to ensure that the bees and queen can get access to the honey stores without hindrance. )

Can you add supers too quickly?
Yes. If you provide the bees with too much space, you increase the amount of air that they have to keep warm and you also make it harder to inspect the hive by having to handle alot of unused boxes.

[/et_pb_text][/et_pb_column][/et_pb_row][et_pb_row _builder_version="4.16" _module_preset="default" global_colors_info="{}"][et_pb_column type="4_4" _builder_version="4.16" _module_preset="default" global_colors_info="{}"][et_pb_text _builder_version="4.16" _module_preset="default" global_colors_info="{}"]

Feeding your bees

There are occasions when you need to give your bees a little boost. These tend to be when their supplies of honey are low. Typically this would occur at the start and end of the season. However, you should also give them extra feed if there has been a long period of bad weather, when the bees have been unable to forage or if you have introduced a nucleus colony.

Feeding a nucleus colony
You can help a nucleus or newly caught swarm of bees settle in by giving some extra feed.

Sugar syrup
Bees can be fed a sugar syrup. This is a simple mixture of water and the correct amount of white sugar.


[/et_pb_text][/et_pb_column][/et_pb_row][et_pb_row _builder_version="4.16" _module_preset="default" global_colors_info="{}"][et_pb_column type="4_4" _builder_version="4.16" _module_preset="default" global_colors_info="{}"][et_pb_text _builder_version="4.16" _module_preset="default" custom_margin="||150px||false|false" global_colors_info="{}"]

Moving a Beehive

Sometimes you may want to move your bees to a different location - for example if you are moving house or rearranging the garden. The simple rule for moving bees is "You should move a beehive fewer than three feet or over three miles"

The reason for this is quite simple: Bees learn their local area by sight very accurately. If you move the hive over three feet, the flying bees will fly back to the original site, not find the hive and certainly die.

However, if you move the hive over three miles - the bees will not recognise any of the surrounding area. They will learn their new location. If you move the hive less than three miles - there is a chance that the bees will recognise their old flight area and attempt to return to their old hive position.

How to move the hive
The best time to move the hive is in winter because the bees are not flying. However, if you have to, you can move the bees in flying season and here are some simple rules:

  1. Wait till dusk when all the bees are in the colony.
  2. Block the entrance with your entrance block.
  3. Make sure that the lid is secure.
  4. Move the hive to its new location - fewer than three feet or over three miles.
  5. Once in their new location, wait fifteen minutes for the bees to settle and then open the entrance block.
  6. Stuff some grass in the entrance to slow the bees exiting the hive. This will make them realise that there location has changed. The grass will wilt overtime and fall away from the entrance.


[/et_pb_text][/et_pb_column][/et_pb_row][et_pb_row _builder_version="4.16" _module_preset="default" global_colors_info="{}"][et_pb_column type="4_4" _builder_version="4.16" _module_preset="default" global_colors_info="{}"][et_pb_post_nav _builder_version="4.16" _module_preset="default" custom_padding="||450px||false|false" global_colors_info="{}"][/et_pb_post_nav][/et_pb_column][/et_pb_row][/et_pb_section]

You cannot copy content of this page